# Compito - A project management app built using Angular, NestJs & Auth0
Compito is a simple and easy-to-use project management application built using Angular and NestJs. Authentication/Authorization is all handled by Auth0.
It's my submission towards the [Auth0 x Hashnode hackthon](https://townhall.hashnode.com/auth0-hackathon). It was a great experience building something within such a short span of 3 weeks. After more than 300 commits, I feel the app is having all the basic functionality that I planned.
## Thought
There are a lot of ways to manage tasks on the internet from simple to really complex project management applications. I always wanted a simple and aesthetic application that should be dead simple without a lot of features. Only the essentials.
And also there should be a simple way to separate projects and share them with different users without a hassle.
And for someone with a lot of side projects, I could see myself building a side project to manage my other side projects, and here we are!
## Features
The basic idea is to create a simple kanban board but later came up with more features and finally decided to go with a Multi-Org project management application.
### Home Page
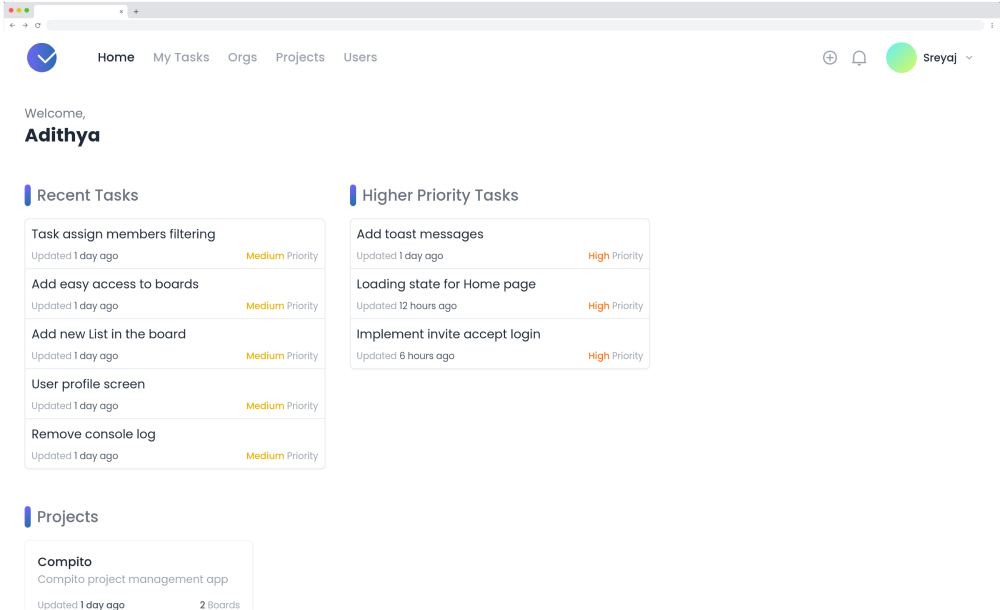
The home page gives you an overview of the tasks and projects the user has access to. The user can see tasks that were recently created and the high-priority tasks as well.
There are quick links to get to projects and boards from the home page.
### Board Page
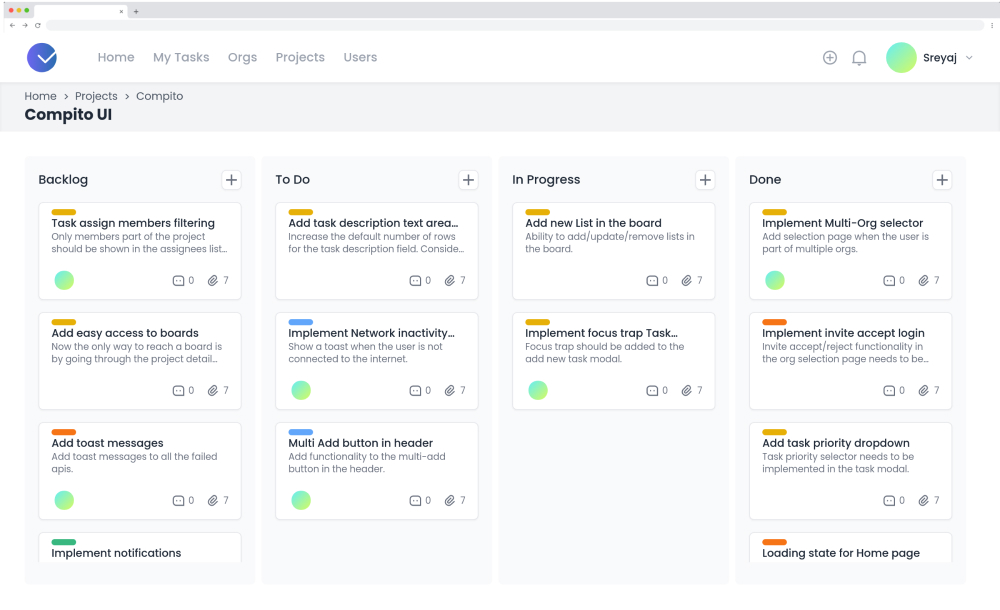
With a simple Kanban board, you can easily track your tasks and assign it to different users within the project.
You can create new tasks with ease. Cards can be dragged and dropped as you progress.
#### Attachments
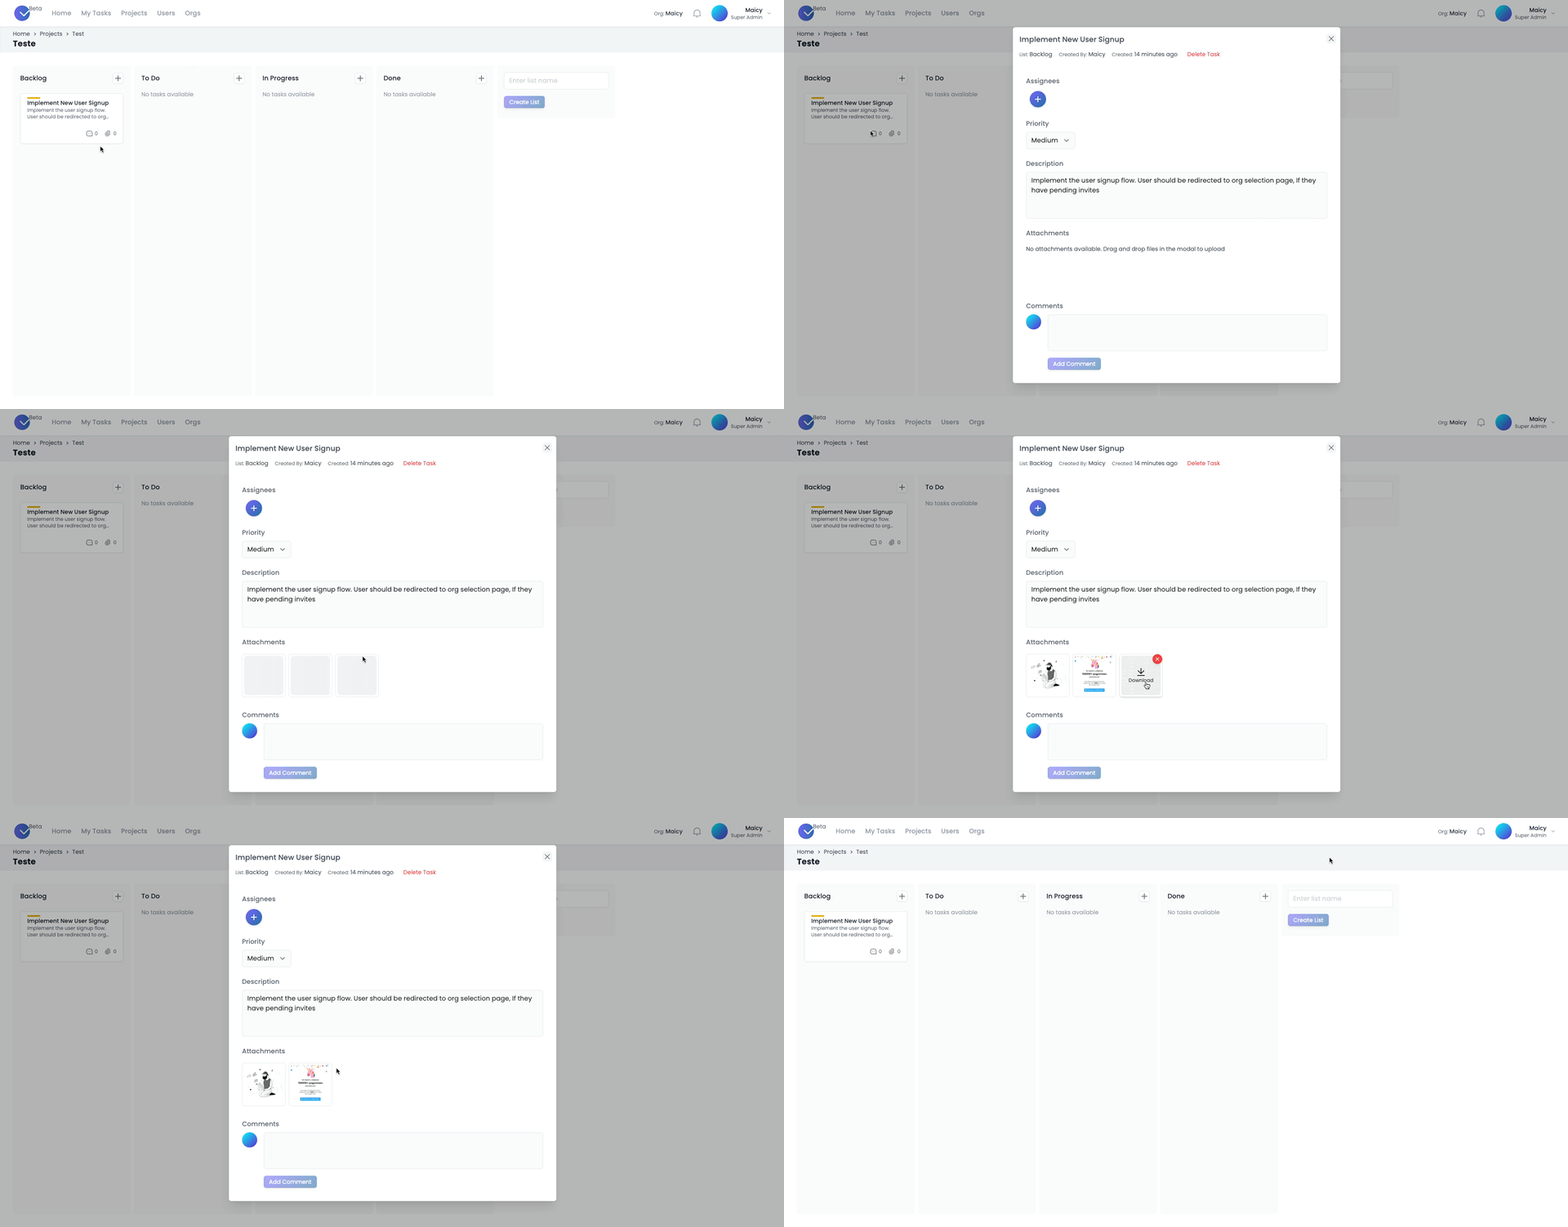
Attachments can be added to the tasks by simply dragging and dropping them into the modal. It will be automatically uploaded and attached to the task. Multiple files with different formats are supported as well.
### Orgs Page
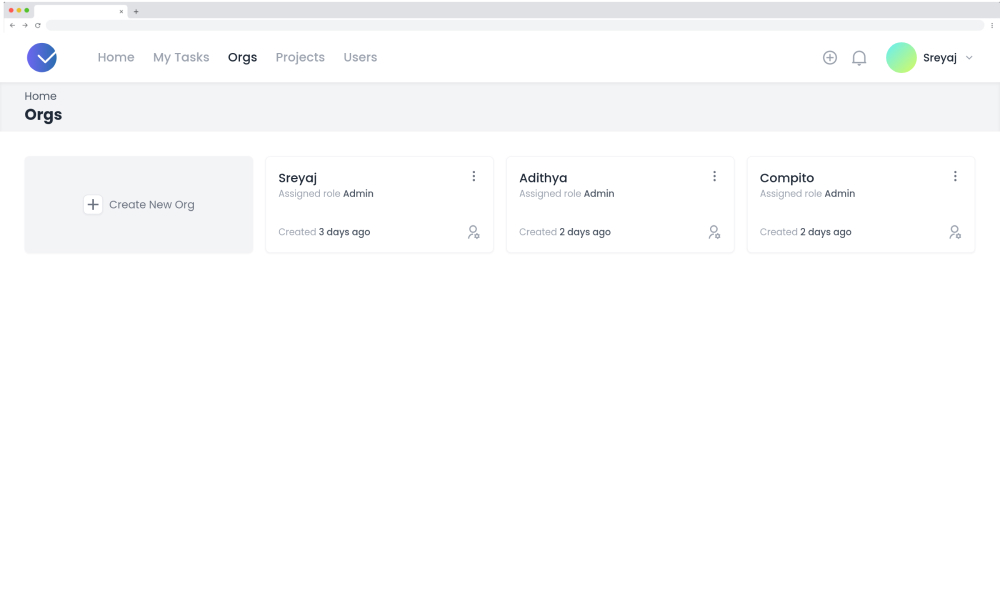
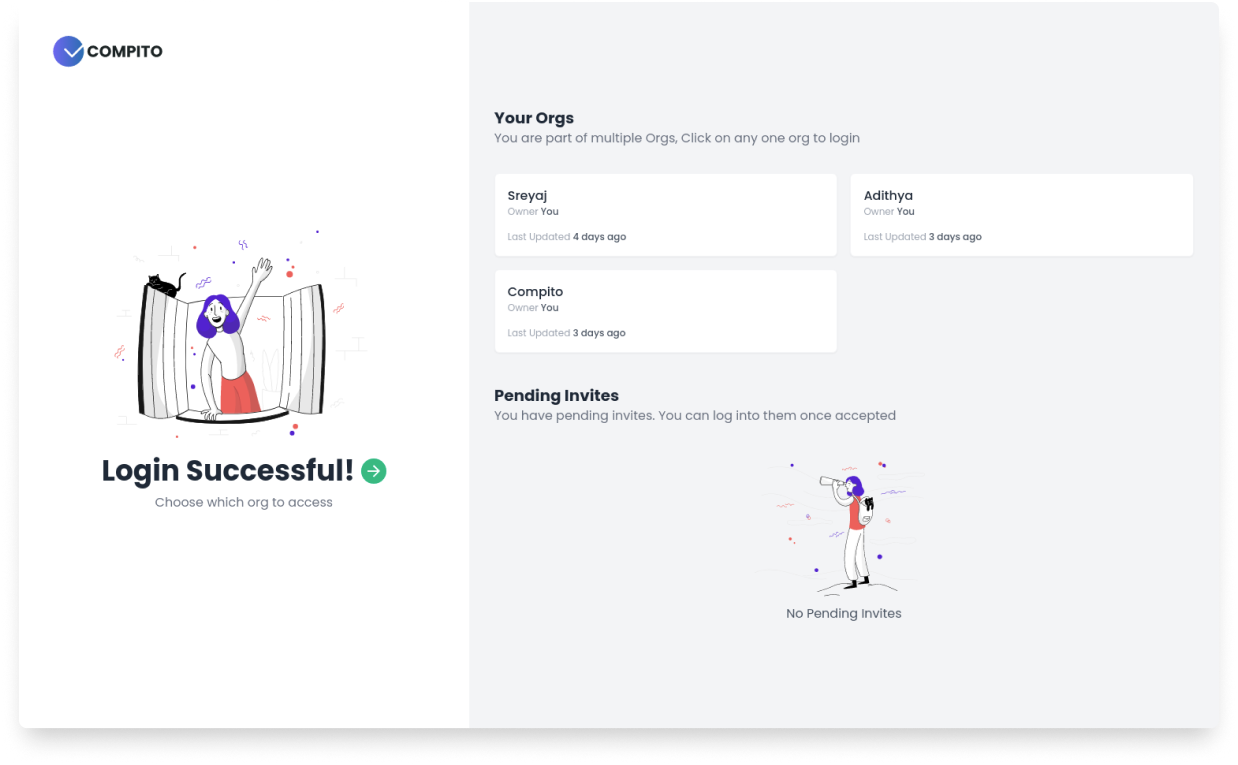
Users can be part of multiple orgs. User can view all the orgs he/she is part of. The user can only access the data of an org. When the user logs in, If they are part of multiple orgs, they will be asked to select an org to log in to.
### Projects Page
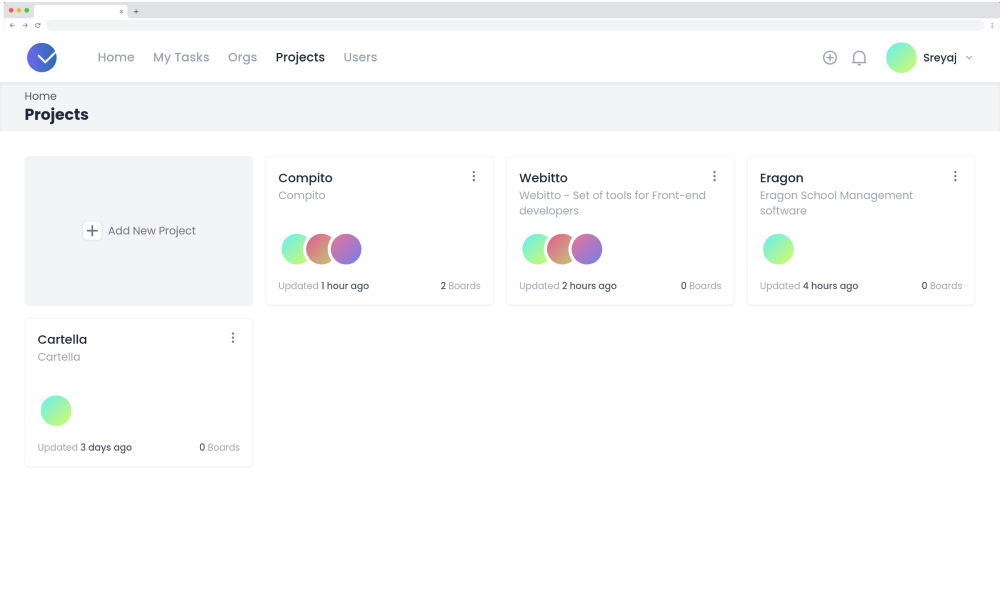
Shows the list of projects in the org the user has access to. Clicking on the project would take you to the detail page where the boards and members within the project can be seen.
Users with admin access will be able to update the project details and add/remove members to/from the project.
### Users
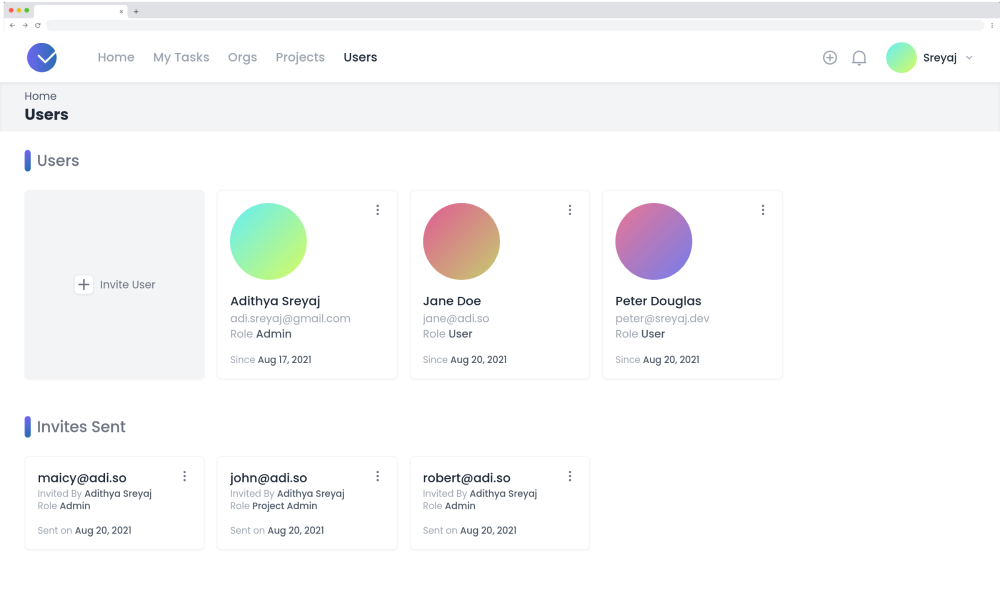
List the members in the org/project based on the role. Admin users can invite new users to the org. The list of pending user invites is also shown on the users page.
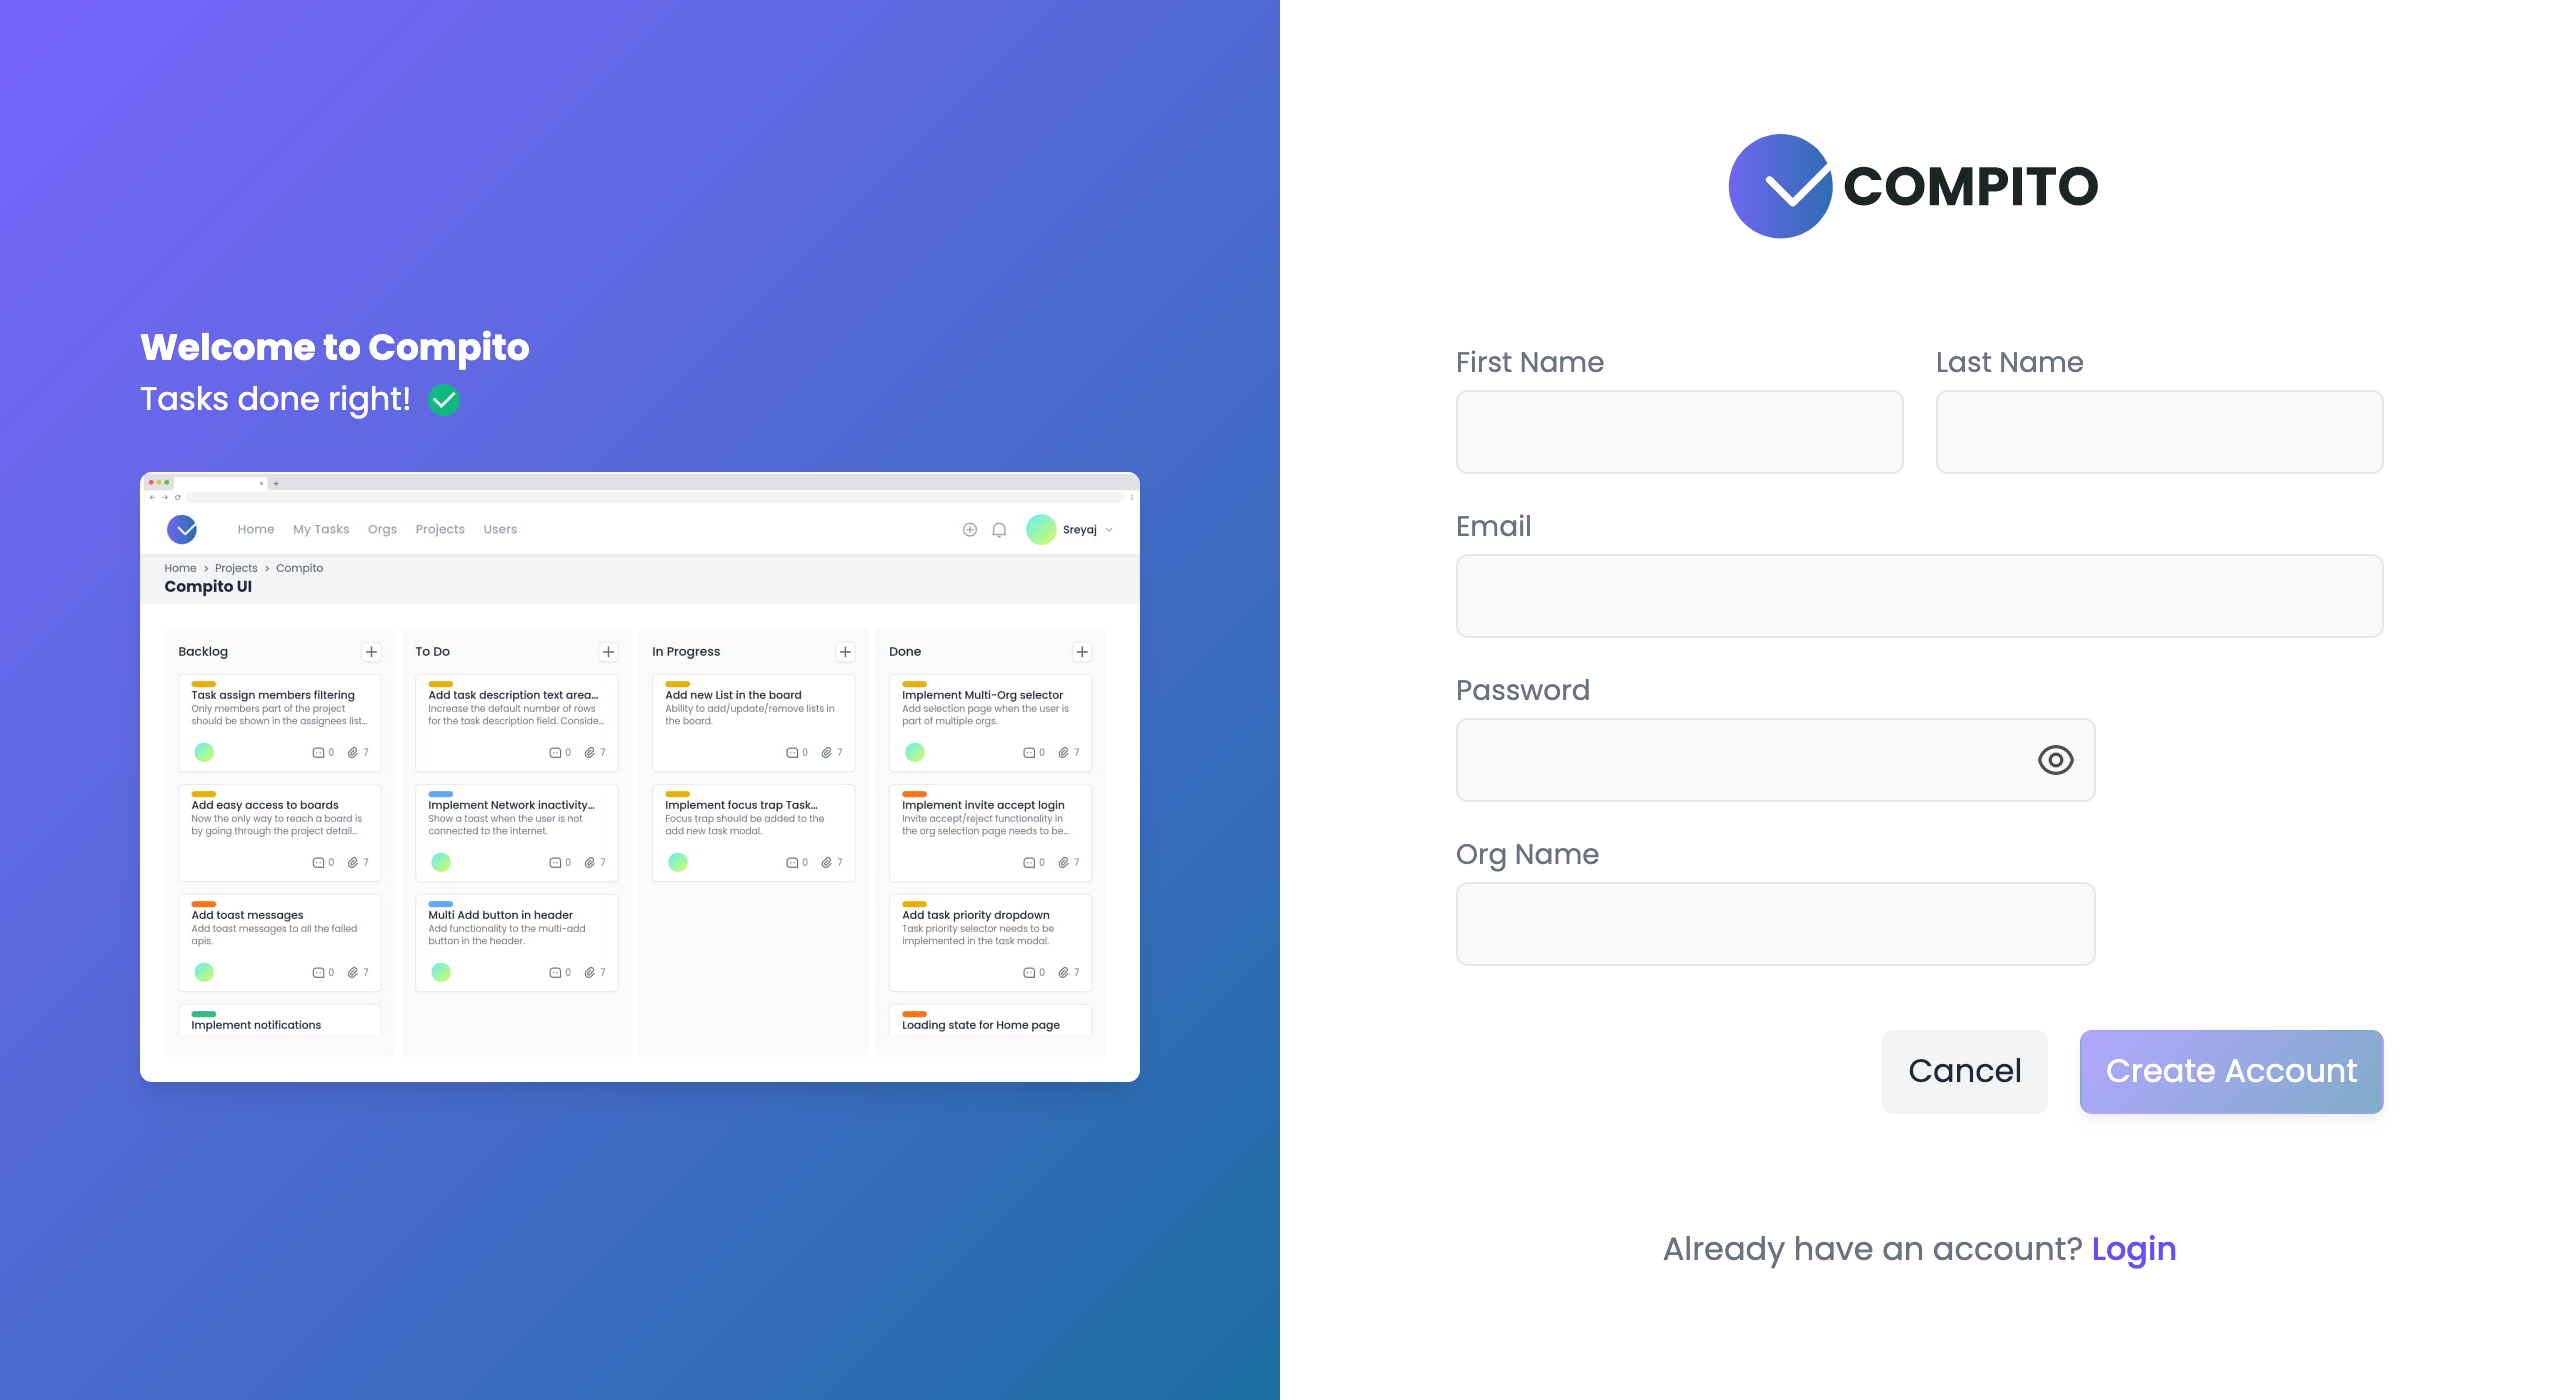
One can signup for the application using the signup page. The user will be asked to create an org when he/she first signs up. The user will be assigned the Admin role for the org.
Once the user signs up, they can invite new users to the org. The invite will be stored in the DB and whenever the user signup/login to the system, they will be able to see invites. The user can then choose to Accept/Reject the invitation.
This is how users can be added to a new org. User's with the most restrictive role `User` will be added to a `Project` and everything will be scoped to within the Project. The role hierarchy diagram explains it better.
## Tech Stack

### Front-end
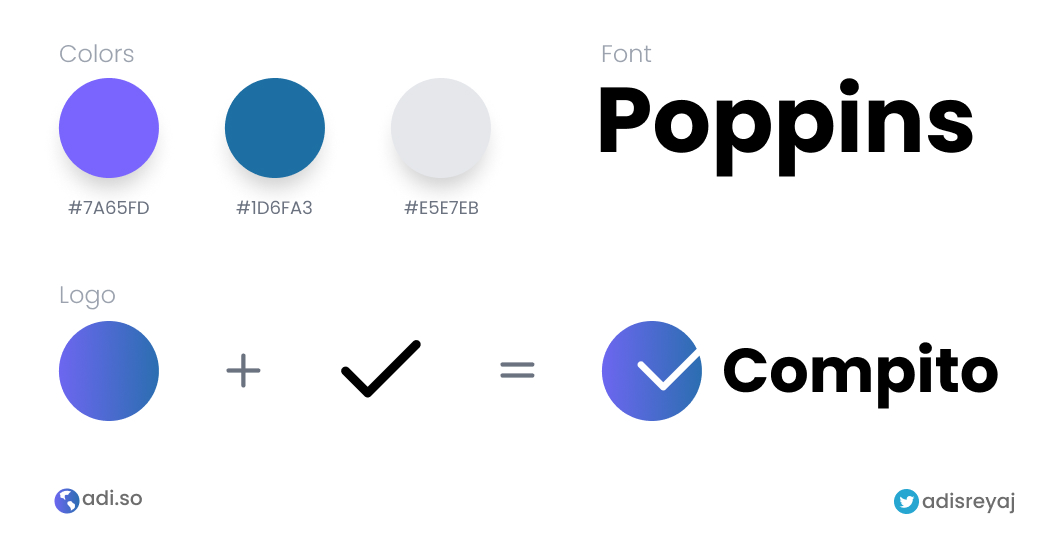
With this idea in mind, it was time to decide the stack. I choose frameworks that I have already worked with in the past. I am most comfortable with **Angular** when it comes to front-end framework and the choice was very easy for me.
I have tried **Tailwind** a few months back, and since then It's my go-to when it comes to CSS framework. I have stopped using UI frameworks like Material, NgBootstrap, etc and it's all Tailwind.
### Back-end
Next up for the back-end, I am familiar with express and **NestJs**. NestJs was the obvious choice here as we are dealing with TypeScript here. I love TypeScript and prefer it over JavaScript at any given time. Nest is a really good framework and is super structured which I like. So for the back-end, I decided to go with NestJs.
Next up, I decided to go with **Postgres** and **Prisma**. They work great. Prisma is the best ORM that I've used so far. I have worked with MongoDB, but I thought Prisma would better fit the whole stack. Prisma works really well with TypeScript.
One of the most important parts of the whole application is authentication. Since there is this concept of multi-org, there is a need for RBAC. Even if it wasn't for the hackathon, the first obvious choice I had in mind is **Auth0**. Everything you could think of when it comes to authentication and authorization, Auth0 has it all covered.
So here we are with the final Tech Stack:
- Angular
- TailwindCSS
- NGXS
- NestJs
- Prisma
- Postgres
- Auth0
- TypeScript
### Deployment
Front-end is deployed to Vercel. The back-end is deployed to a VPS (ubuntu w/ Nginx) using Github Actions. The build artifacts are pushed to the server using `rsync` and then run using `pm2`. The database is also running in the same instance for reduced latency.
Refs:
- [Github Action](https://github.com/adisreyaj/compito/blob/main/.github/workflows/main.yml)
- [rsync](https://www.digitalocean.com/community/tutorials/how-to-use-rsync-to-sync-local-and-remote-directories)
- [pm2](https://github.com/Unitech/pm2)
### Misc
Code formatting is handled by `prettier` and lining is taken care of by `eslint`. All the commits are validated using `husky` and `commitlint`. Commits follow the Conventional commits structure.
Refs:
- [EsLint](https://eslint.org/)
- [Prettier](https://prettier.io/)
- [Commit Lint](https://github.com/conventional-changelog/commitlint)
- [Husky](https://typicode.github.io/husky/#/)
## Folder Structure
The whole project is in a monorepo managed by Nx. The API and the Front-end are the two base apps.
All the other pages in the UI are libs. And the UI components and shared items are in the `UI` lib.
```
├── apps
│ ├── api
│ └── compito
└── libs
├── api-interfaces
└── web
├── auth
├── boards
├── home
├── orgs
├── profile
├── projects
├── settings
├── tasks
├── users
└── ui
├── components
├── directives
├── index.ts
├── interceptors
├── pipes
├── test-setup.ts
├── tokens
└── util
```
## Data Modelling
Here are the main models in the application. Everything revolves around an Organization aka Org.
- Org
- User
- Project
- Board
- Task
- Role
- Invite
An org is the root where everything will be associated to. Inside an org, there can be multiple projects. Each project can have multiple boards. And boards can have multiple tasks.
Here's the full [database schema file](https://github.com/adisreyaj/compito/blob/main/prisma/schema.prisma)
The data modeling is not that complex if you see. But when we bring in roles and permissions-based access, the whole thing just becomes more complex. Now we have to validate the user's role and permission and based on that send only data that the user has access to.
## Roles and Permissions
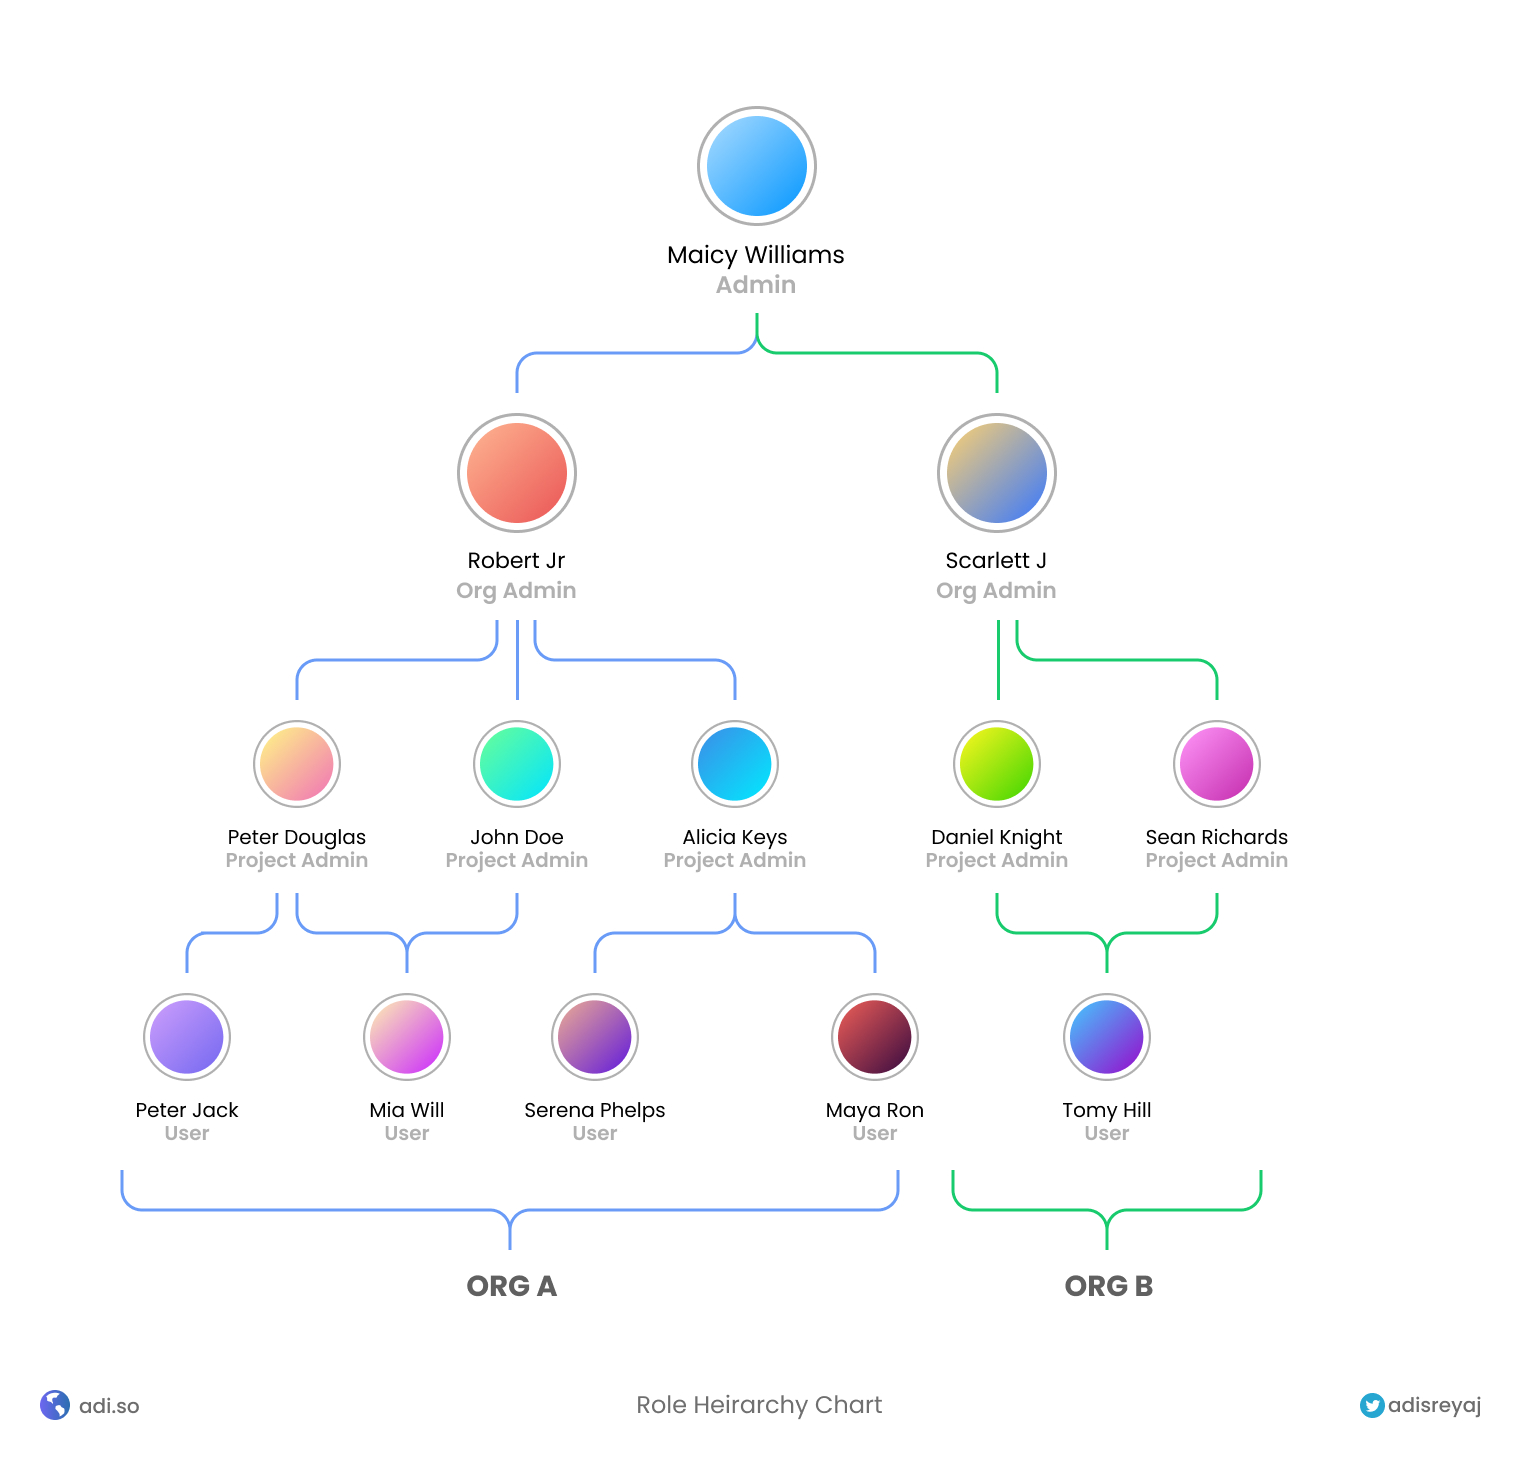
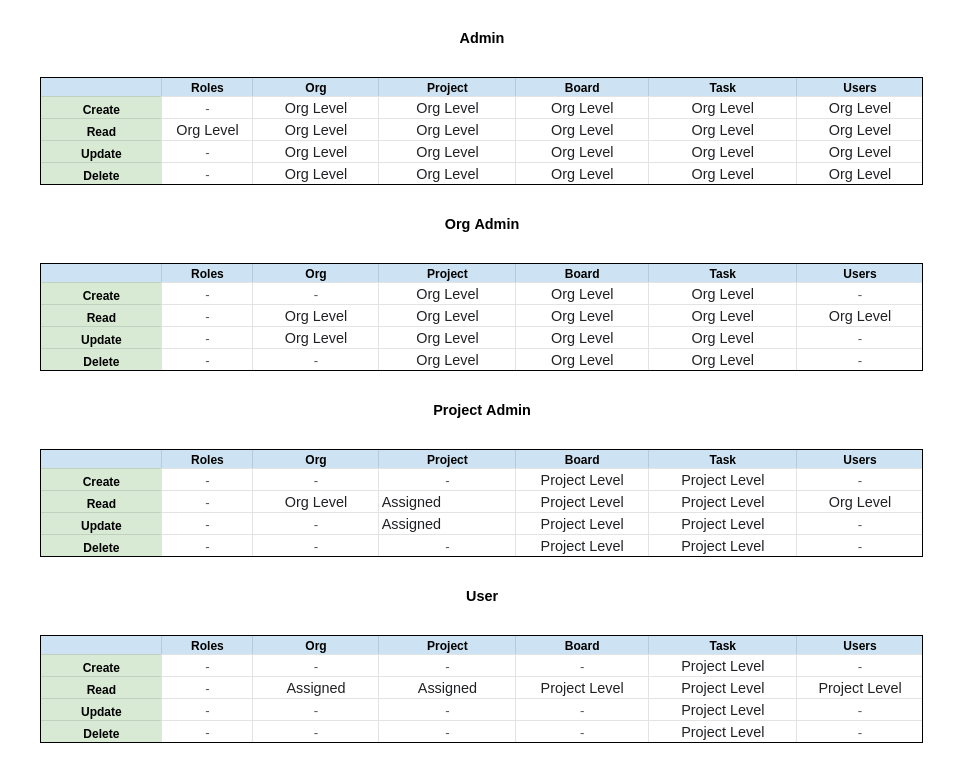
These are the roles defined in the application (No custom roles at this point):
- Admin
- Org Admin
- Project Admin
- User
The hierarchy chart should give some idea about how the users of the application will be placed.
Each role has a set of assigned permissions which is used in the front-end to show only necessary actions and in the back-end to allow access to data they are authorized to view.
## Setting up Auth0
Auth0 manages all things related to user login and tokens. There is quite a bit of setup that needs to be done in Auth0 to make it work with the current architecture of the application.
The good thing is that there is a good amount of documentation and has SDKs for everything which makes our life easier. For the front-end, I used the Auth0-Angular library for everything from logins to token management.
### Setting up front-end and Auth0
The first step is to create a new application in Auth0, of type Single Page Application.
#### 1. Login to Auth0 and create a new application
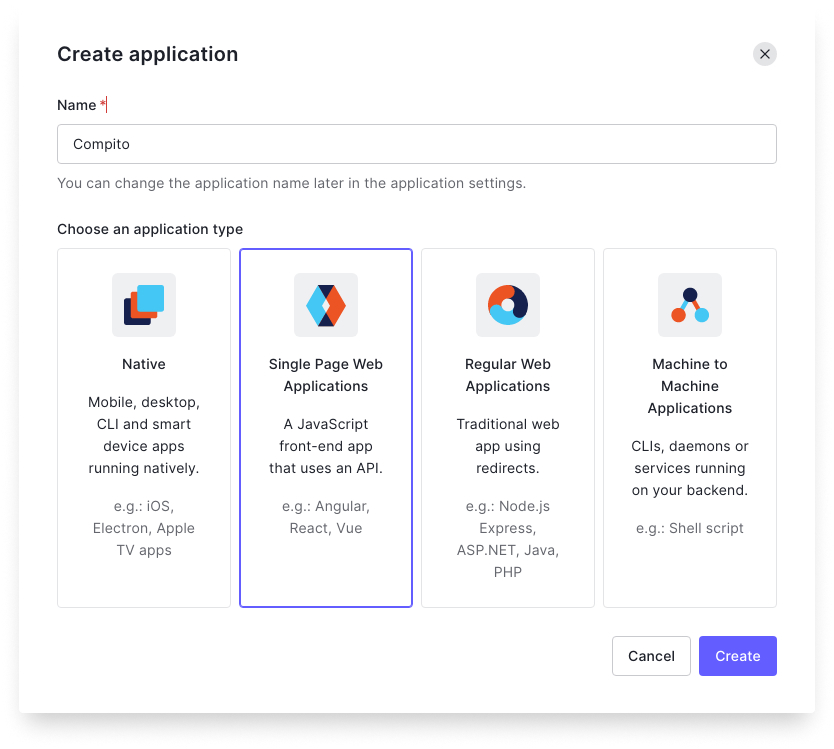
Once you have given a name and selected the type of the application. Go ahead and create it.
#### 2. Go to the `Settings` tab and copy the details to your application.
- Domain
- Client ID
#### 3. Add the front-end URL in the Allowed URL
Add the front-end URL in
- `Allowed Callback URLs`
```sh
http://localhost:4200
```
- `Allowed Web Origins`
```sh
http://localhost:4200
```
- `Allowed Logout URLs`
```sh
http://localhost:4200/auth/login
```
#### 4. Paste the above details in the `environment.ts`
```ts
export const environment = {
production: false,
baseURL: 'http://localhost:4200',
api: 'http://localhost:3333/api',
auth: {
audience: '', // <-- will come back to this
domain: '',
clientId: '',
redirectUri: window.location.origin,
},
};
```
#### 5. Install the Auth0-Angular library:
```sh
npm i @auth0/auth0-angular
```
#### 6. Setup the imports correctly
Import the `AuthModule` module in `app.module.ts`:
```ts
...
imports:[
AuthModule.forRoot({
domain: environment.auth.domain,
audience: environment.auth.audience,
clientId: environment.auth.clientId,
redirectUri: window.location.origin,
errorPath: '/auth/login',
cacheLocation: 'localstorage',
useRefreshTokens: false,
httpInterceptor: {
allowedList: ['/api/*'],
},
})]
...
```
#### 7. Add the button on the Login page
Now we just have to creat a button for login and call `loginWithRedirect()` method:
```ts
@Component({
selector: 'compito-login',
template: `
`,
})
export class LoginComponent implements OnInit {
constructor(public auth: AuthService) {}
login() {
this.auth.loginWithRedirect({});
}
}
````
Ref `login.component.ts` [source code](https://github.com/adisreyaj/compito/blob/main/libs/web/auth/src/lib/login/login.component.ts)
#### 8. Add the route guard
Auth0 ships with a built-in Route guard that can be used to protect the routes.
```ts
{
path: '',
canActivateChild: [AuthGuard], // <-- Add here
loadChildren: () => import('./dashboard/dashboard.module').then((m) => m.DashboardModule),
}
```
#### 9. Adding the Auth Interceptor
We can then add the provided interceptor to attach the token with the API calls. Auth0 provides the interceptor out of the box making things easy. We don't have to worry about saving the token or writing the interceptor on our own.
```ts
import { AuthHttpInterceptor } from '@auth0/auth0-angular';
@NgModule({
providers: [
{
provide: HTTP_INTERCEPTORS,
useClass: AuthHttpInterceptor,
multi: true,
},
],
bootstrap: [AppComponent],
})
export class AppModule {}
```
Ref `app.module.ts` [source code](https://github.com/adisreyaj/compito/blob/main/apps/compito/src/app/app.module.ts)
Now, Auth0 will automatically attach the token with API calls.
This is all that we have to do in the front-end.
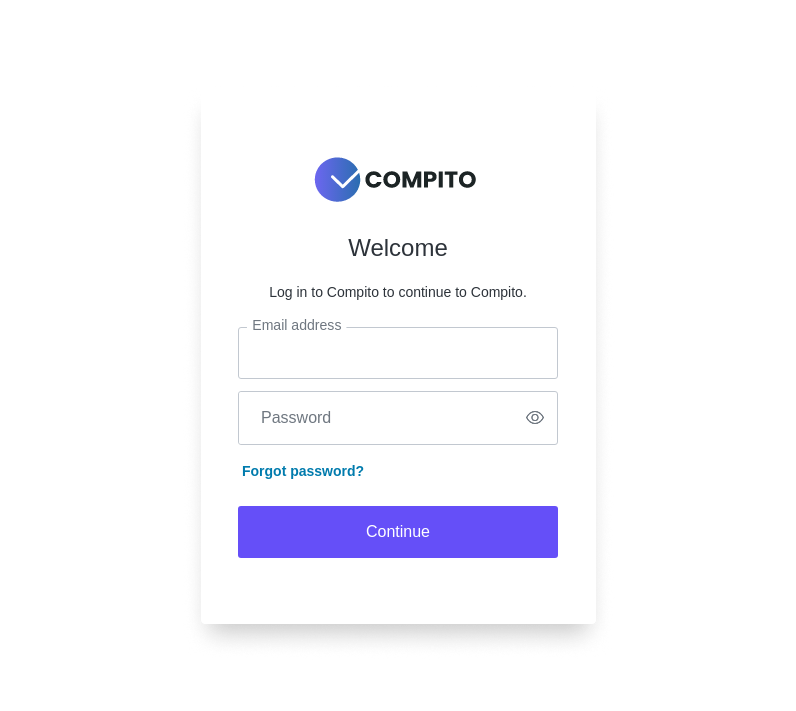
So If the configuration is done correctly, clicking on the login button should take you to the Auth0 login screen.
Ref: https://auth0.com/docs/quickstart/spa/angular
### Setting up back-end and Auth0
When it comes to the back-end, we need some way to add users to Auth0 using an API. For that Auth0 provides a NodeJs SDK which is a great way to interact with Auth0 Management APIs.
Management APIs can be used to do a lot of stuff in Auth0 like:
- Create a new user
- Update user
- Change roles
- and more
Ref: [Auth0 Management APIs](https://auth0.com/docs/api/management/v2/)
Ref: [Auth0 Node SDK](https://github.com/auth0/node-auth0)
For the SDK to work, we need to create a `Machine-to-Machine` or `Non-Interactive` application.
#### 1. Create a Machine-To-Machine App
Go to the Applications page in Auth0 and create a new application, this time select Machine to Machine applications.
Once done, copy the credentials and paste them into the `.env` file so that we can later access it.
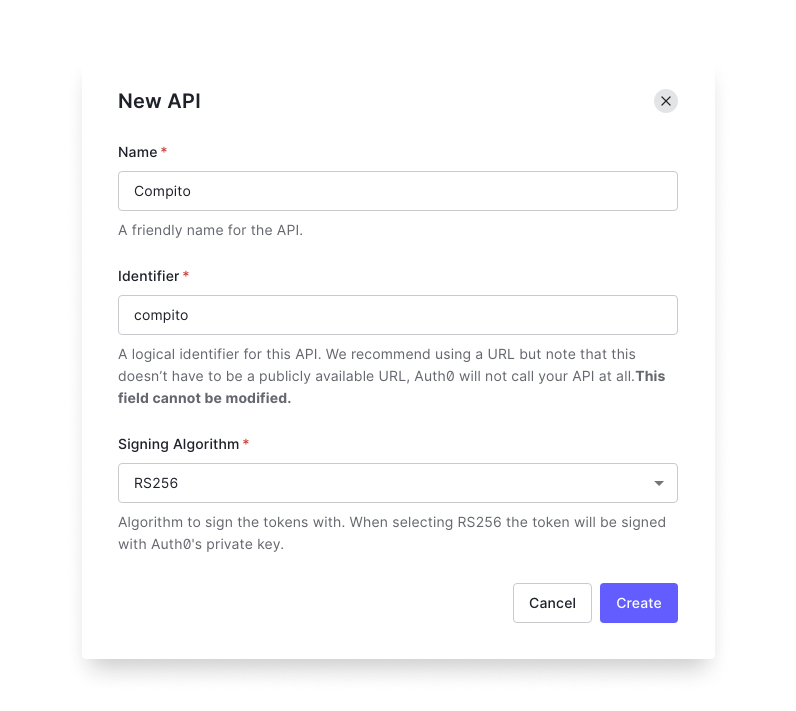
#### 2. Create a new API in Auth0
Next up we need to create an API. Go to the API section and create a new API. The identifier that you provide is going to be the `audience` property for the application.
If you see in the front-end environment file, we have added this property. Make sure to add `AUTH0_AUDIENCE` in the `.env` file as well.
#### 3. Creating an Auth Service
The Auth service will provide us with an instance of the Auth0 Management APIs which can be used throughout our application.
```ts
import { ManagementClient } from 'auth0';
const managmentClient = new ManagementClient({
domain: '{YOUR_ACCOUNT}.auth0.com',
clientId: '{YOUR_NON_INTERACTIVE_CLIENT_ID}',
clientSecret: '{YOUR_NON_INTERACTIVE_CLIENT_SECRET}'
});
```
For the full code, view `auth.service.ts` [source code](https://github.com/adisreyaj/compito/blob/main/apps/api/src/app/auth/auth.service.ts)
#### 3. Validating the API token
In NestJS, we can provide guards to validate the tokens. We can use `passport` to help us with the extraction and validation of the Bearer tokens.
We need to create a Passport Strategy for that:
```ts
import { Injectable, UnauthorizedException } from '@nestjs/common';
import { PassportStrategy } from '@nestjs/passport';
import * as dotenv from 'dotenv';
import { passportJwtSecret } from 'jwks-rsa';
import { ExtractJwt, Strategy } from 'passport-jwt';
import { getUserDetails } from '../core/utils/payload.util';
dotenv.config();
@Injectable()
export class JwtStrategy extends PassportStrategy(Strategy) {
constructor() {
super({
secretOrKeyProvider: passportJwtSecret({
cache: true,
rateLimit: true,
jwksRequestsPerMinute: 5,
jwksUri: `${process.env.AUTH0_ISSUER_URL}.well-known/jwks.json`,
}),
jwtFromRequest: ExtractJwt.fromAuthHeaderAsBearerToken(),
audience: `${process.env.AUTH0_AUDIENCE}`,
issuer: `${process.env.AUTH0_ISSUER_URL}`,
algorithms: ['RS256'],
});
}
validate(payload: any): any {
return payload;
}
}
```
Make sure you have added `AUTH0_AUDIENCE` and `AUTH0_ISSUER_URL` in the `.env` file.
#### 4. Register the strategy
We need to register this as the default strategy in passport.
```ts
import { Module } from '@nestjs/common';
import { PassportModule } from '@nestjs/passport';
import { AuthService } from './auth.service';
import { JwtStrategy } from './jwt.stategy';
@Module({
imports: [PassportModule.register({ defaultStrategy: 'jwt' })],
providers: [JwtStrategy, AuthService],
exports: [PassportModule, AuthService],
})
export class AuthModule {}
```
Create an AuthModule and then define the default strategy. And then we import the `AuthModule` in the `app.module.ts`.
#### 5. Setting up the Auth Guard
Once the `AuthModule` is imported, we can now provide the Auth Guard:
```
pimport { Module } from '@nestjs/common';
import { APP_GUARD } from '@nestjs/core';
import { AuthGuard } from '@nestjs/passport';
@Module({
imports: [
AuthModule,
],
providers: [
{
provide: APP_GUARD,
useClass: AuthGuard('jwt'),
},
],
})
export class AppModule {}
```
If you don't need any custom login in the Guard, directly import and use the `AuthGuard` from `@nestjs/passport`. Else you can create a [custom guard](https://github.com/adisreyaj/compito/blob/main/apps/api/src/app/core/guards/auth.guard.ts) and use it as I did in this case.
**Note**: Here we have enabled the guard globally. You can also enable [guards per request](https://docs.nestjs.com/guards#binding-guards) in NestJs.
So now when the Front-end sends the `Bearer token` to the Back-end, it's validated by the guard and if successful, the Details in the `Access Token` are available for us in the Request prop (`req.user`).
Ref: https://auth0.com/blog/developing-a-secure-api-with-nestjs-getting-started/
## Multi-Org User Management
Since the application is a multi-org application, each user can have access to different orgs. For each org, the user will have a different role.
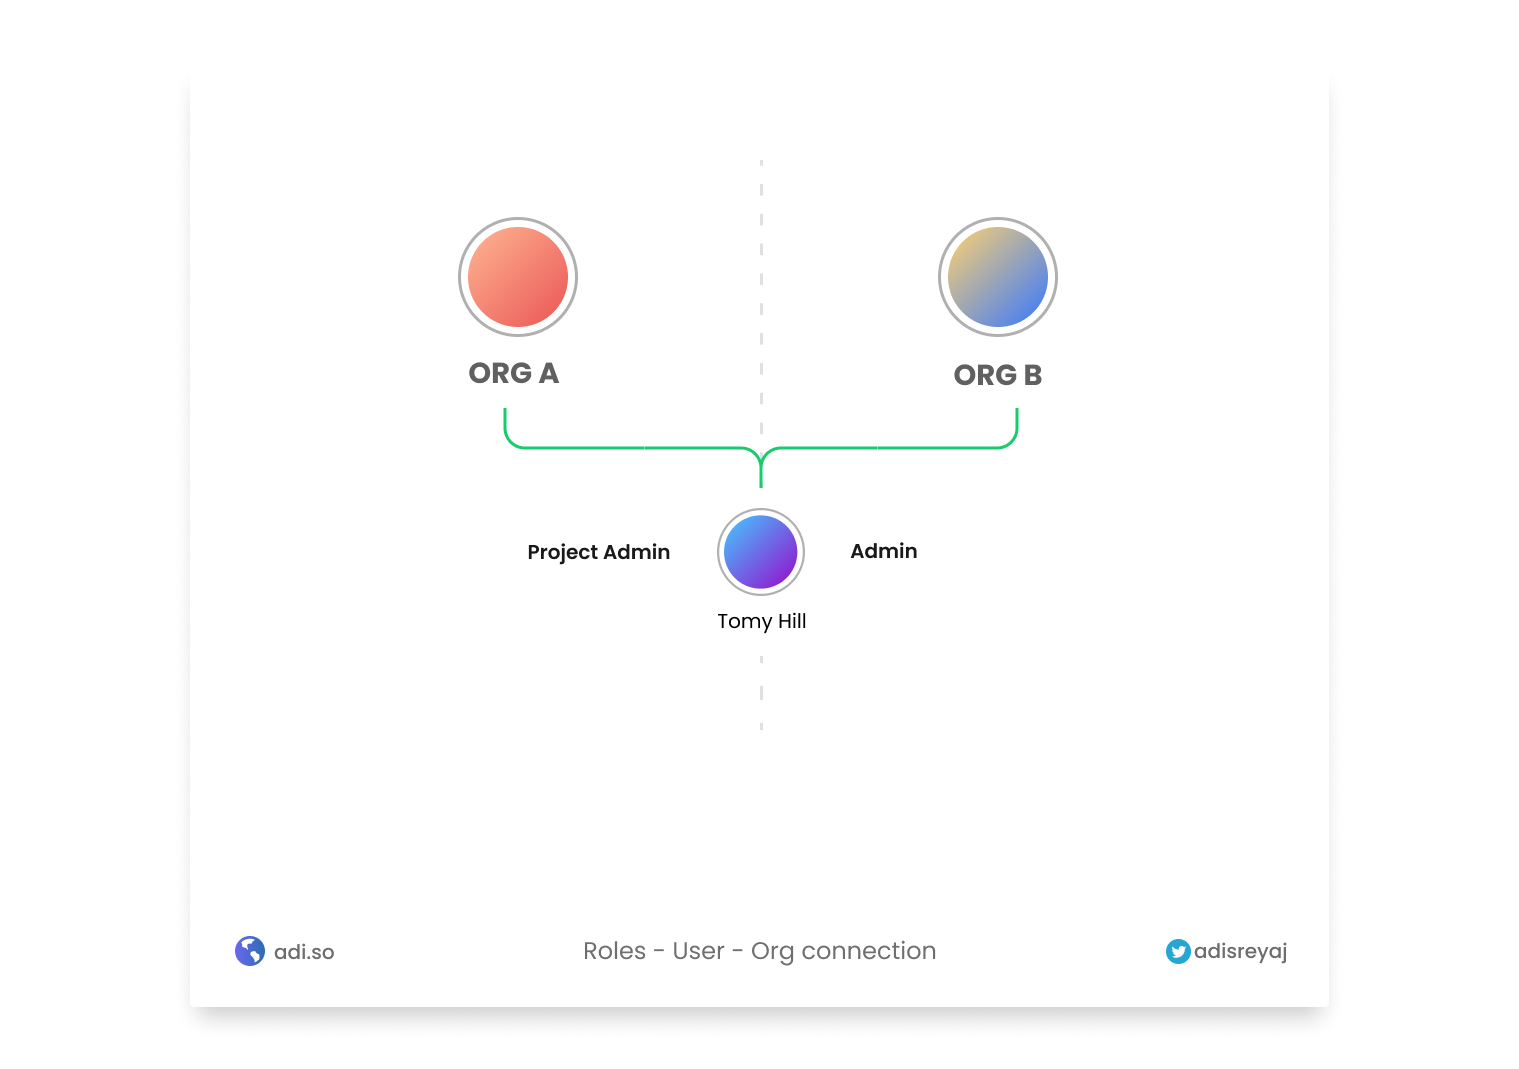
In the example above Tomy is an Admin for Org B while he is a Project Admin for Org A.
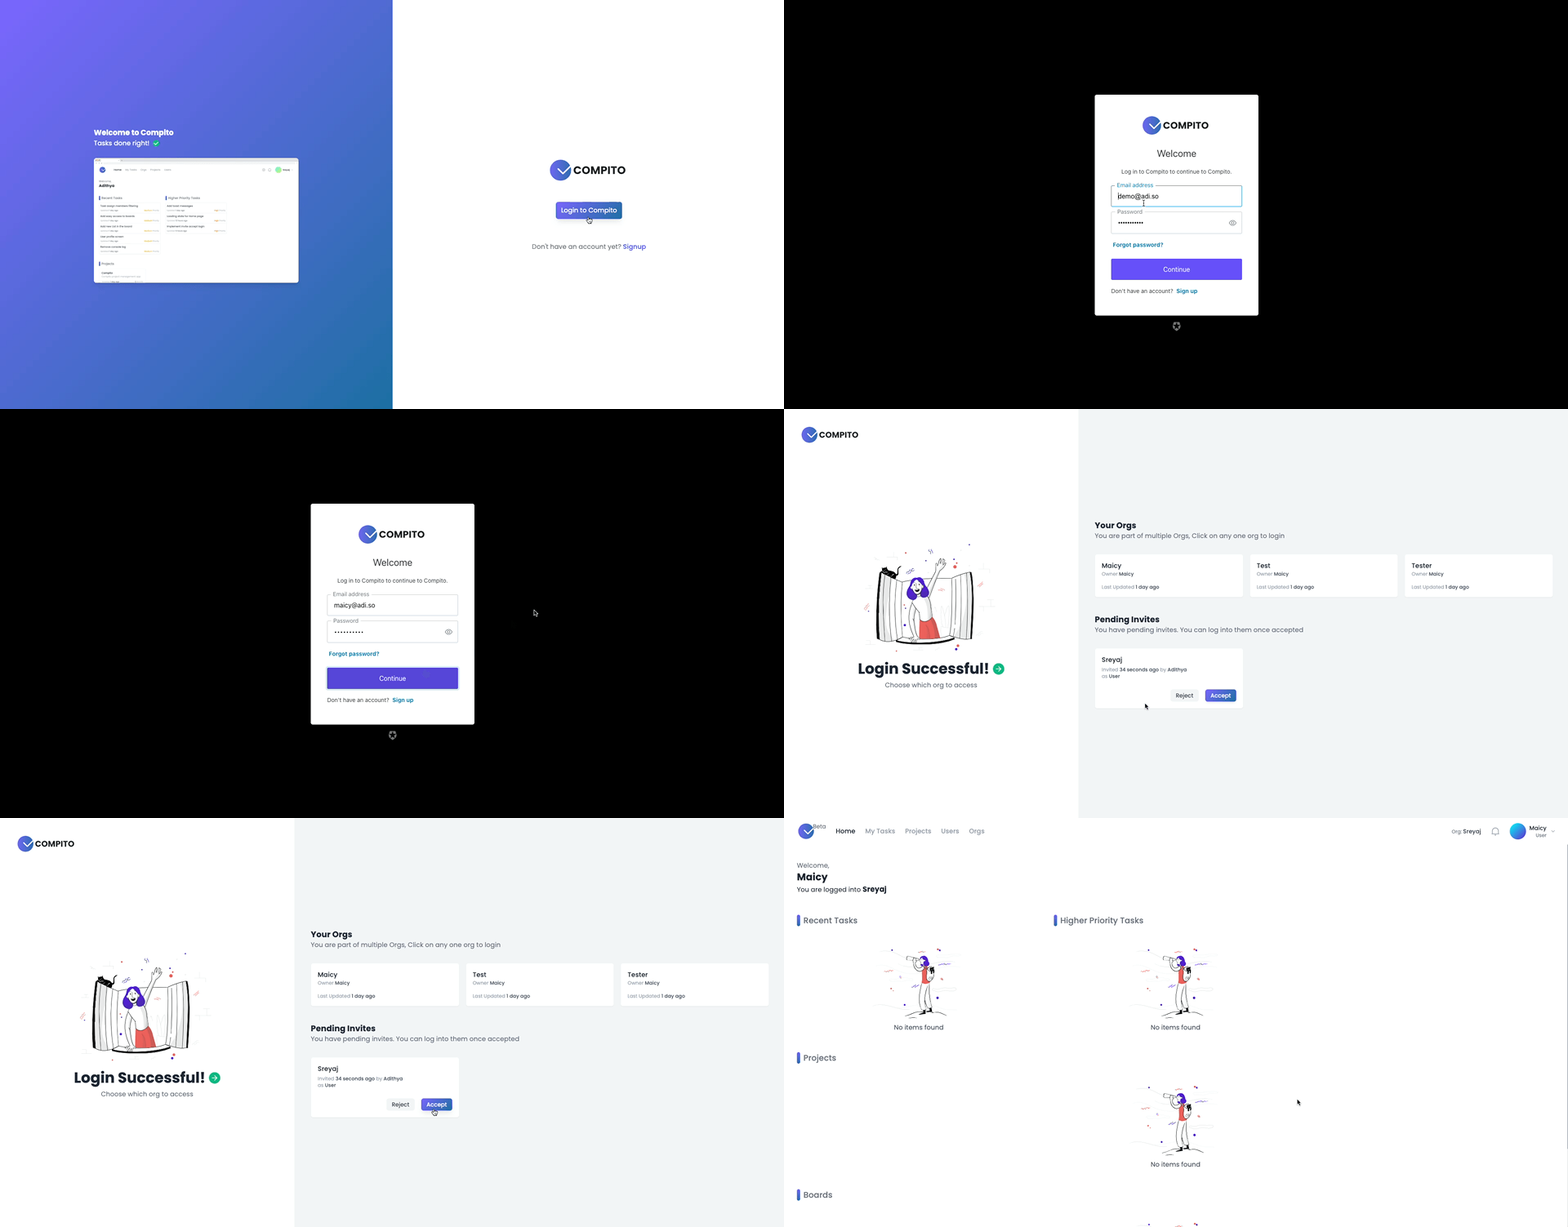
For the MVP, the initial way is to lock the user to one org on login. So If they want to access another org, they can log out of the current org and then log in to another one. In this way, a lot of complexity tied up to the RBAC can be removed.
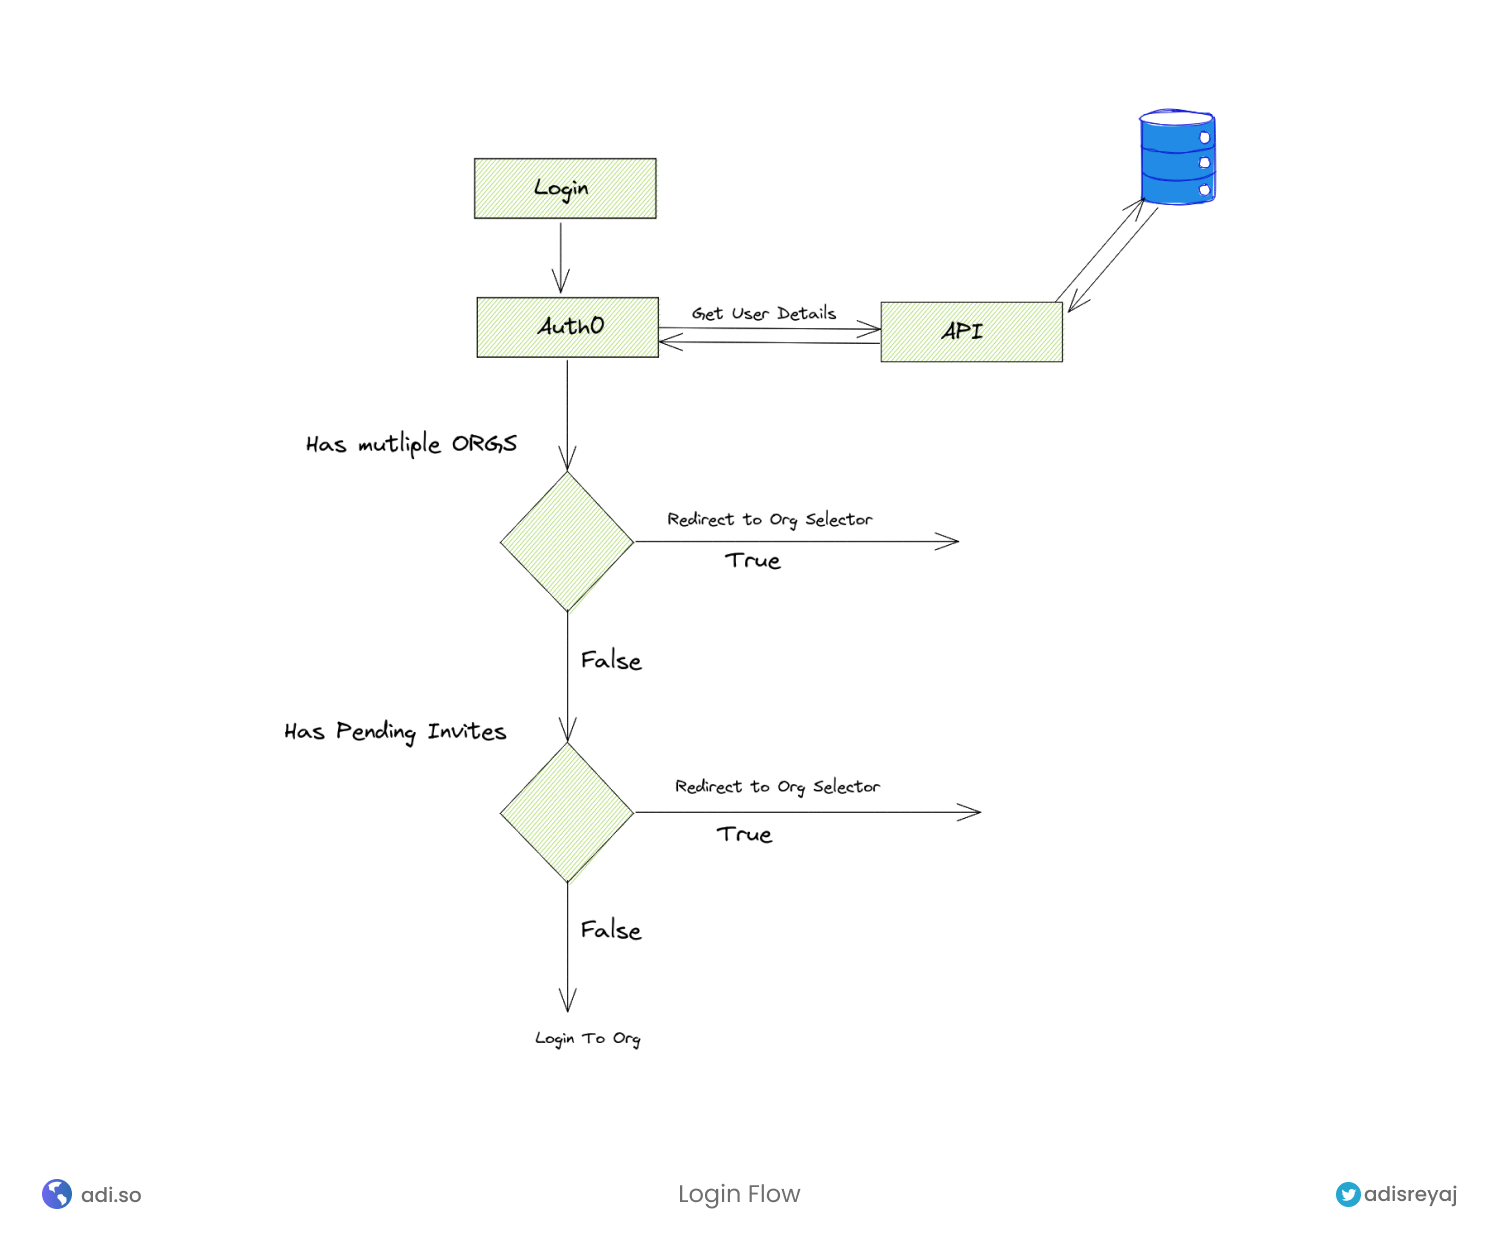
This is the proposed user login flow.
1. User logins to the system.
2. If the user is only part of one org, log in directly
3. Else redirect the user to the org selection page, where the user can select an org to log in to.
4. User selects and org, which completes the login.
### Implementing the Login flow in Auth0
I thought this could be a problem in the architecture and might not be feasible. But to my surprise, all this was super easy thanks to [Auth0 Actions](https://auth0.com/docs/actions).
Auth0 Actions are a game-changer. It opens up the door to a lot of extendability. The whole login flow that I mentioned above can be done using an action.
#### Creating an action
Go to Actions > Custom and Create a new action. For the `Trigger`, we need to go with `Login / Post Login`.
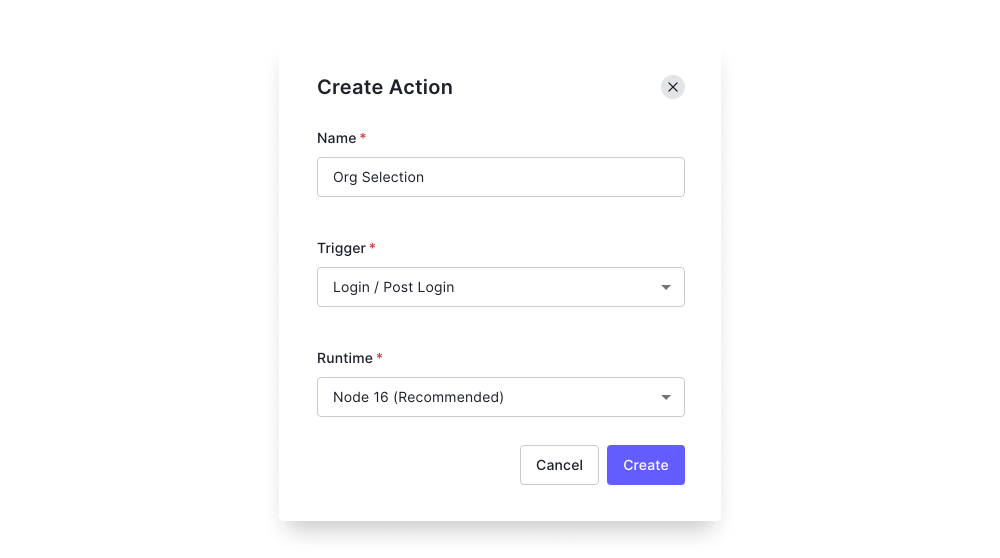
Once you click on the action, we can write custom JavaScript to do a lot of stuff. Our main aim here is to check and redirect the user to an Org Selection landing page if the user is part of multiple orgs.
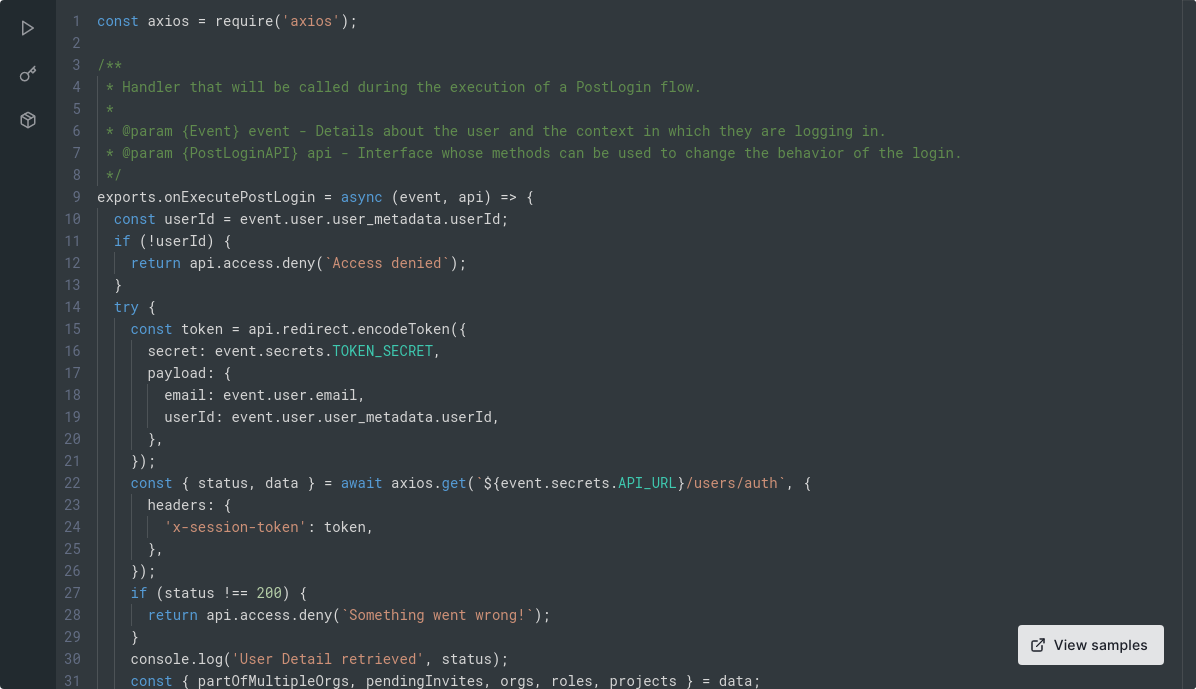
Also once the user is logged in, we need to add some metadata into the access token so that we can easily access them and don't have to hit the DB for every request.
Here is the information that we need to add to the tokens.
- `User Id` - user id associated with the logged-in user
- `Email` - logged in user's email
- `Org Id` - the current logged in org id
- `Role Details` - the role of the user for the current org
#### Setup the action
We need to set few environment variables in the action. Then add `axios` as a dependency for the action.
1. Once the user is logged in, we call our API to fetch the details of the user. For validating pre-auth request, inside actions we can create `sessions_token` which can be validated in the back-end. The session token `payload` can be used to transport any information to the back-end.
```js
const token = api.redirect.encodeToken({
secret: event.secrets.TOKEN_SECRET,
payload: {
email: event.user.email,
userId: event.user.user_metadata.userId,
},
});
const { status, data } = await axios.get(`${event.secrets.API_URL}/users/auth`, {
headers: {
'x-session-token': token,
},
});
```
2. If the user is part of multiple orgs, we redirect the user to the org selection page:
```js
if (partOfMultipleOrgs || pendingInvites) {
return api.redirect.sendUserTo(event.secrets.ORG_SELECT_REDIRECT, {
query: { session_token: token },
});
}
```
The `session_token` is passed as a query so that once in the org selection page, we can use the same to get the org details from the Back-end.
3. Else if the user is part of only one org, we proceed with attaching custom claims to the tokens:
```js
api.accessToken.setCustomClaim(`${namespace}/role`, role);
api.idToken.setCustomClaim(`${namespace}/role`, role);
```
It's that simple, now our tokens will have the role information.
The user gets redirected to the org selection page. We get the `session_token` in the front-end and make an API call to get the user's orgs and pending invites. When the user clicks on the org, we call the `/continue` API from the front-end which will resume the action.
```ts
loginToOrg(orgId: string) {
window.location.href = `https://${this.environment.auth.domain}/continue?state=${this.state}&orgId=${orgId}`;
}
```
Ref: [Front-end API Call](https://github.com/adisreyaj/compito/blob/bb06389d5917ea4d51aa8f4d0c33c859d83612df/libs/web/auth/src/lib/login/org-selection/org-selection.component.ts#L89)
```js
exports.onContinuePostLogin = async (event, api) => {}
```
We then attach the role and other info to the token. Here is the full action code:
```js
const axios = require('axios'); //<-- require axios for making api calls
exports.onExecutePostLogin = async (event, api) => {
const userId = event.user.user_metadata.userId; // <-- Get user Id
if (!userId) {
return api.access.deny(`Access denied`);
}
try {
// Create the session token
const token = api.redirect.encodeToken({
secret: event.secrets.TOKEN_SECRET,
payload: {
email: event.user.email,
userId: event.user.user_metadata.userId,
},
});
// Get user details from the back-end
const { status, data } = await axios.get(`${event.secrets.API_URL}/users/auth`, {
headers: {
'x-session-token': token,
},
});
if (status !== 200) {
return api.access.deny(`Something went wrong!`);
}
const { partOfMultipleOrgs, pendingInvites, orgs, roles, projects } = data;
// If the user is part of multiple orgs, redirect to org selection page
if (partOfMultipleOrgs || pendingInvites) {
return api.redirect.sendUserTo(event.secrets.ORG_SELECT_REDIRECT, {
query: { session_token: token },
});
}
const namespace = event.secrets.CLAIM_NAMESPACE;
// Add extra data to tokens as custom claims
if (event.authorization) {
const org = orgs[0];
const role = roles[org.id];
api.accessToken.setCustomClaim(`${namespace}/role`, role);
api.accessToken.setCustomClaim(`${namespace}/projects`, projects);
api.accessToken.setCustomClaim(`${namespace}/org`, org);
api.accessToken.setCustomClaim(`${namespace}/userId`, userId);
api.accessToken.setCustomClaim(`${namespace}/email`, event.user.email);
api.idToken.setCustomClaim(`${namespace}/role`, role);
api.idToken.setCustomClaim(`${namespace}/projects`, projects);
api.idToken.setCustomClaim(`${namespace}/org`, org);
api.idToken.setCustomClaim(`${namespace}/userId`, userId);
}
} catch (e) {
return api.access.deny(`Something went wrong`);
}
};
// Once the user has selected the org in UI, we will do the same thing as above
exports.onContinuePostLogin = async (event, api) => {
try {
const userId = event.user.user_metadata.userId;
const orgId = event.request.query.orgId;
if (!orgId) {
return api.access.deny(`Something went wrong`);
}
const token = api.redirect.encodeToken({
secret: event.secrets.TOKEN_SECRET,
payload: {
email: event.user.email,
org: orgId,
userId: event.user.user_metadata.userId,
},
});
const { status, data } = await axios.get(`${event.secrets.API_URL}/users/auth`, {
headers: {
'x-session-token': token,
},
});
console.log('Project Response Status', status);
if (status !== 200 || data == null) {
return api.access.deny(`Something went wrong!`);
}
const { org, role, projects } = data;
const namespace = event.secrets.CLAIM_NAMESPACE;
if (event.authorization) {
api.accessToken.setCustomClaim(`${namespace}/role`, role);
api.accessToken.setCustomClaim(`${namespace}/projects`, projects);
api.accessToken.setCustomClaim(`${namespace}/org`, org);
api.accessToken.setCustomClaim(`${namespace}/userId`, userId);
api.accessToken.setCustomClaim(`${namespace}/email`, event.user.email);
api.idToken.setCustomClaim(`${namespace}/role`, role);
api.idToken.setCustomClaim(`${namespace}/projects`, projects);
api.idToken.setCustomClaim(`${namespace}/org`, org);
api.idToken.setCustomClaim(`${namespace}/userId`, userId);
}
} catch (error) {
return api.access.deny(`Something went wrong`);
}
};
```
Ref: [Aut0 Action source code](https://github.com/adisreyaj/compito/blob/main/auth0/actions/add-role.js)
Note: If you are planning to copy the actions code, copy it from the source code.
Once the action is ready and all the environment variables are configured properly, **Deploy** the action.
#### Implementing the action
Head to **Actions** > **Flows** and Choose Login Flow.
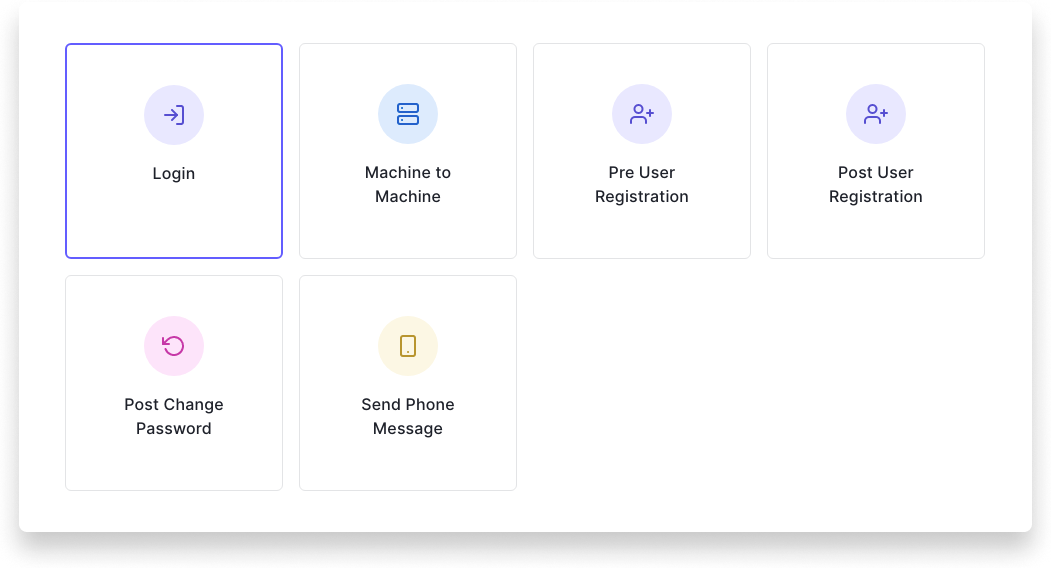
Now we can add the action to our login flow by just dragging and dropping the action in the flow.
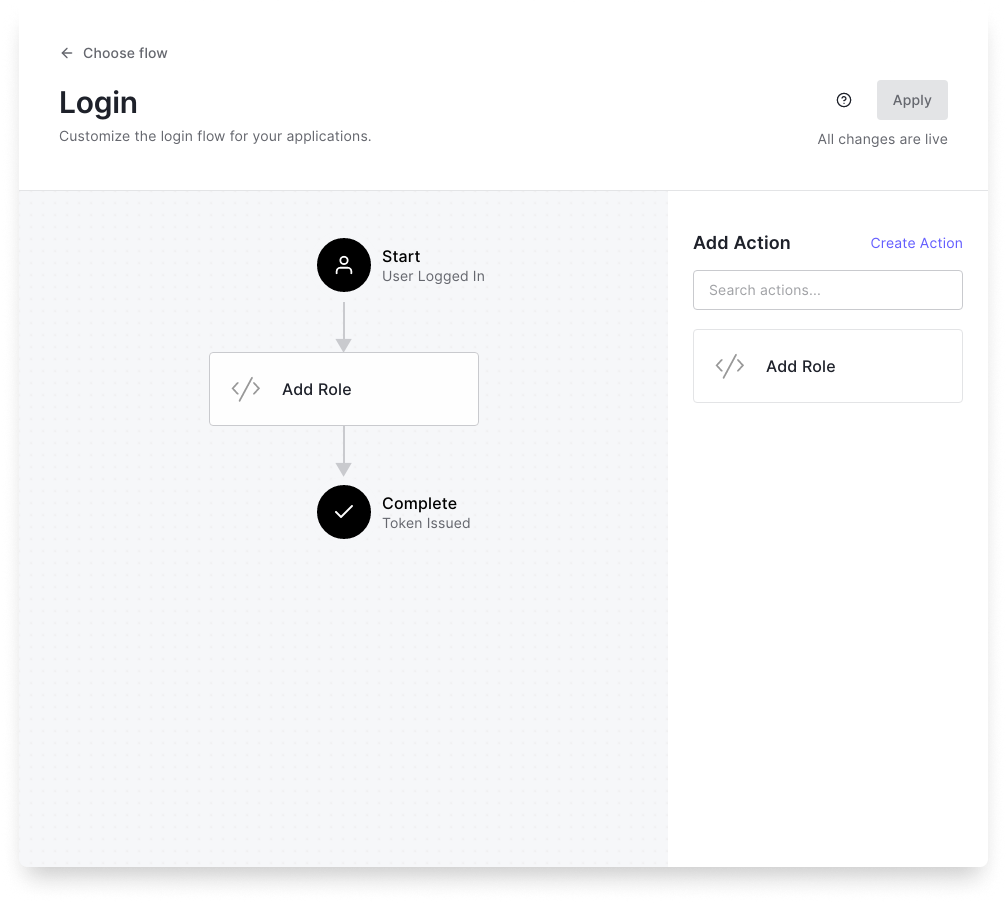
Once you apply the flow, we are all set. See the outcome below:
## Setting up Roles and Permissions in Back-end
In the back-end we need to set two guards:
- Role Guard - to check if the user has the required role to perform the operation
- Permission Guard - to check if the user has required permission to perform the operation
Role Points:
```ts
export const ROLE_LEVEL = {
'user': 1,
'project-admin': 2,
'org-admin': 3,
'admin': 4,
'super-admin': 5,
};
```
User has the lowest level of access or is the most restrictive role we can say.
Ref: [Role guard source code](https://github.com/adisreyaj/compito/blob/main/apps/api/src/app/core/guards/roles.guard.ts)
Ref: [Permission guard source code](https://github.com/adisreyaj/compito/blob/main/apps/api/src/app/core/guards/permissions.guard.ts)
I'll write separate articles about them.
This is how we would use these guards:
```ts
@UseGuards(RolesGuard, PermissionsGuard) // <-- apply guards
@Role('org-admin') // <-- set min required role
@Permissions(PERMISSIONS.project.create) // <-- permission required
@Post()
create(@Body() project: ProjectRequest, @Req() req: RequestWithUser) {
return this.projectService.create(project, req.user);
}
```
## Handling Role and Permission in UI
In the UI, the user should only be seeing actions that they have access to. So for example a `Project Admin` should not be able to see the `Edit` option in the Org card.
For implementing this, I created a simple directive that does the job.
```ts
@Directive({
selector: '[permission]',
})
export class PermissionsDirective implements OnInit, OnDestroy {
private loggedInUser!: UserDetails;
private requiredPermission!: string;
subscription!: Subscription;
@Input()
set permission(permission: string) {
this.requiredPermission = permission;
this.updateView();
}
constructor(
private tpl: TemplateRef,
private vcr: ViewContainerRef,
private authService: AuthService,
private cdr: ChangeDetectorRef,
) {}
ngOnInit() {
this.subscription = this.authService.user$.pipe(formatUser()).subscribe((user) => {
if (user) {
this.vcr.clear();
this.loggedInUser = user;
this.updateView();
}
});
}
ngOnDestroy() {
this.subscription.unsubscribe();
}
private updateView() {
if (this.hasPermission()) {
this.vcr.createEmbeddedView(this.tpl);
} else {
this.vcr.clear();
}
this.cdr.markForCheck();
}
private hasPermission() {
if (!this.loggedInUser) return false;
const userPermissions = this.loggedInUser.role.permissions;
if (userPermissions) {
return userPermissions.includes(this.requiredPermission);
}
return false;
}
}
```
The directive will only render the component if the user has access to the item.
## Attachments and Object storage
For saving and managing the files, I've used Oracle Cloud which provides object storage under its [free tier](https://www.oracle.com/in/cloud/free/) . For managing the uploads, `minio` (https://docs.min.io/docs/minio-client-complete-guide.html) client is used for interacting with the S3 compatible APIs of Oracle Cloud.
```ts
@Injectable()
export class FileStorageService {
private client: Client;
private logger = new CompitoLogger('FILE_STORAGE');
constructor(private config: ConfigService) {
this.client = this.createMinioInstance();
}
private createMinioInstance(): Client {
return new Client({
endPoint: this.config.get('FILE_STORAGE_URI'),
useSSL: true,
pathStyle: true,
region: 'ap-mumbai-1',
accessKey: this.config.get('FILE_STORAGE_ACCESS_KEY'),
secretKey: this.config.get('FILE_STORAGE_ACCESS_SECRET'),
});
}
async get(path: string) {
const bucket = this.config.get('BUCKET');
return this.client.getObject(bucket, path);
}
async upload(file: Express.Multer.File, name: string, folder: string) {
const bucket = this.config.get('BUCKET');
const fileName = `${folder}/${name}.${extension(file.mimetype)}`;
try {
const result = await this.client.putObject(bucket, fileName, file.buffer);
return { result, filePath: fileName };
} catch (error) {
this.logger.error('upload', 'Failed to upload', error);
return null;
}
}
async delete(path: string) {
const bucket = this.config.get('BUCKET');
try {
await this.client.removeObject(bucket, path);
return true;
} catch (error) {
this.logger.error('delete', 'Failed to delete object', error);
return false;
}
}
}
```
Full [source code](https://github.com/adisreyaj/compito/blob/main/apps/api/src/app/core/services/file-storage.service.ts)
## Roadmap
- Task Dates and Time tracking
- Calendar view
- Activity Bar
- Notifications (Email and Push)
- Audit Trail Logs
- Easy Org Switching
- Tags
- Sub Tasks
I am planning to write about individual features and API in-depth as it would be very hard to include all in this one blog post. So it makes sense to maybe make a series on the same in the future. Till then, feel free to hit me up If you have any questions or doubts.
## Best practices
#### Validation
The server uses [**joi**](https://github.com/sideway/joi) for validating the request even before reaching the services. There is also a custom logger implemented to give a clear idea of the errors. The custom logger can be used to connect to log monitoring services like Sentry in the future.
#### Error handling
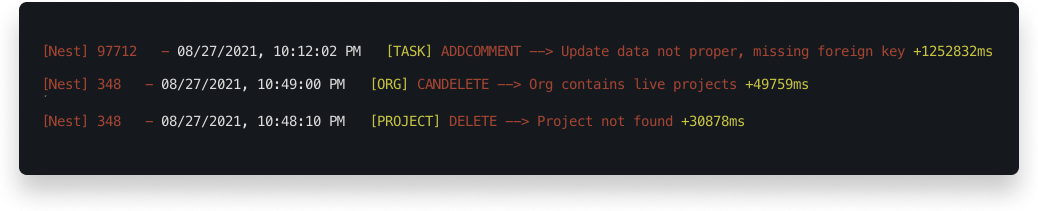
Error handling is very important in any project and so is logging. With proper logs in place, it's much easier to sport the bugs. The errors are streamed by pm2 and are visible via the PM2 Dashboard.
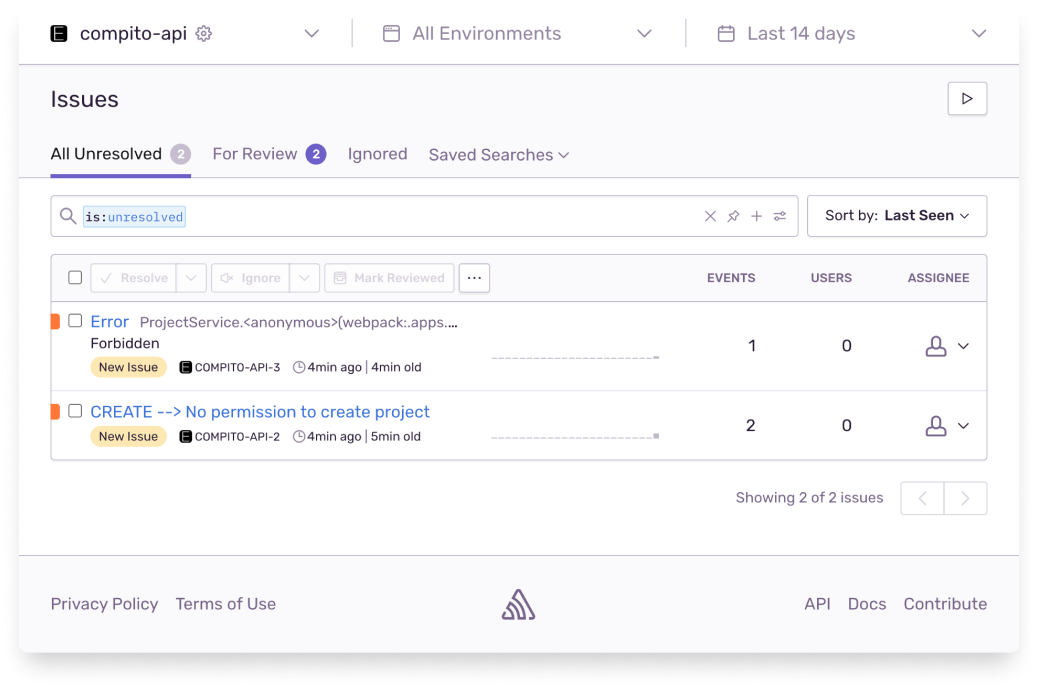
Errors are also sent to Sentry for easy RCA. Sentry has a good integration and setting up was not that difficult. Will try to write about it in a separate blog.
#### Database backups
Database backups are created locally on a daily basis and uploaded to object storage in the cloud. More details about the setup here: [How to backup Postgres data to object storage](https://blog.sreyaj.dev/how-to-backup-postgres-data-to-s3-bucket-using-minio).
#### Security and Others
When it comes to API Security, there is CORS, Rate limiting, etc implemented. Thanks to middleware like
- [Helmet](https://helmetjs.github.io/)
- [Express Rate Limit](https://www.npmjs.com/package/express-rate-limit)
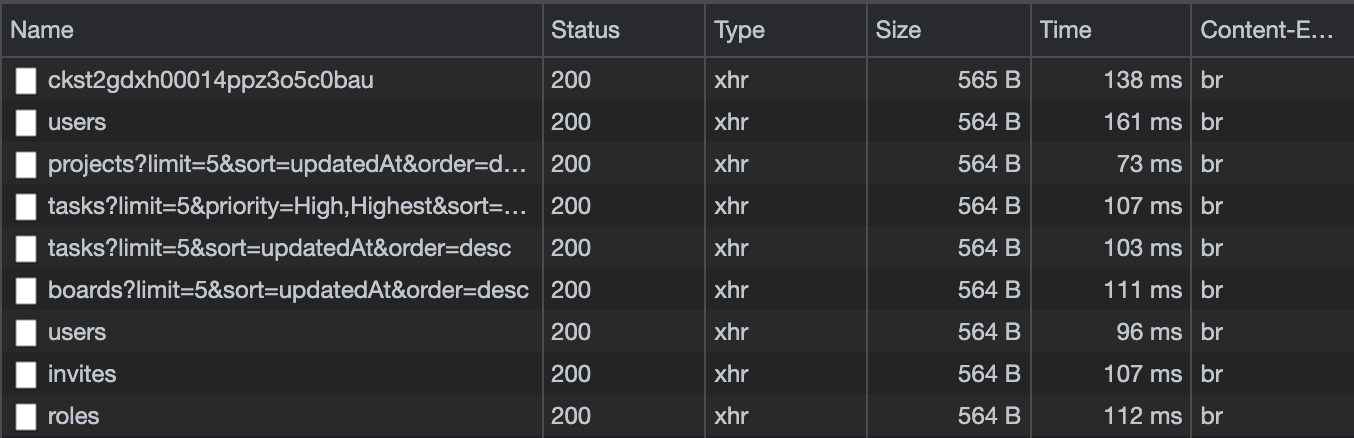
Since the API is proxied via Nginx, by setting up [brolti](https://github.com/google/brotli) compression, the API payload can be compressed very well making APIs faster.
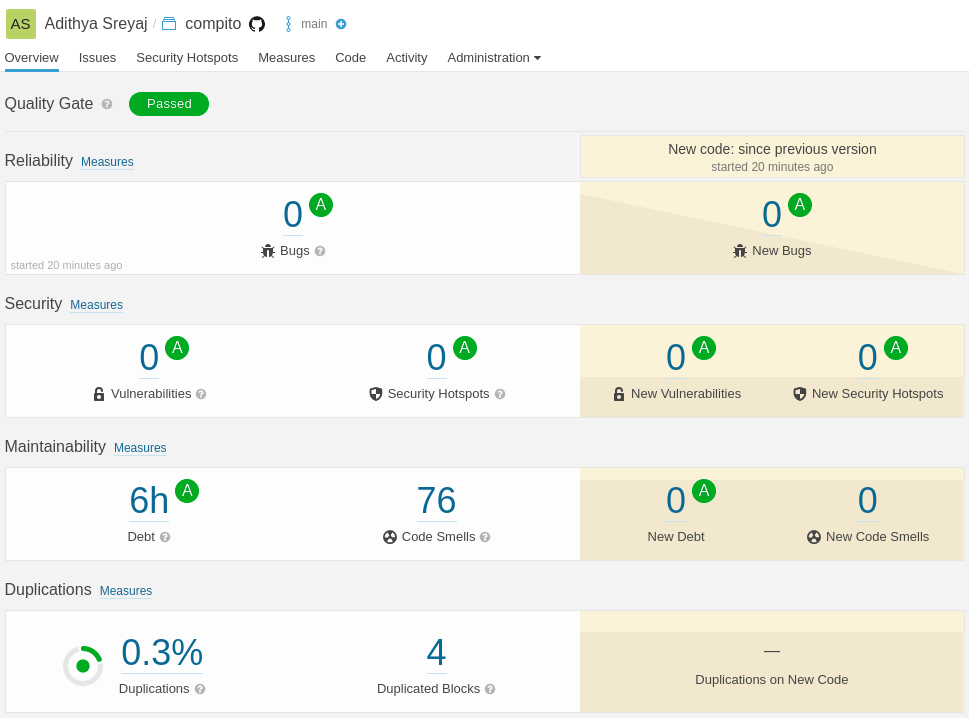
I am pretty much satisfied with the outcome of the project given I was able to put all this together in under 3 weeks of my free time. Code quality is checked by SonarQube. There are few smells, which can be easily cleaned up.
## Lighthouse Scores
The initial lighthouse scores without much optimizations done are pretty good I would say. The test is done on the production website. There are a lot of improvements in the application and I can see the scores improving more over time.
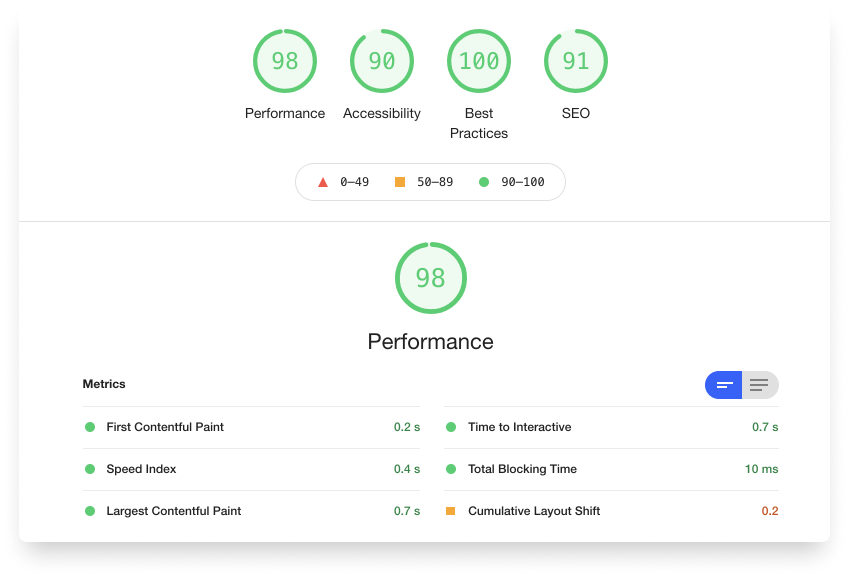
As always thanks to Vercel for making the websites super fast.
## Links
- [Github Repo](https://github.com/adisreyaj/compito)
- [Demo](https://compito.adi.so/)
## Update
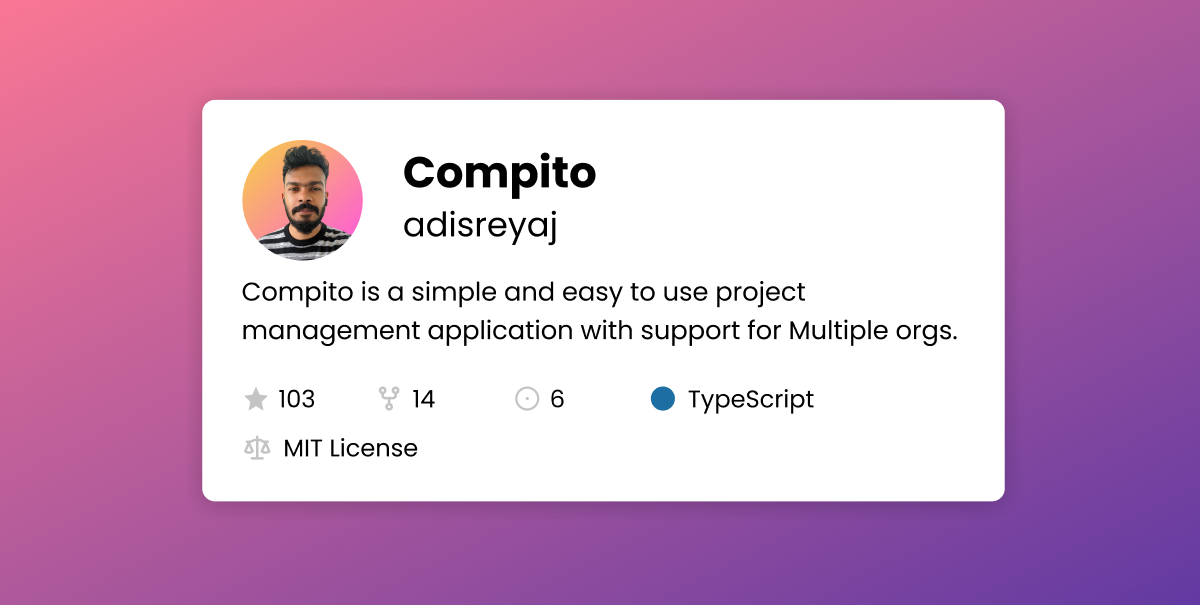
Thanks all for the massive support. We've crossed **100** stars on Github, More than **120** users signed up in Auth0, and also around **1.5K** pageviews after the launch.

## Connect with me
- [Twitter](https://twitter.com/AdiSreyaj)
- [Github](https://github.com/adisreyaj)
- [Linkedin](https://www.linkedin.com/in/adithyasreyaj/)
- [Cardify](https://cardify.adi.so) - Dynamic SVG Images for Github Readmes
Do add your thoughts in the comments section.
Stay Safe ❤️
[](https://www.buymeacoffee.com/adisreyaj)