# How I implemented sticky columns in tables using directives - Angular!
How to create sticky columns in Angular using directives. Implementing tables with sticky columns can be tricky especially when you have to make multiple columns sticky. Using directives, we can easily implement sticky columns.
I can't emphasize more the power of directives in Angular. I've written a couple of articles showcasing how one can actually use it to implement really cool stuff. You can check some use-cases for directives here: [Angular Directive Showcase](https://ng-directives.vercel.app/).
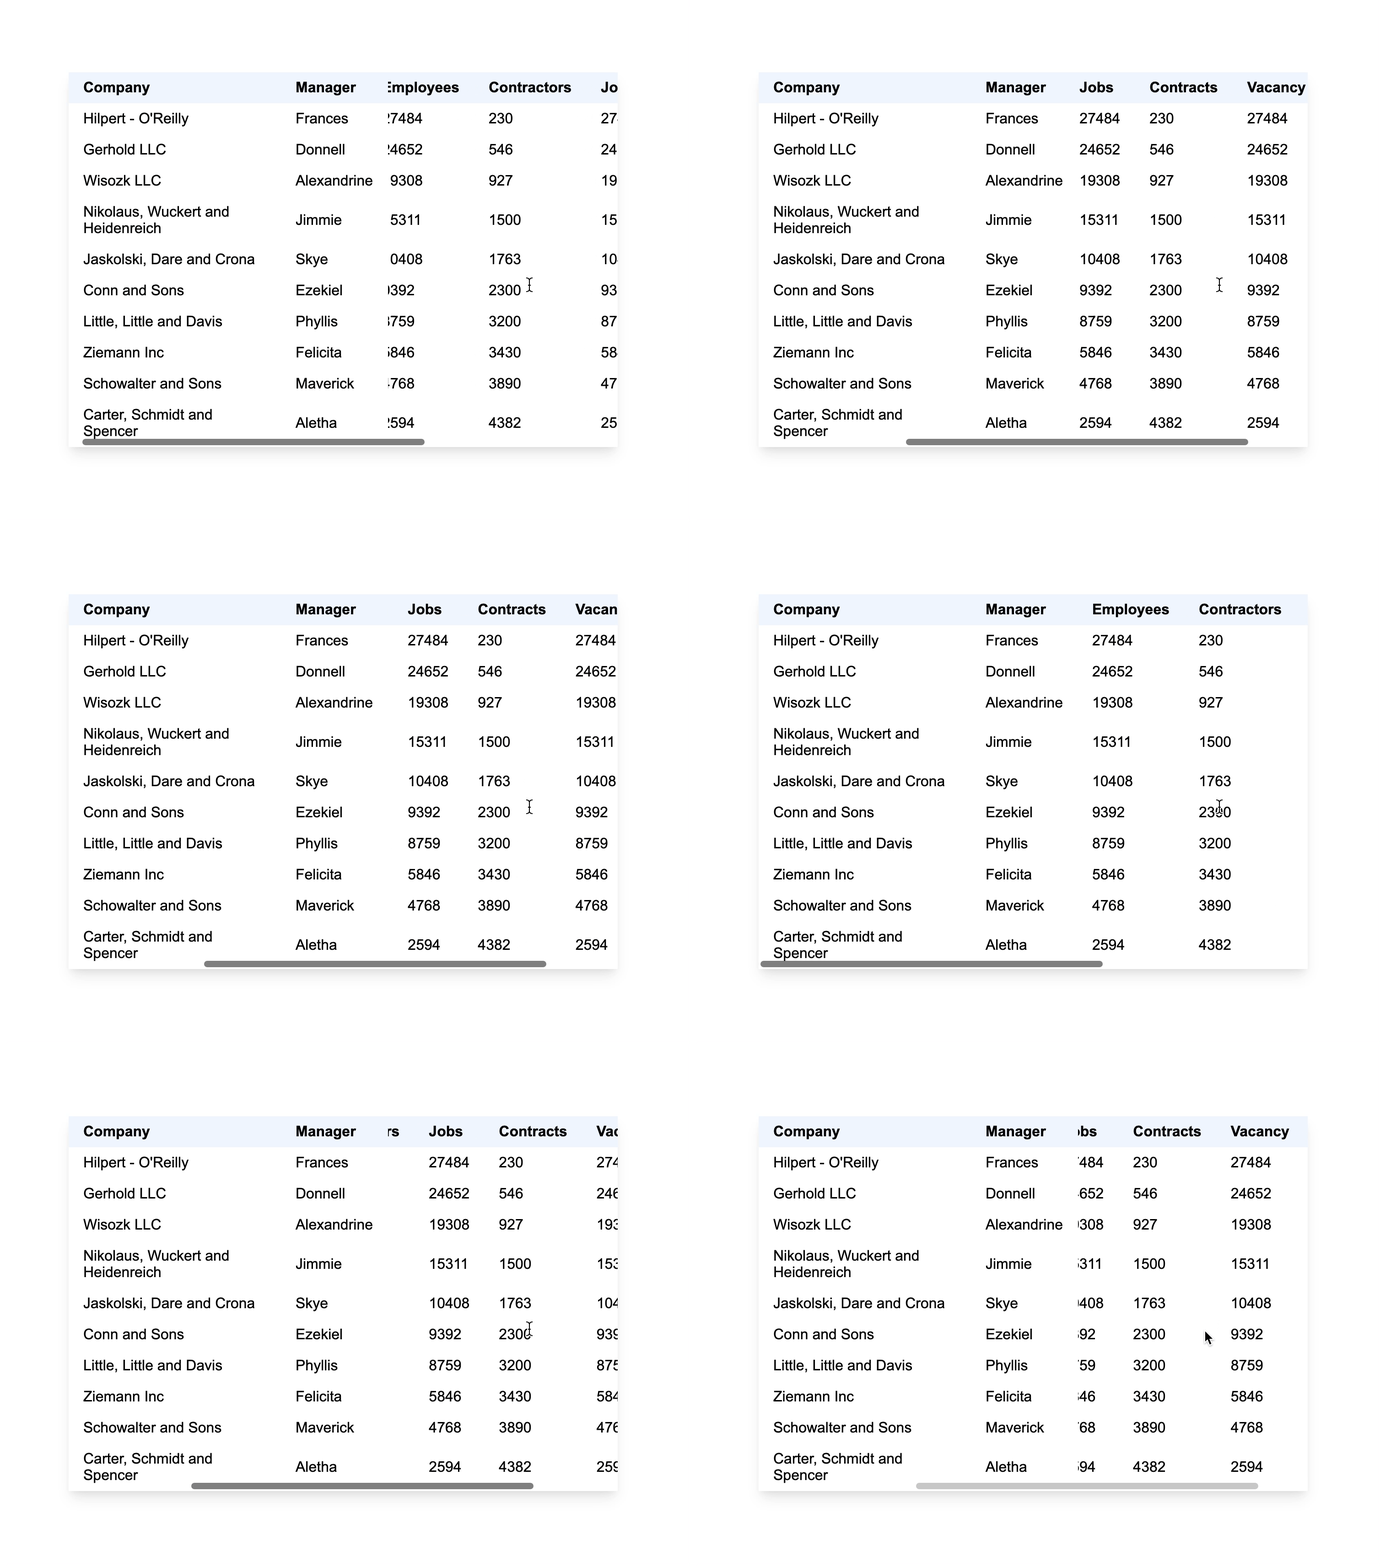
## Tables with sticky columns
We make use of the `position: sticky` CSS property to make an element sticky. Read more about sticky positioning at [MDN](https://developer.mozilla.org/en-US/docs/Web/CSS/position#sticky_positioning).
```css
.sticky {
position: sticky;
left: 0;
}
```
For the sticky position to work properly, at least one of `top`, `right`, `bottom`, or `left` should be specified.
## The problem
Making the first column in a table sticky is super simple, you basically add the `sticky` class to the column.
When two columns need to stick to the left, we can't just add the `sticky` class to both of the columns. This is how it looks if you did so:
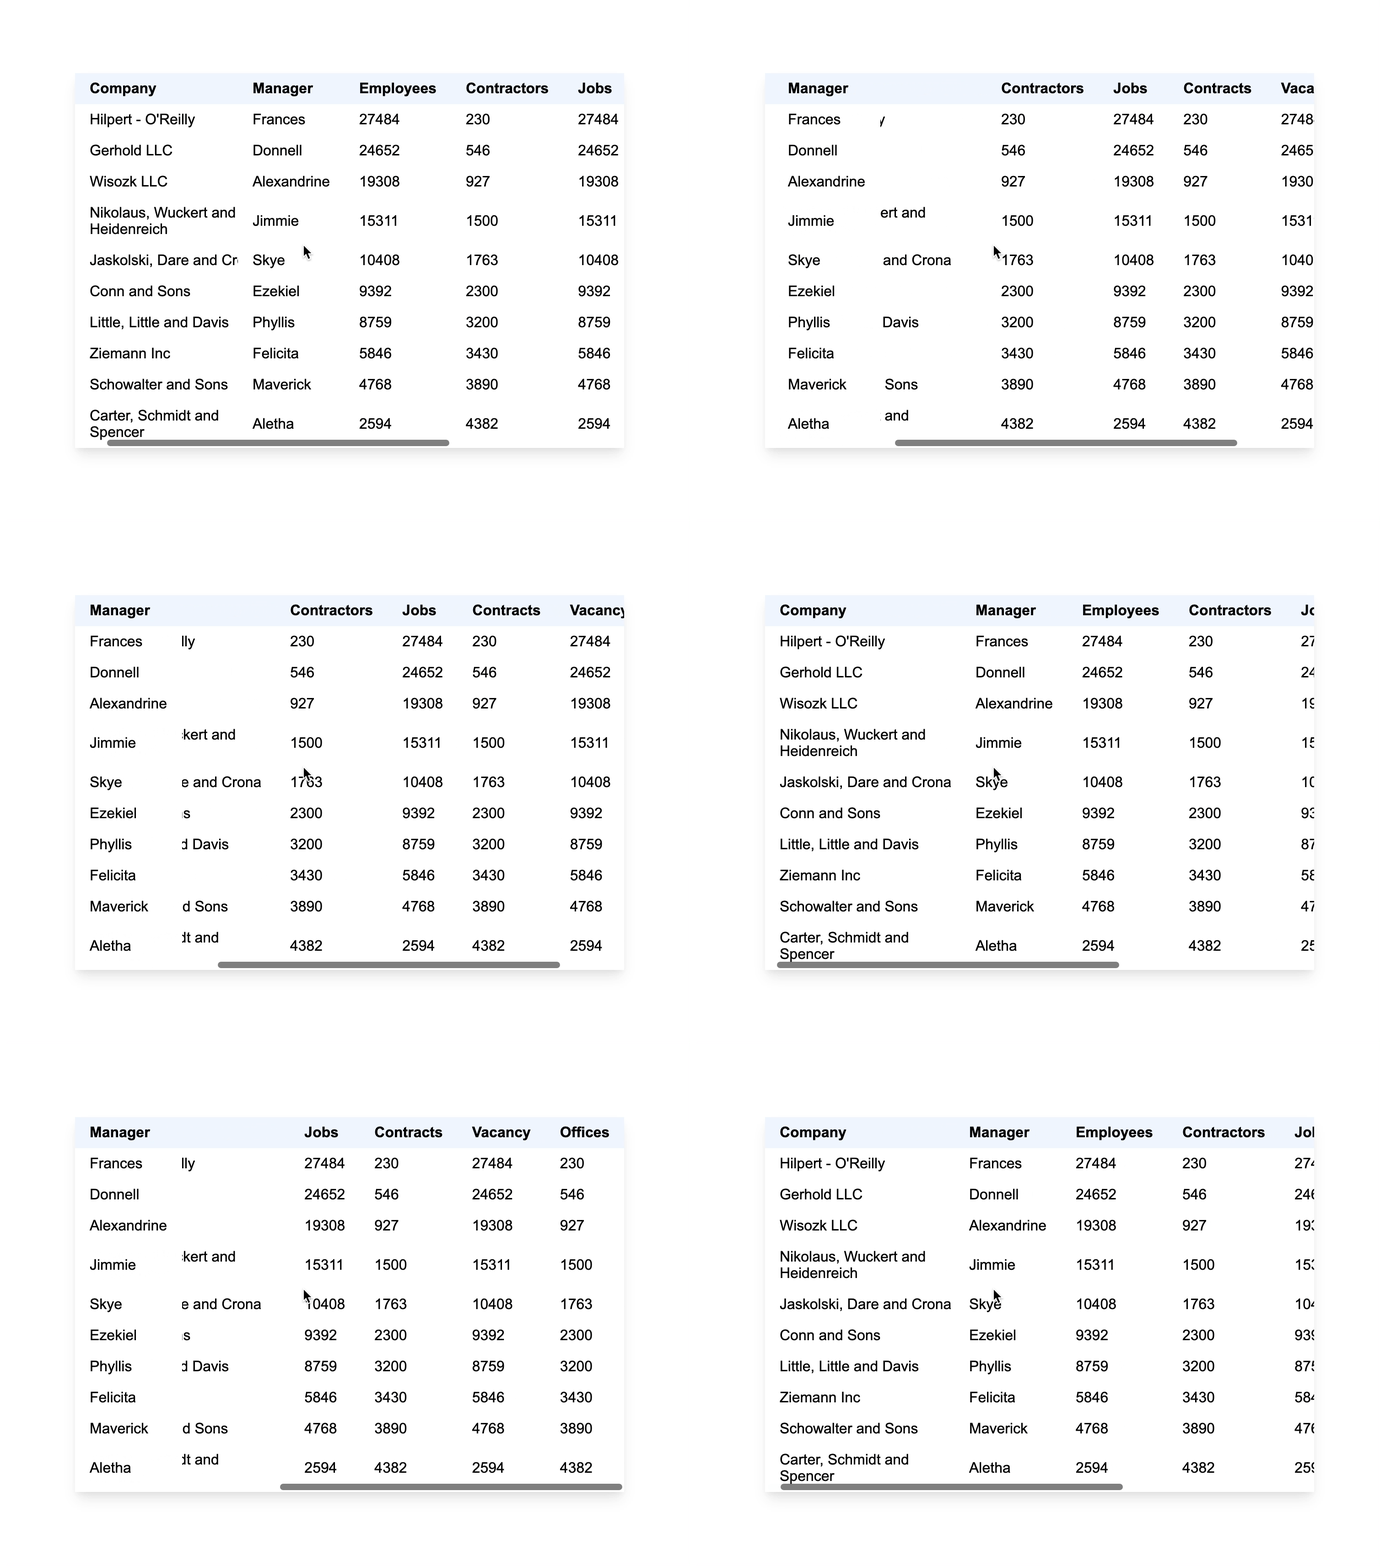
Here you can see the **Manager** column overlapping with the **Company** column. This is because we gave both the columns `left:0`.
To make it work as expected, the styles should be like this:
```css
.company {
position: sticky;
left: 0px;
}
.manager {
position: sticky;
left: 120px; // <-- width of the company column
}
```
What we did here is we added the offset of the **Manager** column as the `left` property value.
## Sticky Calculations
For calculating the `left` value, we need to find the `x` value of the column. If we look at the first column **Company** and get its offset from the left side.
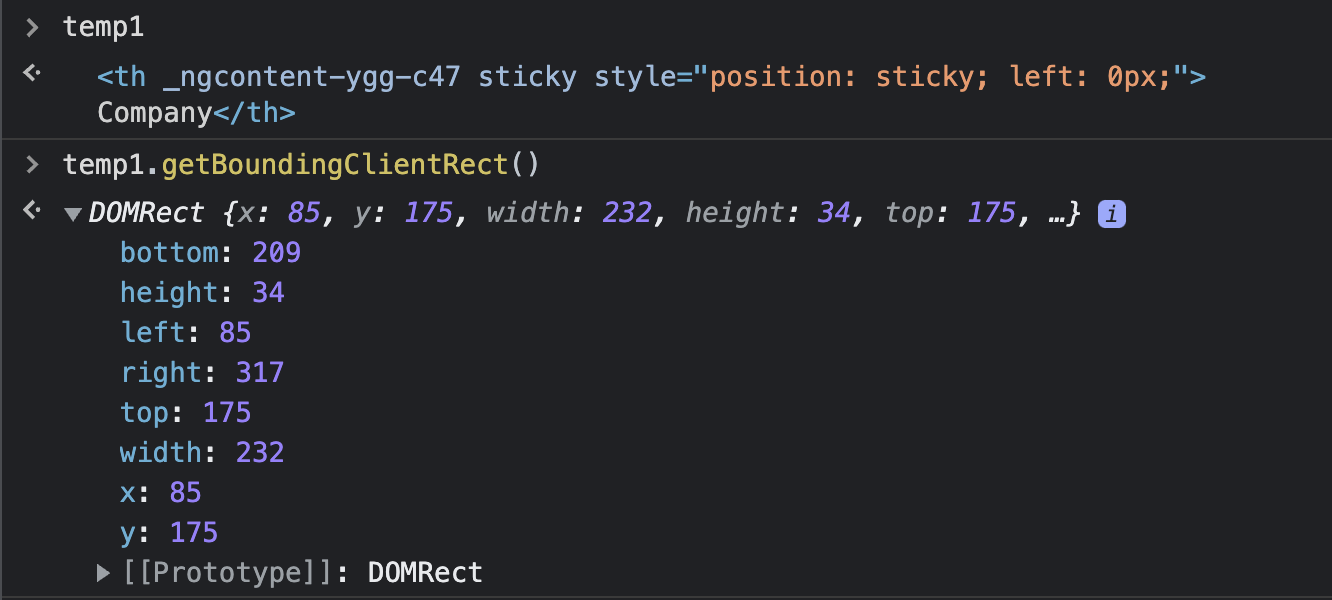
We expect the `x` value to be `0` but we get `85` here. This is because the `x` value is calculated from the left side of the window to the column. For getting the left threshold of the column with respect to the table, we need to find the `x` value of the table. Once we get the table's offset, we can subtract it from the offset of the column.
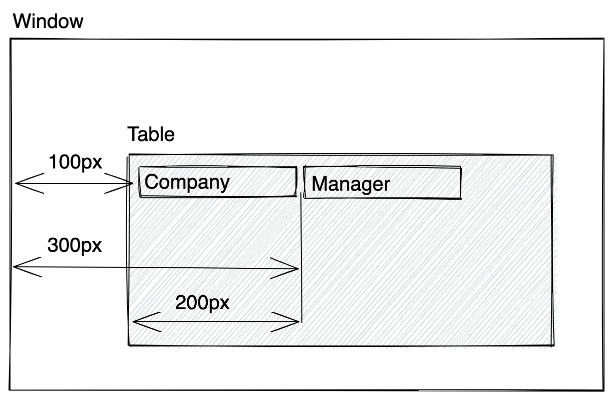
Example of the calculation:
- Position of Table = (100, 200) // <-- x = 100
- Position of Company = (100, 200) // <-- x with respect to table = 100 - 100 = 0
- Position of Manager = (300, 200) // <-- x with respect to table = 300 - 100 = 200
## Sticky Directive
We are going to create a directive to do just that. The directive can then be placed on the columns which need to be sticky. If you are thinking about why a directive for this particular use case, the calculation of the sticky thresholds can be done easily. Creating a directive makes it easy to re-use the functionality for different elements.
```ts
import { CommonModule } from '@angular/common';
import {
AfterViewInit,
Directive,
ElementRef,
NgModule,
Optional,
} from '@angular/core';
@Directive({
selector: '[stickyTable]',
})
export class StickyTableDirective {
constructor(private el: ElementRef) {}
get x() {
return (this.el.nativeElement as HTMLElement)?.getBoundingClientRect()?.x;
}
}
@Directive({
selector: '[sticky]',
})
export class StickyDirective implements AfterViewInit {
constructor(
private el: ElementRef,
@Optional() private table: StickyTableDirective
) {}
ngAfterViewInit() {
const el = this.el.nativeElement as HTMLElement;
const { x } = el.getBoundingClientRect();
el.style.position = 'sticky';
el.style.left = this.table ? `${x - this.table.x}px` : '0px';
}
}
@NgModule({
declarations: [StickyDirective, StickyTableDirective],
imports: [CommonModule],
exports: [StickyDirective, StickyTableDirective],
})
export class StickyDirectiveModule {}
```
If you look at the code above, we have two directives:
1. StickyDirective
1. StickyTableDirective
The second directive is really interesting here. Why do we need a second directive?
We have a separate directive that can be placed on the table to get the offset of the table. The directive can then be injected inside the main `StickyDirective`.
```ts
constructor(
private el: ElementRef,
@Optional() private table: StickyTableDirective
) {}
```
We mark the `StickyTableDirective` as `@Optional()` so that we can add the `StickyDirective` directive on other elements and it can automatically be sticky with the default value.
Ref: https://angular.io/guide/hierarchical-dependency-injection#optional
Here is how we use it in HTML.
```html
| Company |
Manager |
Employees |
Contractors |
Jobs |
Contracts |
Vacancy |
Offices |
| {{ item.company }} |
{{ item?.manager }} |
{{ item?.employees }} |
{{ item?.contractors }} |
{{ item?.employees }} |
{{ item?.contractors }} |
{{ item?.employees }} |
{{ item?.contractors }} |
```
We add the `stickyTable` directive to the table and the `sticky` directive to the column.
## Demo and Code
[Stackblitz Link](https://stackblitz.com/edit/angular-ivy-mcwnrf?file=src/app/sticky.directive.ts)
## Improvements
A lot of improvements can be made to this directive to make it more re-usable like:
- Add support for other directions.
- Generalize the `StickyTableDirective` to be able to use it on other elements as well.
For the sake of keeping the example here simple, I've kept it simple.
## Similar Reads
1. [Implement Heatmaps in a table using directives](https://blog.sreyaj.dev/how-to-implement-heatmap-in-tables-using-directives-in-angular)
2. [Highlight text in paragraphs with a simple directive in Angular](https://blog.sreyaj.dev/highlight-text-in-angular-using-directives)
3. [Fullscreen toggle functionality in Angular using Directives.](https://blog.sreyaj.dev/fullscreen-toggle-angular-using-directives)
## Connect with me
- [Twitter](https://twitter.com/AdiSreyaj)
- [Github](https://github.com/adisreyaj)
- [Linkedin](https://www.linkedin.com/in/adithyasreyaj/)
- [Cardify](https://cardify.adi.so) - Dynamic SVG Images for Github Readmes
Do add your thoughts in the comments section.
Stay Safe ❤️
[](https://www.buymeacoffee.com/adisreyaj)