

Presenting Show Off ✨ - Showcase your setup!
One stop for showcasing your gadgets and software to your friends and fans.


Show Off is a great place to showcase all the gadgets and software you use and share them with your friends or fans. Add affiliate links to the items and make it easy to earn when the user clicks through your collection.
Problem Statement
A lot of times, I stumble upon youtube videos or posts on Twitter and other social media where the person shares their setup and most of the comments below would be something like this:
- What IDE are you using?
- Which monitor do you use?
- What headphones/microphone is that in the background?
- Are you using a mac?
With show off, users can create a collection of what they have or use and share it with their friends and followers. This makes it easier for you and your followers and I bet you'll not have to reply to these comments anymore.
Features
With show off, the primary idea is to make it super easy to share things with your followers. Also, the user interface is designed in such a way that it's functional and super easy to use as well. Copy the collection link and pin it to your Twitter profile or Github Readme or Instagram or Youtube or wherever you get asked about your stuff.
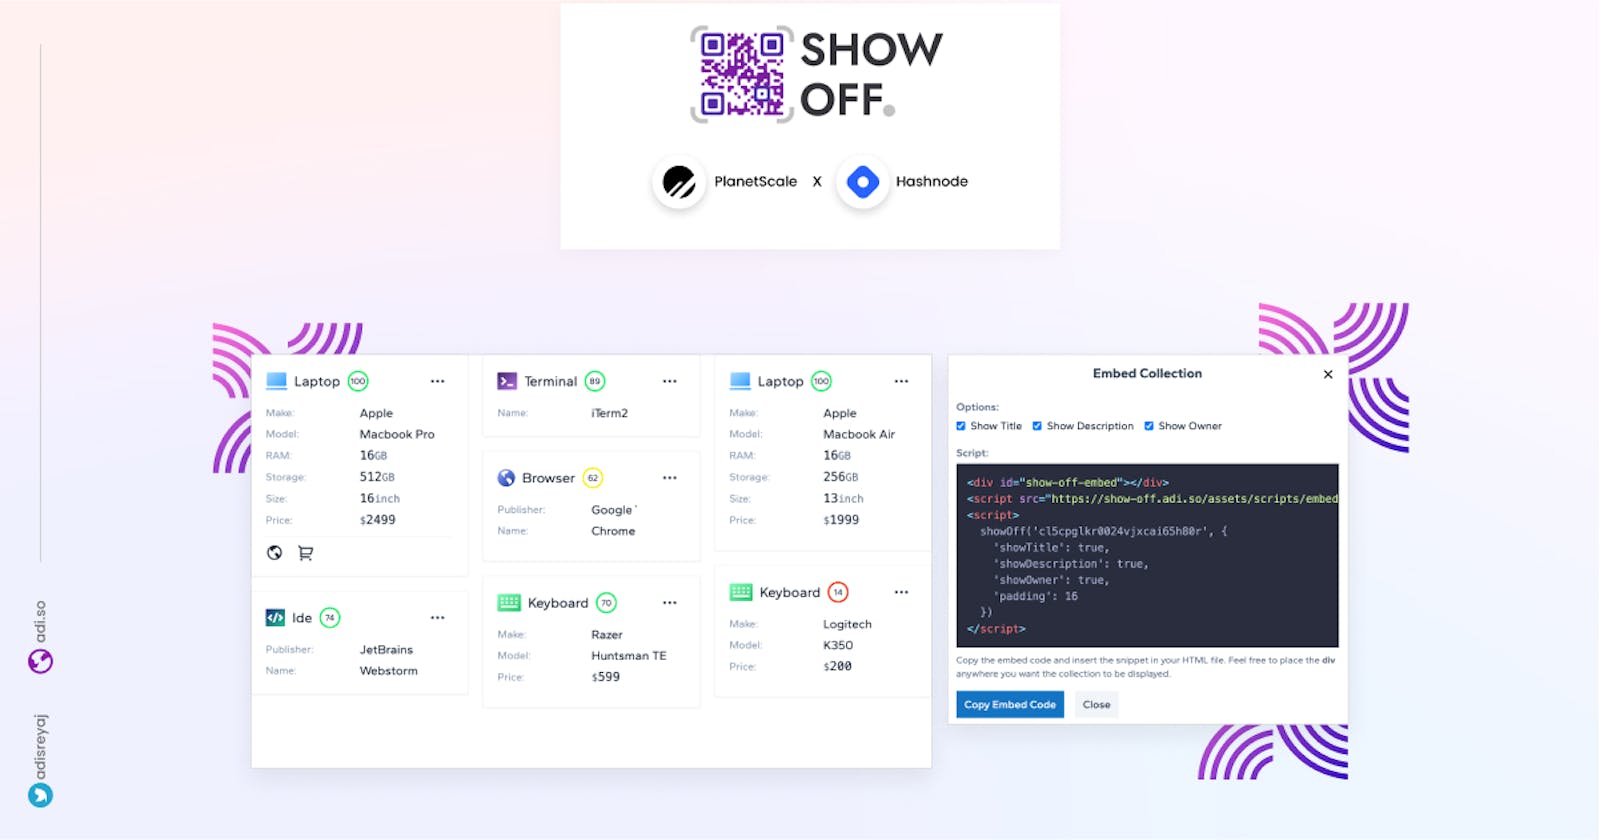
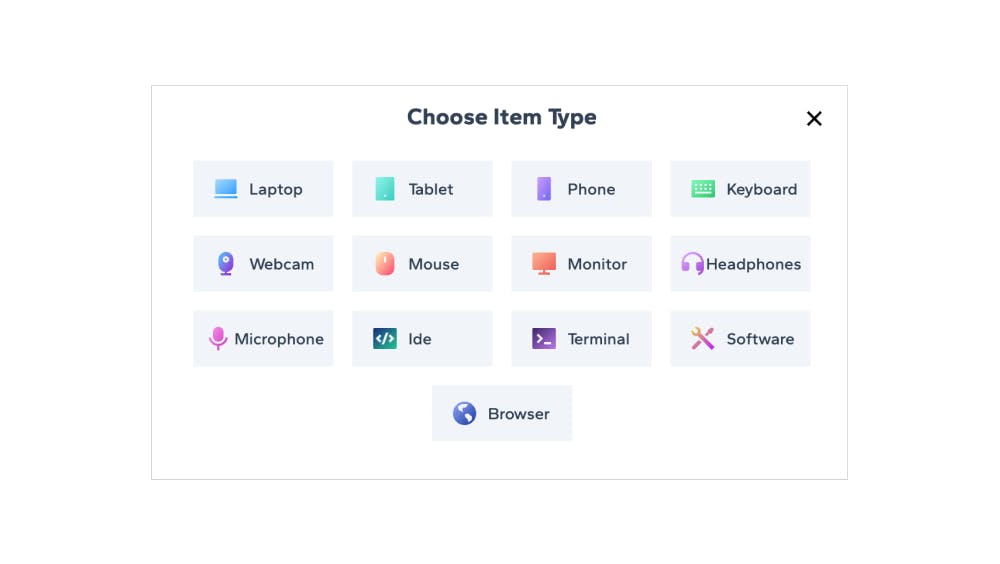
1. Multiple Collections
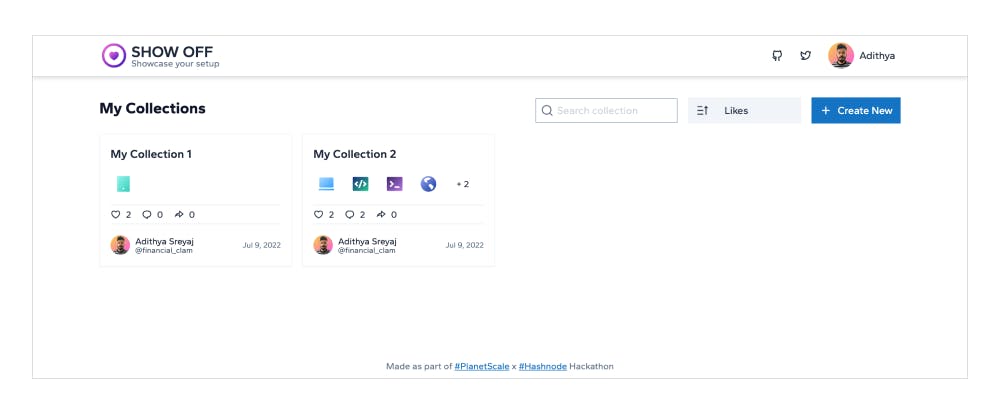
You can create multiple collections for different use cases. So for example as a developer, you can have a collection to showcase your laptop, keyboard, monitor, etc in a list. Then create another list to showcase different software that you use.
2. Built for developers, designers, and content creators
 Preset for common categories tailored for developers, designers, and content creators.
3. Share & Embed
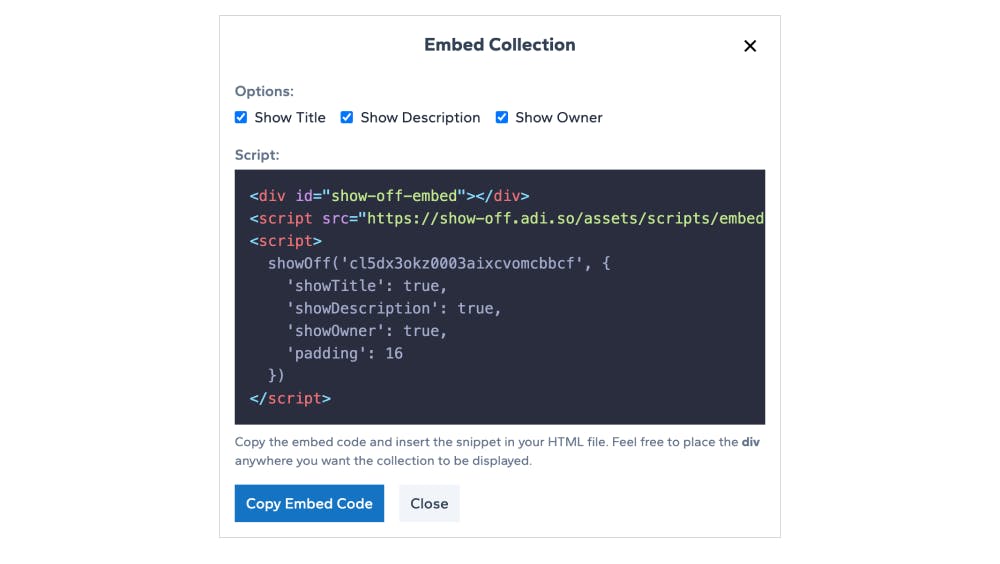
With the unique link that you get for your collection, you can use it to share on social media. There is also a way to embed the collection into your personal website or portfolio.
Clicking on share, will give two more options, one to copy the collection link or to directly share to Twitter.
4. Private collections
Ability to mark a collection as private and when you are ready to add items, you can open up the visibility to make it public.
5. Like and Comments
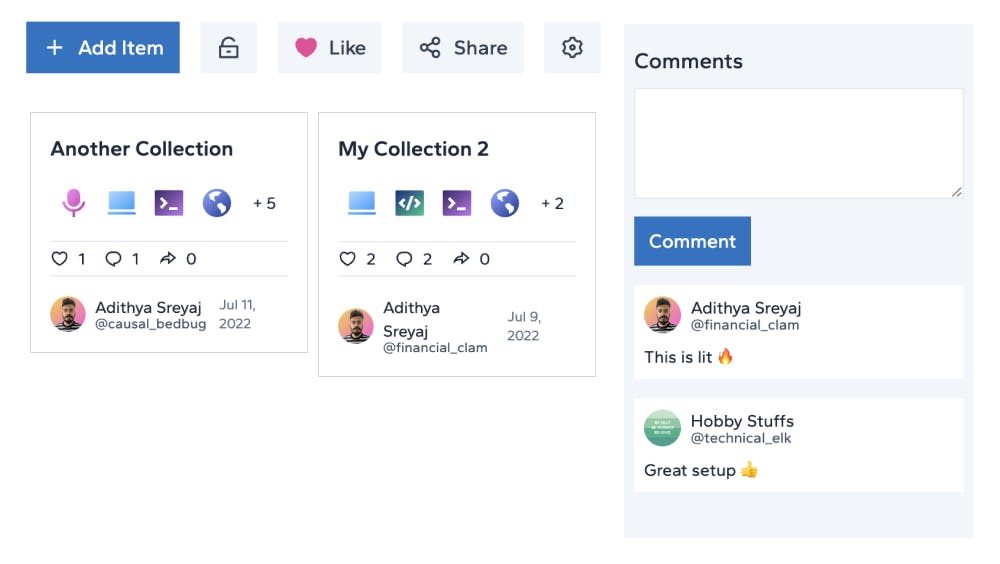
Users can comment and like the collection giving it more flare. Interact with your followers within the collection. Be in the spotlight if your collection gets more likes.
6. Recommendation Meter
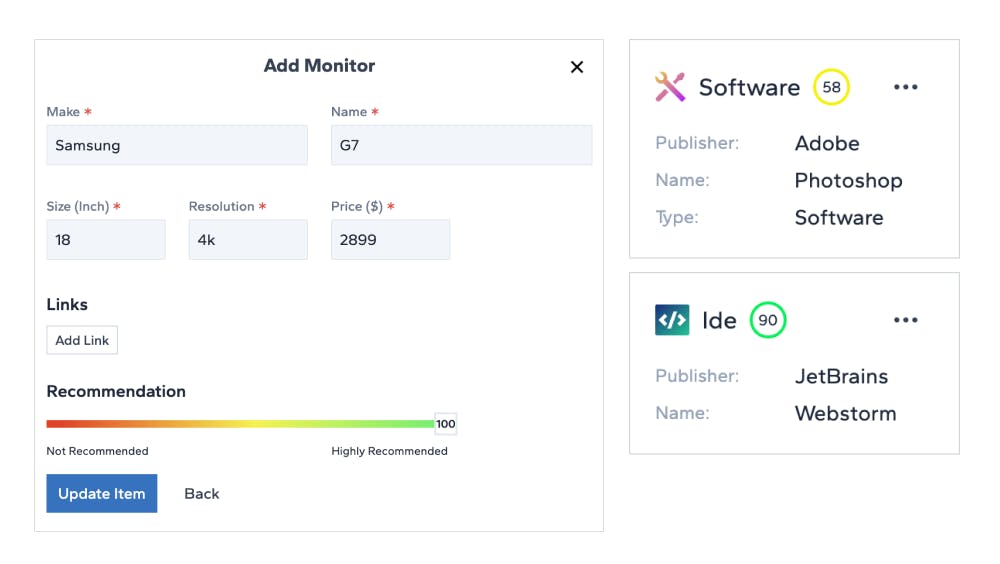
Love or hate a product that you use personally? Let your followers know how much you would recommend it. With the recommendation meter, you can do just that. This gives them the idea of how good the gadget/software/item is.
7. Affiliate Links
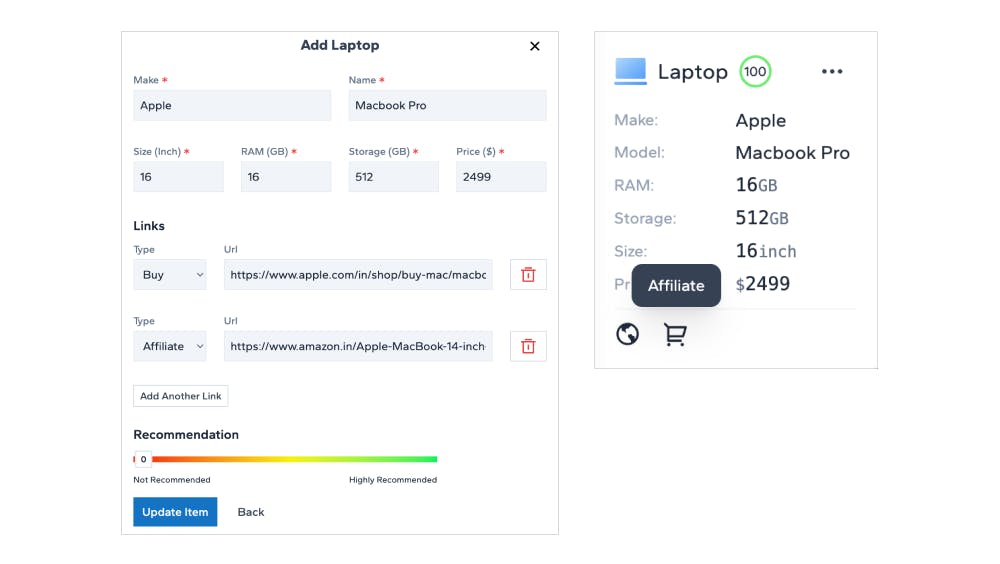
With each item, there is an option to add multiple links. Which includes affiliate links as well. Those who have affiliate accounts with a marketplace like Amazon, Flipkart, etc can add the affiliate links for the item. This helps you earn additional income when someone purchases the item using your affiliate link.
You can always use a normal link type and add an affiliate link instead, but it's always a good practice to let the user know that the link you add is an affiliate link. If you choose the right type, they will be able to see that its affiliate link gives the user full disclosure.
Other features in the pipeline
- Custome item types
- Image uploads where users can share their setup images and others
Tech Stack

Front-end
The UI is built using the latest and greatest Angular v14. And the best thing is that all the components, directives, pipes, etc are standalone.
Standalone components were one of the most hyped features of v14 and I really enjoyed my time without modules in Angular.
Since the concept of standalone components is fairly new, I am pretty confident that this application will serve as an example for folks trying out standalone components as there aren't many open source angular applications at the time of writing this article.
As always styling is TaliwindCSS all the way. I have created a UI library called ZigZag that is built with TailwindCSS that I used in this project. I had a chance to migrate most of the components in zigzag to standalone as well.
Back-end
My back-end framework of choice is NestJs as it goes very well with Angular. Especially when you work in an Nx monorepo. Things are so inline that you have very less context switching between the UI and Server code.
GraphQL is used which makes things even better. And for the database, Planetscale is used obviously paired with Prisma. More about it in a dedicated section as there are a few things I noticed when working with Planetscale and Prisma that I would like to elaborate on.
Planetscale + Prisma = 🔥
Deployment
My go-to for deploying the UI is Vercel. When it comes to the server, the repo has Github Actions integrated which automatically builds the server and sends the code to a remote Ubuntu instance.
In Depth: UI
When it comes to the UI, as I have mentioned, all the components are standalone. With standalone components, we don't have to declare them in a NgModule. All the dependencies are imported inside the @Component itself.
@Component({
  selector: 'show-off-login',
  template: ``,
  styles: [],
  standalone: true, // <-- Mark as standalone
  changeDetection: ChangeDetectionStrategy.OnPush,
  imports: [ButtonComponent, ...FORM_COMPONENTS], // <-- Import deps
})
export class LoginComponent {}
The main thing that I noticed when working with standalone components is that the amount of boilerplate has reduced considerably. Also, I feel that it's more convenient at times. I'm not against modules though.
Another thing that is a rather big change was that I don't have an AppModule for the application. With standalone components, Angular introduced a new method that can bootstrap the application using a standalone component.
// main.ts
bootstrapApplication(AppComponent, {
  providers: [
    {
      provide: AUTH_CONFIG,
      useValue: {
        authURL: `${environment.apiURL}/api/auth`,
      },
    },
    {
      provide: CURRENT_USER,
      useFactory: (auth: AuthService) => auth.me(),
      deps: [AuthService],
    },
    importProvidersFrom(HttpClientModule), // <-- import from existing modules
   ]
});
And a look at my AppComponent
@Component({
  selector: 'show-off-root',
  template: `<router-outlet></router-outlet>`,
  standalone: true, // <-- standalone component
  imports: [RouterModule],
})
export class AppComponent {
  constructor(private readonly authService: AuthService) {
    authService.init().pipe(take(1)).subscribe();
  }
}
Another change to note is the way we do lazy loading in routes.
export const COLLECTION_ROUTES: Routes = [
  {
    path: '',
    pathMatch: 'full',
    title: 'Home | Show Off', // <-- directly update title
    data: {
      context: CollectionPageContext.Home,
      header: {
        text: 'Home',
      },
    },
    loadComponent: () => // <-- new `loadComponent` method
      import('./components/collections.component').then(
        (m) => m.CollectionsComponent
      ),
  }
]
What are the major changes I noticed when working with Angular v14 (w/ standalone components).
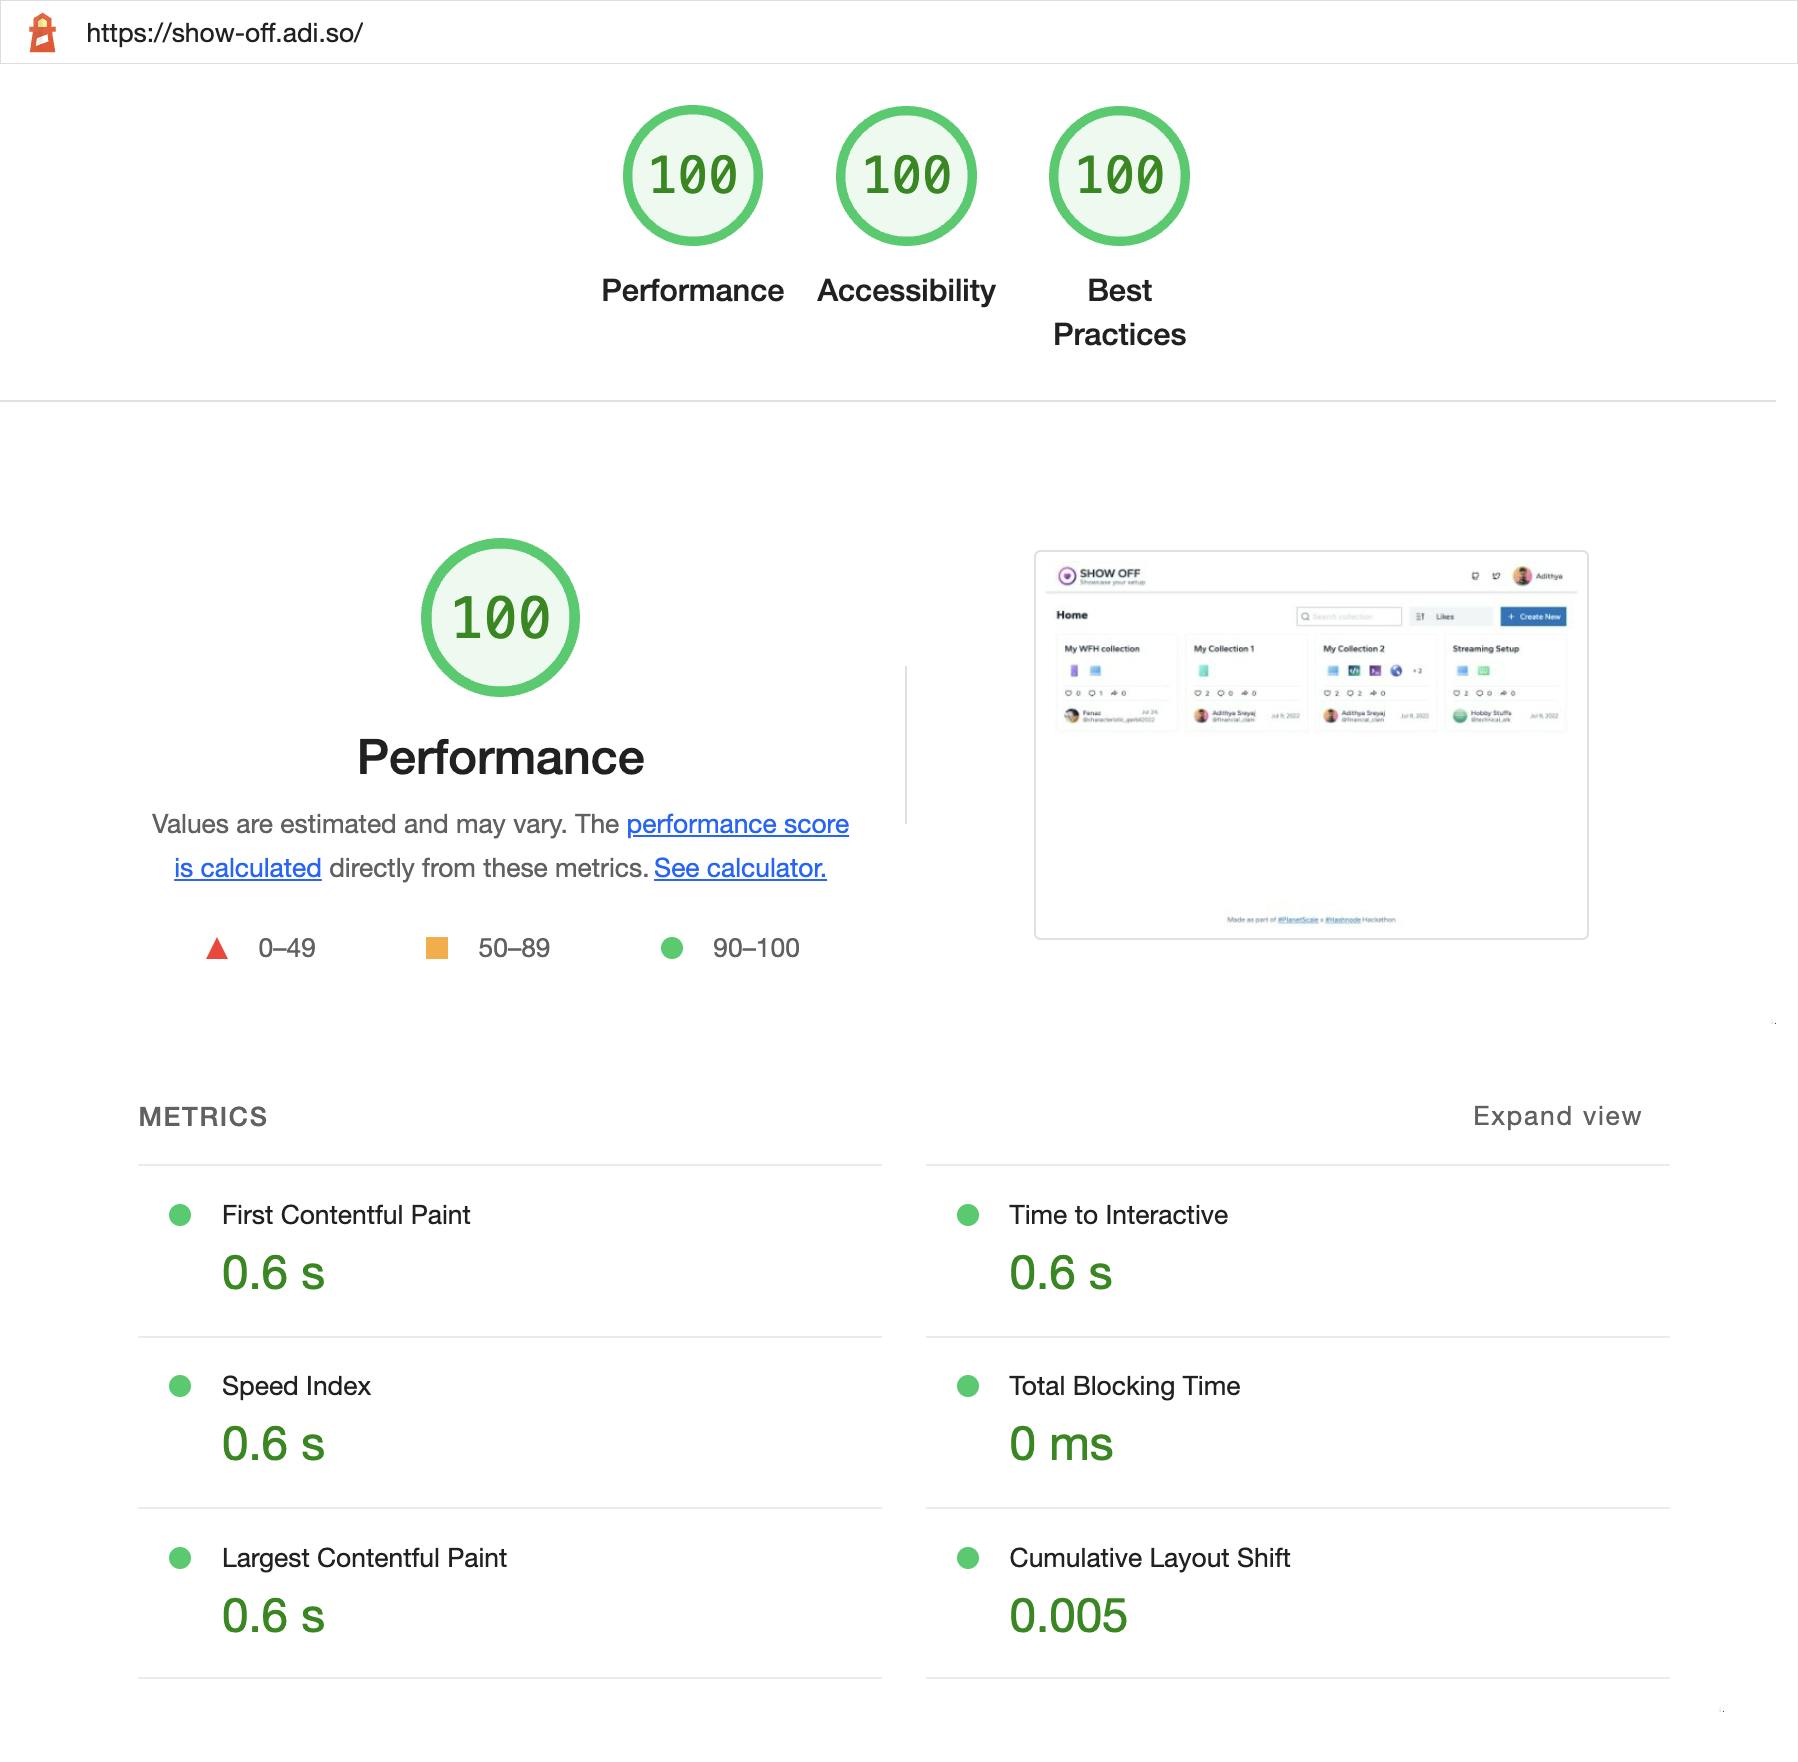
Attaching lighthouse report run on the deployed app:
Embed Feature
One of the most striking features of Show Off is the embed feature where users can embed a collection into their website or portfolio by just copy-pasting the snippet generated from the application.
This was something that I haven't done before, so was really interesting to get this functionality working. The below section is actually what an embedded collection would look like.
It renders an iframe under the hood. You can inspect the below section and see that it's just an iframe:
<iframe width="100%" height="600px" src="https://show-off.adi.so/embed/cl5dx3okz0003aixcvomcbbcf"></iframe>
Here how the embed script looks like:
function showOff(collectionId, opts) {
  if (!collectionId) {
    throw new Error('showOff: collectionId is required');
  }
  const iframe = document.createElement('iframe');
  iframe.src = constructIframeSrc(collectionId, opts);
  iframe.width = opts?.width ?? '100%';
  iframe.height = opts?.height ?? '500px';
  iframe.frameBorder = '0';
  iframe.scrolling = '0';
  iframe.style.border = 'none';
  document.getElementById('show-off-embed').appendChild(iframe);
}

function constructIframeSrc(collectionId, opts) {
  const queryParams = {
    showTitle: opts?.showTitle ?? 'true',
    showDescription: opts?.showDescription ?? 'true',
    showOwner: opts?.showOwner ?? 'true',
    padding: opts?.padding ?? '16',
  };
  let baseUrl = new URL(`https://show-off.adi.so/embed/${collectionId}`);
  Object.keys(queryParams).forEach((key) => {
    baseUrl.searchParams.append(key, queryParams[key]);
  });

  return baseUrl.href;
}
What the script does is that it creates an iframe and then loads the /embed/<collection_id> route.
Embed Code Display
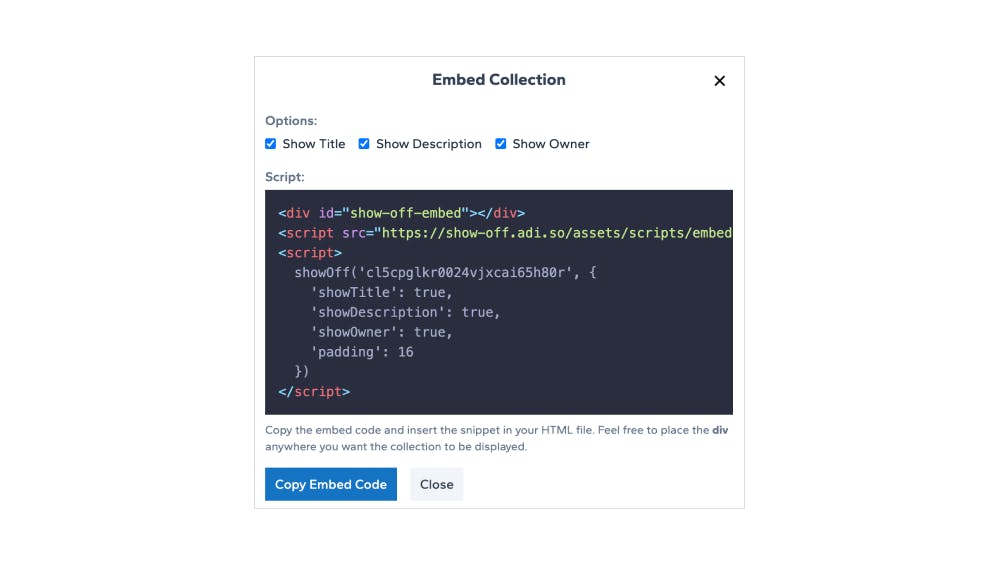
Embed code that is displayed on the application has syntax highlighting for the embed snippet. The syntax highlighting is powered by Shiki
Here's what the code looks like in UI:
shiki.setCDN('https://unpkg.com/shiki/'); // <-- Don't miss this
this.highlighter = await shiki.getHighlighter({
   theme: 'material-palenight', // <-- Load a theme
   langs: ['html'], // <-- Load only HTML lang
});
this.code.nativeElement.innerHTML = this.highlighter.codeToHtml(script ?? '', {
        lang: 'html',
})
Zigzag - UI library
Zigzag is a very small UI component library that I built with Angular and TailwindCSS. It contains a few basic sets of components:
- Button
- Modal
- Dropdown
- Tooltip
- Form Components
It's not packaged as an npm library yet, so I use Git Submodule to load the repo into the main project repo.
More about zigzag and how to use it here:
In Depth: Back-end
NestJs is a back-end framework for building server-side applications. It plays very well with Angular as it shares a lot of concepts. And everything inside an Nx monorepo makes it even better.
I've been using GraphQL lately and totally love it. Mainly because I get instant documentation of my queries and mutations. Setting up GraphQL is a bit of a pain, but once you set it up, things are easy. NestJs has support for GraphQL using the official plugins.
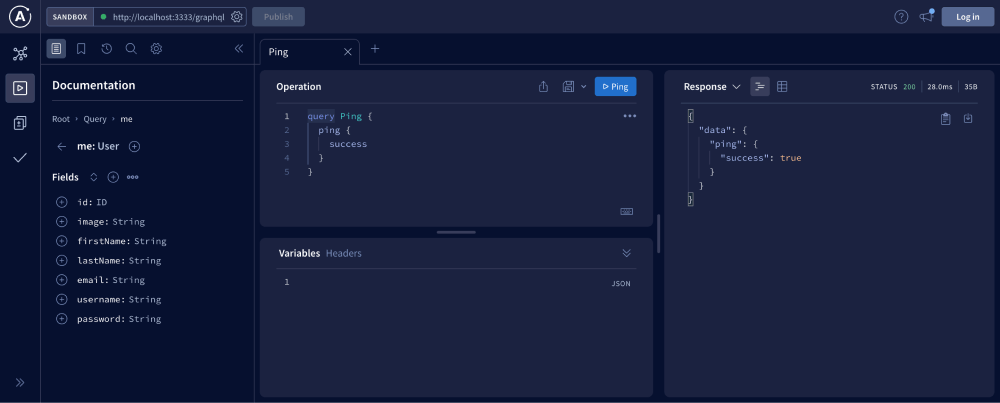
NestJs supports both schema-first and code-first approaches. I've used the Schema first approach here. For querying and testing everything, Apollo Sandbox provides a great interface. You'll be able to see the schema and all the queries and mutations and test them with ease.
You can enable Apollo sandbox in NestJs by making these changes:
// app.module.ts
import { ApolloServerPluginLandingPageLocalDefault } from 'apollo-server-core';

@Module({
  imports: [
    GraphQLModule.forRootAsync<ApolloDriverConfig>({
      driver: ApolloDriver,
      useFactory: (configService: ConfigService) => {
        const isProd = configService.get('NODE_ENV') === 'production';
        return {
         ...
          playground: false, // <-- default playground disabled
          plugins: [
            ApolloServerPluginLandingPageLocalDefault({ // <-- use apollo sandbox plugin
              embed: true,
            }),
          ],
        };
      },
    }),
  ],
})
export class AppModule {}
Once this is done, I faced some issues because of the Content Security Policies as I was using helmet, so I had to update them in the main.ts file:
// main.ts
  const devContentSecurityPolicy: ContentSecurityPolicyOptions = {
    directives: {
      manifestSrc: ["'self'", '*.cdn.apollographql.com'],
      scriptSrc: ["'self'", "'unsafe-inline'", '*.cdn.apollographql.com'],
      frameSrc: ["'self'", '*.embed.apollographql.com'],
      imgSrc: ["'self'", 'data:', '*.cdn.apollographql.com'],
    },
  };

  app.use(
    helmet({
      // when undefined it will load the default option: https://github.com/graphql/graphql-playground/issues/1283#issuecomment-723705276
      contentSecurityPolicy: isProd ? undefined : devContentSecurityPolicy,
      crossOriginEmbedderPolicy: false,
    })
  );
Authentication is done using Google and Github OAuth right now. Username & password based auth is not set up right now. Authentication flow is taken care of by Passport.
Auth-related code can be found: github.com/adisreyaj/show-off/tree/main/lib..
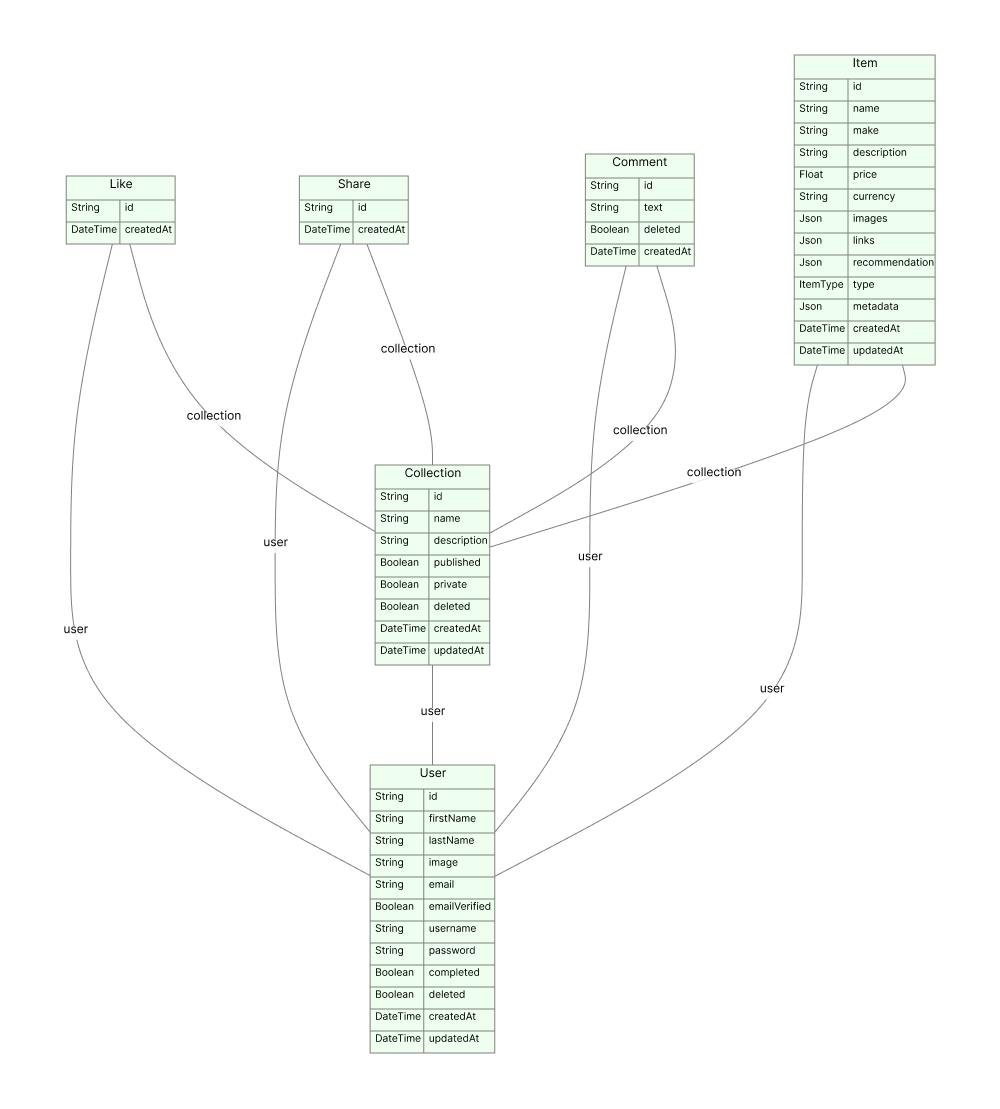
Here's what the entities look like:
In Depth: Database
For databases, my primary choice is always Postgres or MySQL mainly because I love Prisma so much. So my go-to for ORM is Prisma. PlanetScale is a MySQL-compatible database platform. I've been following PlanetScale for a long time and was really impressed with what they do.
Databases are always difficult to architect, scaling, backups, etc are always crucial for any application. I used to set up Postgres or MySQL in a docker container on my Ubuntu instance and pray to god that nothing goes wrong.
With Planetscale you leave everything related to a database like scaling, downtimes, backups, etc. One of the most interesting features that you get is database branching 🤯
I have to admit that I really liked how you can test out schema changes to your table in a separate branch. And once you are comfortable with the changes, you can merge them into the main branch.
I've used the Prisma Full-text Search for searching with collections.
To set it up we make the following changes in schema.prisma file:
generator client {
  provider        = "prisma-client-js"
  // add `fullTextSearch` and  `fullTextIndex`
  previewFeatures = ["referentialIntegrity", "fullTextSearch", "fullTextIndex"]
}

datasource db {
  provider             = "mysql"
  url                  = env("DATABASE_URL")
  referentialIntegrity = "prisma"
}

model Collection {
  id          String    @id @default(cuid())
  name        String
  description String
  user        User      @relation(fields: [userId], references: [id])
  userId      String
  likes       Like[]
  shares      Share[]
  comments    Comment[]
  items       Item[]
  published   Boolean   @default(true)
  private     Boolean   @default(false)
  deleted     Boolean   @default(false)
  createdAt   DateTime  @default(now())
  updatedAt   DateTime  @updatedAt

  @@index([userId])
  @@fulltext([name]) // <-- add index
}
Prisma x PlanetScale
PlanetScale and Prisma work very well. I still remember the time when people started asking to support Prisma and PlanetScale finally did it. They made it really easy to use it with Prisma.
1. Create an account on PlanetScale.
They provide a free account to start with generous limits.
2. Create a new Database
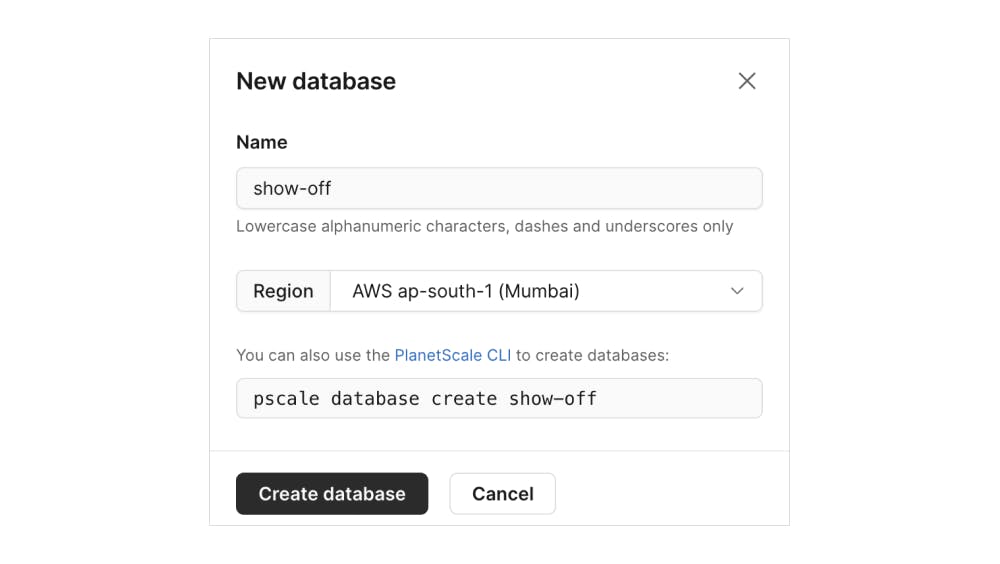
You can create a database from the web console or using their CLI which is a nice little tool to have. You can setup PlanetScale CLI by referring to the docs here: planetscale.com/docs/concepts/planetscale-e..
Once you have the CLI you need to authenticate:
pscale auth login
and then create a database
pscale database create <name>
Note: When selecting the location, make sure to select a region near to where your server is hosted. In my case, I did a mistake in one of my previous projects where I selected a region very far from where my server was hosted. This caused latency issues as it takes time for the communication between the server and the DB itself.
3. Connecting to Database
PlanetScale gives a list of options that you can use to connect to the database. In our case, we need to connect with Prisma, so we select Prisma from the dropdown. This gives us the connection string, that we can use with Prisma.
We can then add the DATABASE_URL in the .env file:
DATABASE_URL=mysql://<username>:<password>@<subdomain>.psdb.cloud/show-off?sslaccept=strict
You can set this environment variable for when the server is deployed. For local workflow, the easiest way to set up the connection is using the PlanetScale CLI.
pscale connect <databast-name> <branch-name> --port 3309
This will create a tunnel to your localhost, so you can use the following connection string:
DATABASE_URL=mysql://localhost:3309/<db-name>
Note: The --port 3309 is not required, by default it will run on 3306
4. Prisma configuration
There is a slight change in the way we configure Prisma when using PlanetScale:
generator client {
  provider        = "prisma-client-js"
  previewFeatures = ["referentialIntegrity"]
}

datasource db {
  provider             = "mysql"
  url                  = env("DATABASE_URL")
  referentialIntegrity = "prisma"
}
The main thing to note here is that we add the referentialIntegrity under preview features and also set the referentialIntegrity type to prisma
Here's the official documentation on how to get started with PlanetScale and Prisma
Read more about referential integrity.
Note: With PlanetScale, the way we handle migrations is different.
Prisma has a prisma migrate command that does the schema diff and generates the corresponding migration scripts. But with PlanetScale, the way we do this is different.
Migrations and PlanetScale
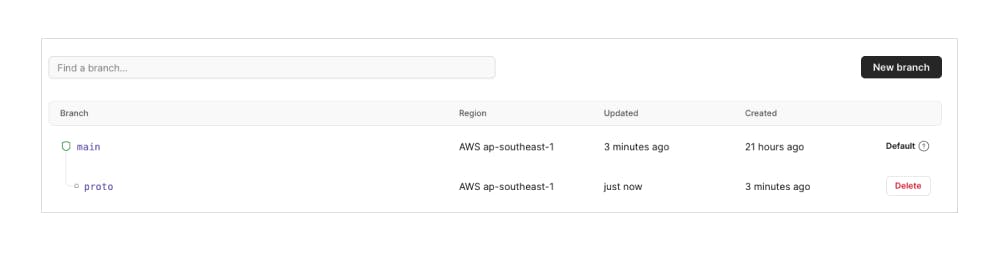
When we make a change to the schema, we start by creating a development branch in PlanetScale:
pscale branch create <db-name> <branch-name>
Once the branch is connected, go ahead and close the connection and connect to the new branch that we created:
pscale connect <databast-name> <branch-name> --port 3309
Note: You can also create a branch from the web console. Once the branch is created you'll have to copy the connection string and use that instead of the main branch connection string in the .env file. This is why I would recommend using the PlanetScale CLI as you don't have to keep on updating your .env file with a new connection string when working on big changes to the schema. What you do is just stop the connection to the main branch and instead connect to the new branch we created.
Once changes are made we push the changes to the DB using the following command:
prisma db push
This pushes the latest changes to the dev branch. When you are ready, we can create a Deploy Request to the production branch.
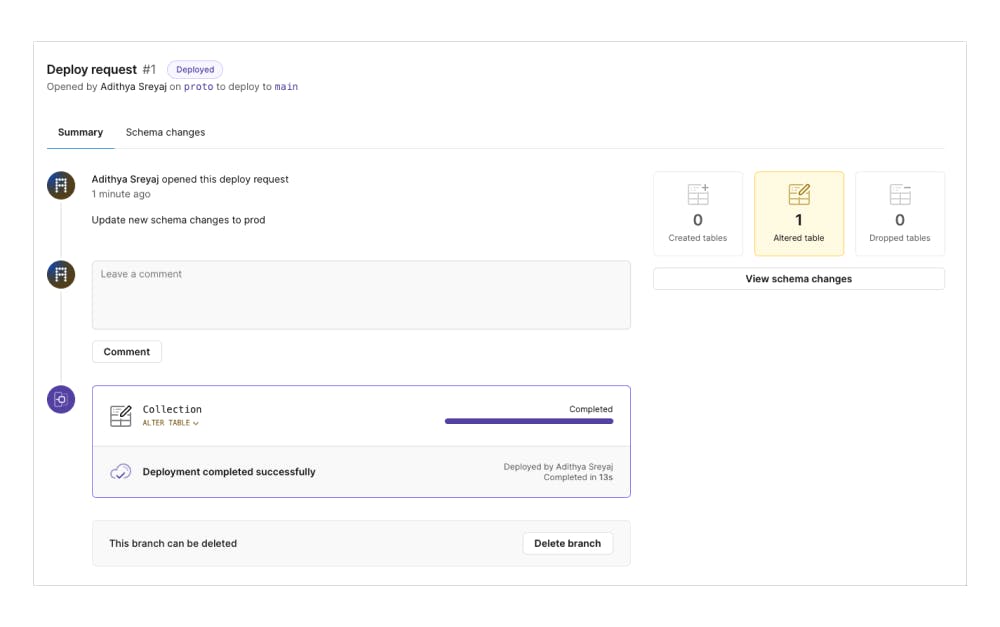
In the deploy request, we'll be able to see the schema changes. Once we are happy with the changes, the changes can be merged into the prod branch.
This is a really cool feature that gives you more power to prototype and makes changes to the schema with confidence. They also provide Rollback functionality as well which gives you peace of mind.
In Depth: Deployment
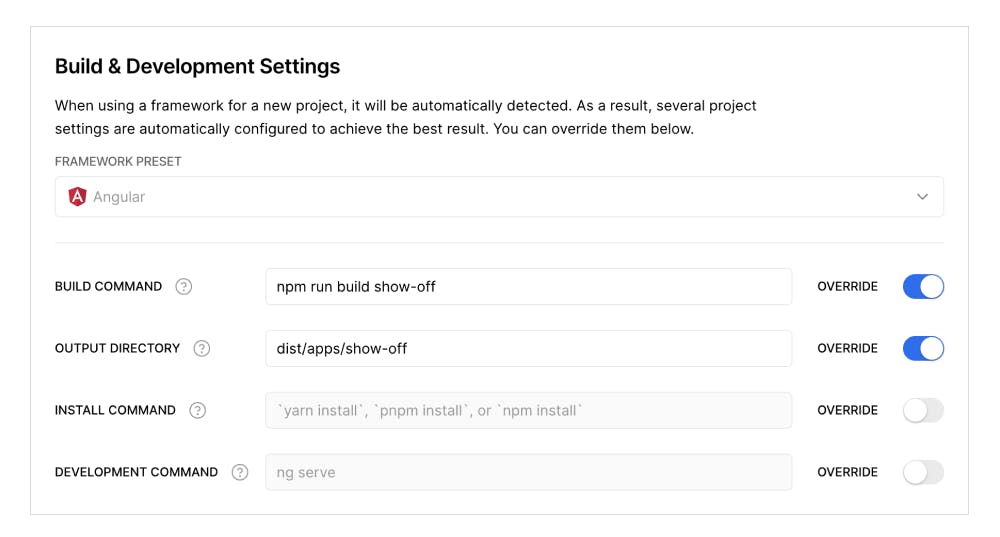
Deployment of the UI is very straightforward. Just push the code to git and it gets deployed to Vercel. So nothing to do there. Here's what the deployment setting in Vercel looks like for those who wonder.
When it comes to back-end deployment, Here's how things are done.
- Code pushed to GitHub.
- Github Actions run the build script.
- Copy the
.graphqlfiles to thedistdirectory. - Dist artifacts are then packaged into a
.tar.gzfile. - The
.tar.gzfile is sent to a remote server usingrsync - SSH into the remote server
- The packaged bundle is extracted into a folder.
- Install all the dependencies
- PM2 is used to run the server
The server port is then pointed to a subdomain using Nginx. I always refer to my article on setting up Nginx and port forwarding to a subdomain with SSL.
You can see that the API calls for the app are made to https://show-off-api.adi.so
Monitoring the server is easy, thanks to PM2:

Coding Practices
✅ Linting: ESLint
✅ Code formatting: Prettier
✅ And commit messages are following Conventional Commits enforced using Husky
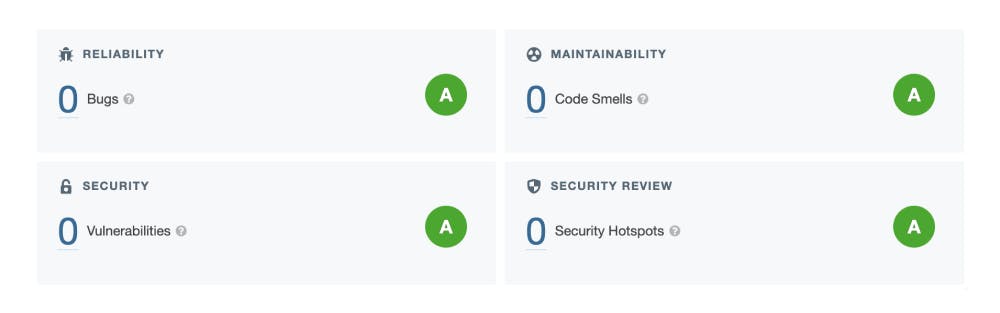
✅ Code Quality: SonarCloud See Project
- ✅ Code Vulnerabilities: Snyk

Running Locally 💻
#1. Clone the repo
git clone https://github.com/adisreyaj/show-off.git
#2. Initialize the submodule (zigzag)
git submodule update --init
#3. Install the dependencies
npm install
#4. Install Peer deps for zigzag
npm i @floating-ui/dom
#5. Setup the environment variables
Set up all the required environment variables required for the back-end:
DATABASE_URL=mysql://localhost:3309/show-off

NODE_ENV=development
FRONT_END_CALLBACK_URL=http://localhost:4200/auth/callback

# JWT sign secret
JWT_SECRET=very_very_strong_secret_key
JWT_EXPIRY="3d"
COOKIE_SECRET=very_very_strong_secret_session_key

# Google OAuth Details
GOOGLE_CLIENT_ID=xxxxx.googleusercontent.com
GOOGLE_CLIENT_SECRET=xxxxxxx
GOOGLE_CALLBACK_URI=http://localhost:3333/api/auth/google/callback

# Github OAuth Details
GITHUB_CLIENT_ID=Iv1.xxxxxxxxxx
GITHUB_CLIENT_SECRET=xxxxxx
GITHUB_CALLBACK_URI=http://localhost:3333/api/auth/github/callback
#6. Set up the Database
Run the command to populate the DB with tables:
npm run prisma:push
#7. Start up the UI and Back-end
For UI:
npm start show-off
For Back-end
npm start api
UI: http://localhost:4200 & GQL: http://localhost:3333
Links and References 🔗
| Title | Link | Description |
| Angular | angular.io | Front-end framework |
| NestJs | docs.nestjs.com | Back-end framework based on NodeJs |
| PlanetScale | planetscale.com | MySQL Compatible DB |
| Prisma | prisma.io | Node.js and TypeScript ORM |
| Tailwind CSS | tailwindcss.com | Utility first CSS framework |
| Nx | nx.dev/#getting-started | Build system with monorepo support |
| PM2 | app.pm2.io | Advanced, production process manager for Node.JS |
Code and Demo 💫
Link: show-off.adi.so
Github: github.com/adisreyaj/show-off
Connect with me
Do add your thoughts or if you have any questions, shoot'em below in the comments. Stay Safe ❤️
