

How I dynamically updated the Title and Meta Tags in my Angular application

Full stack web developer with main focus in Angular and NodeJs. Loves creating blogs, a side projects when I can find time.
Title and meta tags are really important for any web app or website. The title gives the user an idea about the page itself and also the title is what is shown on the tab bar of the browser. So providing meaningful titles is good UX.
Angular being a SPA (Single Page Application) and so the title and meta tags are not managed automatically since there is only one single HTML for the whole application.
Title and Meta Services
Angular comes with few services that can be used to manipulate the title and meta tags with ease.
Updating the page title
The Title service that is exposed by Angular Platform Browser can be used to update the Page title. The service exposes two basic functions, one for updating the title and the other one for getting the existing title value.
More info here: https://angular.io/api/platform-browser/Title
Here is how you use it. Since it is a service, it's as simple as injecting the service into the component constructor and using the functions.
import { Component, OnInit } from "@angular/core";
import { Title } from "@angular/platform-browser";
@Component({
  selector: "app-products",
  templateUrl: "./products.component.html",
  styleUrls: ["./products.component.css"]
})
export class ProductsComponent implements OnInit {
  constructor(private title: Title) {} // <-- Inject the service

  ngOnInit() {
    this.title.setTitle("Product Page - This is the product page"); // <-- Update the title
  }
}
Updating the meta tags
The Meta service that is exposed by Angular Platform Browser can be used to update the Meta attributes like description, feature image, theme colors, and more. There are a couple of functions that are exposed by the service like:
- addTag
- addTags
- getTag
- getTags
- updateTag
- removeTag
- removeTagElement
More info here: https://angular.io/api/platform-browser/Meta
Here is how you use it. Since it is a service, it's as simple as injecting the service into the component constructor and using the functions.
import { Component, OnInit } from "@angular/core";
import { Meta } from "@angular/platform-browser";
@Component({
  selector: "app-products",
  templateUrl: "./products.component.html",
  styleUrls: ["./products.component.css"]
})
export class ProductsComponent implements OnInit {
  constructor(private meta: Meta) {} // <-- Inject the service

  ngOnInit() {
     this.meta.updateTag({
         name: 'description',
         content: 'This is the description'
     });
  }
}
Before
As you can see all the tab names are the same even though the user in different pages and there is no way someone can make sense of which page those tabs are.
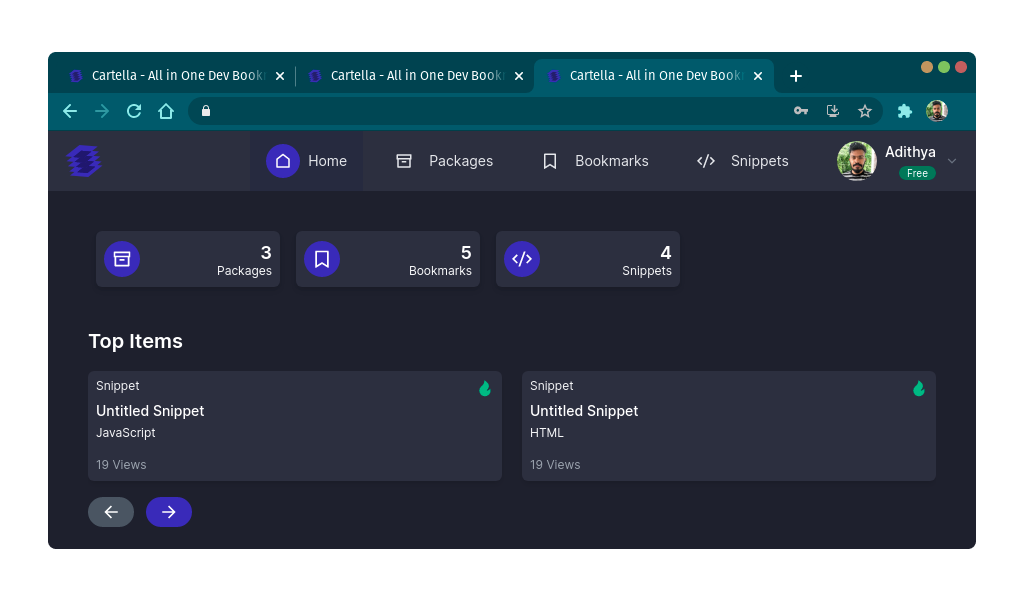 Most of us would simply not do this while writing applications in Angular, but this should be done so that the user can distinguish each page.
After
If there are 4 tabs open of our angular application, before this all would have the same title even though the user is on different pages and can be confusing (see image above).
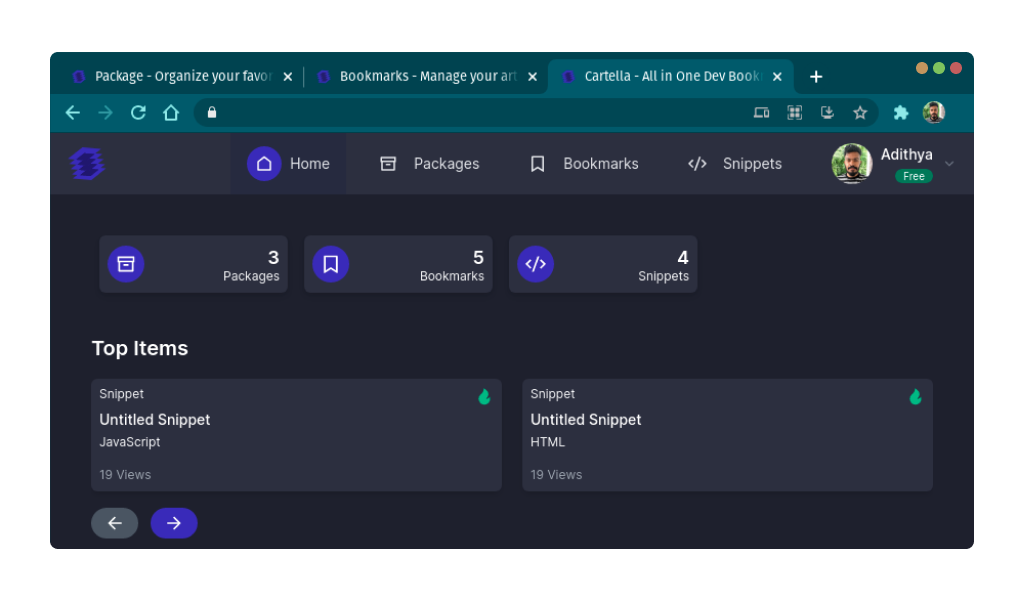 After you add proper titles, the tabs are easily distinguishable.
Dynamically updating title and meta tags
There are multiple ways to update the title and meta tags on navigation. There is no hard and fast rule that we have to use one particular method to achieve this. But there is this one method that I found really interesting and is much cleaner than most of the solutions out there.
Approach 1 - Using Router Data
So I talked about multiple approaches being possible to achieve this, so here we are going to use a clean way by making use of Router data. The data property accepts an object which will be injected into the route and can be later accessed from the router.
Create the Meta Service
We can create a service that can help us in updating the title and the meta tags. In this way, we are isolating the logic which is more maintainable and changes can be easily incorporated later.
import { Injectable } from '@angular/core';
import { Meta, Title } from '@angular/platform-browser';

@Injectable({
  providedIn: 'root',
})
export class MetaService {
  constructor(private title: Title, private meta: Meta) {}

  updateTitle(title: string) {
    if (title) {
      this.title.setTitle(title);
    }
  }

  updateDescription(description: string) {
    if (description) {
      this.meta.updateTag({ name: 'description', content: description });
    }
  }
}
Specify the data for routes
import { NgModule } from "@angular/core";
import { CommonModule } from "@angular/common";
import { Route, RouterModule } from "@angular/router";
import { AboutComponent } from "./about/about.component";
import { ProductsComponent } from "./products/products.component";
const routes: Route[] = [
  {
    path: "about",
    component: AboutComponent,
    data: {
      title: "About Page - Know our team",
      description: "Welcome to the about page of the application"
    }
  },
  {
    path: "product",
    component: ProductsComponent,
    data: {
      title: "Products - Find the latest and hottest products",
      description: "Welcome to the product page of the application"
    }
  }
];

@NgModule({
  imports: [CommonModule, RouterModule.forRoot(routes)],
  exports: [RouterModule]
})
export class AppRoutingModule {}
Listen to route events and update the title
Now you can listen to the router events and based on the route update the meta tags and title like shown below. Make sure to include this in your root component.
import { Component, OnInit } from '@angular/core';
import { ActivatedRoute, Data, NavigationEnd, Router } from '@angular/router';
import { MetaService } from '@app/services/meta/meta.service';
import { filter, map, mergeMap } from 'rxjs/operators';
@Component({
  selector: 'app-root',
  templateUrl: './app.component.html',
  styleUrls: ['./app.component.scss'],
})
export class AppComponent implements OnInit {
  constructor(
    private router: Router,
    private activatedRoute: ActivatedRoute,
    private metaService: MetaService
  ) {}
  ngOnInit(): void {
    this.router.events
      .pipe(
        filter((event) => event instanceof NavigationEnd),
        map(() => this.activatedRoute),
        map((route) => {
          while (route.firstChild) {
            route = route.firstChild;
          }
          return route;
        }),
        filter((route) => route.outlet === 'primary'),
        mergeMap((route) => route.data),
        tap(({title,description}: Data) => {
           this.metaService.updateTitle(title);
           this.metaService.updateDescription(description);
         })
      ).subscribe();
  }
}
Also, make sure to unsubscribe on component destruction.
Approach 2 - Managing separate configuration
In this approach, we manage a separate config file to specify all the metadata in a single file.
Meta config file
We have to specify the metadata with the route as the key
export const META_INFO = {
  "/about": {
    title: "About Page - Know our team",
    description: "Welcome to the about page of the application"
  },
  "/product": {
    title: "Products - Find the latest and hottest products",
    description: "Welcome to the product page of the application"
  }
};
Meta Service
We would create a single function to update all the meta in this approach rather than calling two different functions.
import { Injectable } from '@angular/core';
import { Meta, Title } from '@angular/platform-browser';
import { META_INFO } from './meta.config';

@Injectable({
  providedIn: 'root',
})
export class MetaService {
  constructor(private title: Title, private meta: Meta) {}

  updateMeta(route: string){
    if(Object.prototype.hasOwnProperty.call(META_INFO, route)){
      const {title, description} = META_INFO[route];
      this.updateTitle(title);
      this.updateDescription(description)
    }
  }

  updateTitle(title: string) {
    if (title) {
      this.title.setTitle(title);
    }
  }

  updateDescription(description: string) {
    if (description) {
      this.meta.updateTag({ name: 'description', content: description });
    }
  }
}
Listen to router event
There is a slight change in how we listen to the router and update the meta when compared to the previous approach:
import { Component, OnInit } from '@angular/core';
import { ActivatedRoute, Data, NavigationEnd, Router } from '@angular/router';
import { MetaService } from '@app/services/meta/meta.service';
import { filter, map, mergeMap } from 'rxjs/operators';
@Component({
  selector: 'app-root',
  templateUrl: './app.component.html',
  styleUrls: ['./app.component.scss'],
})
export class AppComponent implements OnInit {
  constructor(
    private router: Router,
    private activatedRoute: ActivatedRoute,
    private metaService: MetaService
  ) {}
  ngOnInit(): void {
      this.router.events
          .pipe(
             filter(event => event instanceof NavigationEnd),
             pluck('urlAfterRedirects'),
             tap((data: string)=> this.meta.updateMeta(data))
         ).subscribe();
  }
}
These are some of the ways in which you can dynamically update the title and meta tags in your Angular application. You can always add more meta tags in this way.
Hope you liked the article! Comment down your thought on these two approaches and which one would you go for.
🌎 Connect with me

Do add your thoughts in the comments section. Stay Safe ❤️


