

How To Implement Heatmap In Tables Using Directives In Angular

Full stack web developer with main focus in Angular and NodeJs. Loves creating blogs, a side projects when I can find time.
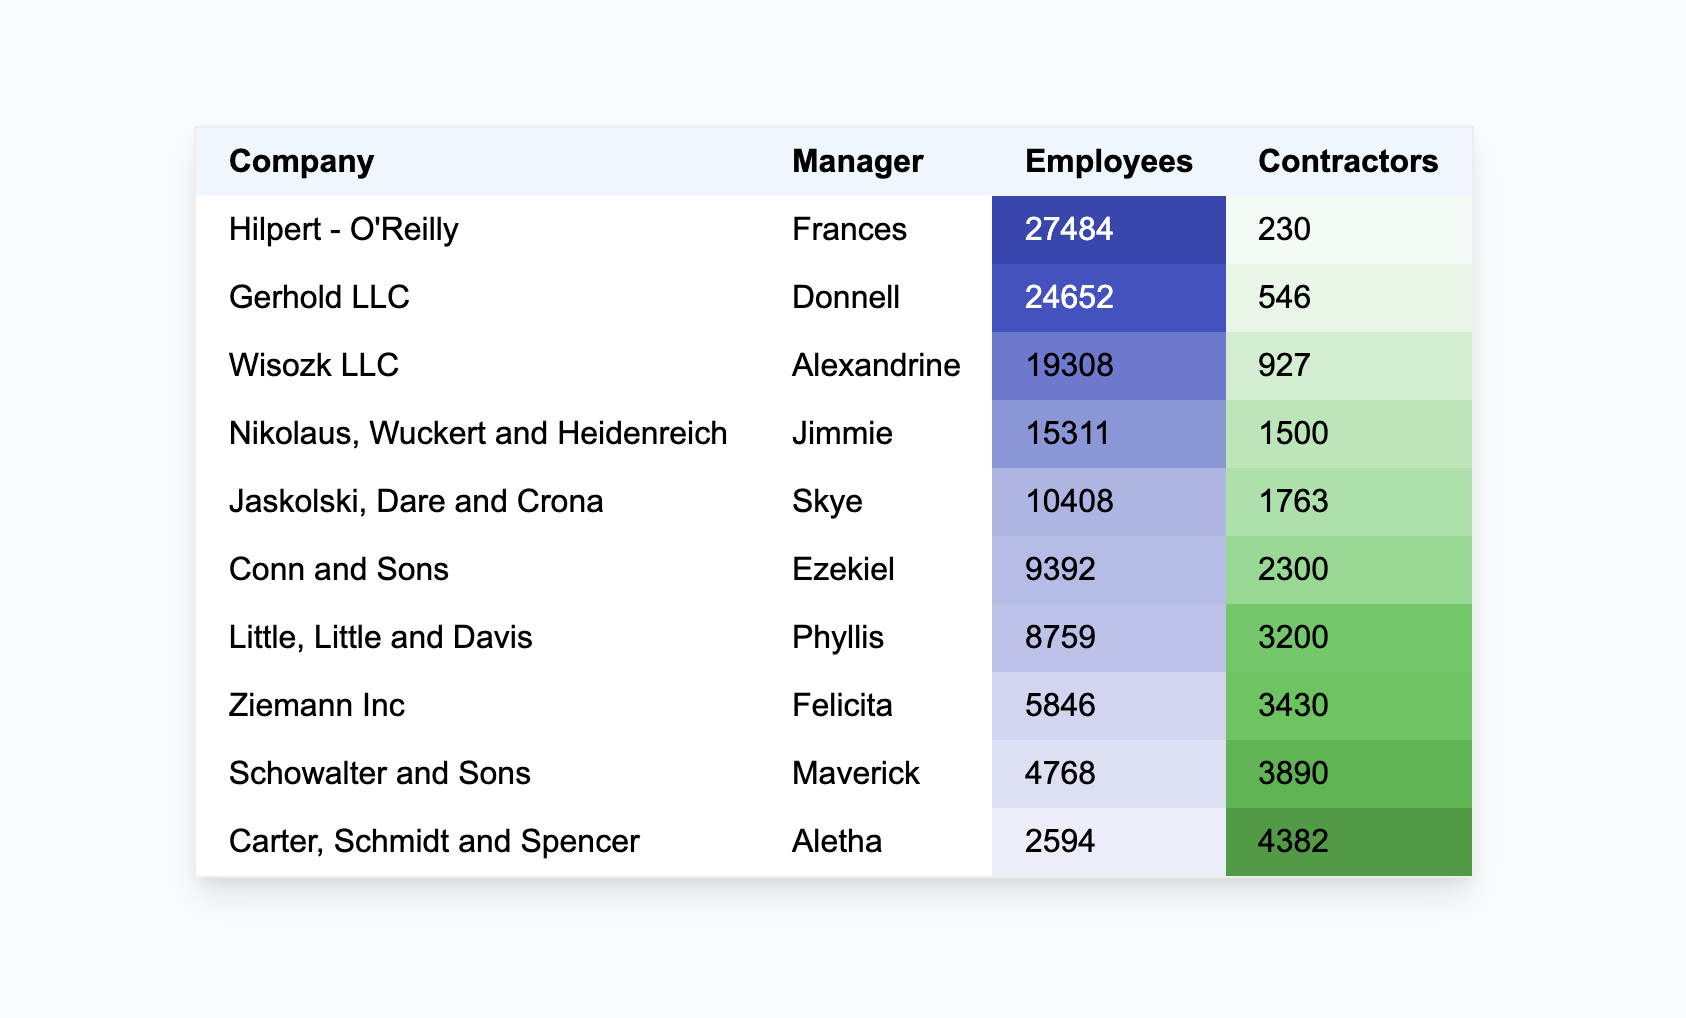
Let's see how easy it is to add heatmaps to tables in Angular using Directives. We'll go for a really simple and elegant solution to have separate heatmap colors to different columns in the table.
As I always say, Directives are a really powerful feature of Angular. It can be used as an elegant solution to implement a lot of cool functionalities. You can clearly see why the directive approach makes more sense when you reach the end of the post.
Heatmaps in table
Even though it's not that often we see heatmaps in tables, but heatmaps can really add some value in terms of visualization. It would make sense in data sets where there is some kind of comparison or range.
Why Directives?
If you have this question in mind, here are some reasons which justify why creating a directive for implementing this feature will make sense. The logic can be completely moved outside of the component, making it simpler and leaner. If the logic is separated from the component, that means it's more reusable. When something is built in a re-usable manner, it will be easy to scale and maintain.
Heatmap Logic
For implementing this functionality let's look at what exactly needs to be done here. So basically, heatmaps give the user idea of the magnitude of something by variation in color or hue.
So If we have a set of numbers:
[1,2,3,4,5,6,7,8,9,10]
Here based on the value we can manipulate the intensity of a color. Meaning 1 will be the lightest shade of the color and 10 will be the color itself. So we just need to map the values to the intensity of the colors here. We can also have the opposite condition as well.
There are different ways to implement this.
Using Alpha Channel
We can easily implement heatmaps using RGBA or HSLA by just changing the alpha channel meaning the transparency of the color.
I am not going with this approach as we are also trying to generate accessible text colors based on the background color. This will ensure the text will remain readable for all the color stops.
Using HSL Color Expression
Here I am gonna be using HSL color expression to easily get the right color for each value by manipulating the L (Lightness) parameter.
HSL is a really good way to express colors and manipulating the colors is very easy with it.
HSL stands for Hue Saturation Lightness and it can also have an Alpha channel with HSLA
So the idea here is to find the Lightness factor for each value. Here's how we can do it.
So here the original color value is first parsed to HSLA:
hsla(234, 77%, 46%, 1) --> Lightness = 46%
We have the min possible value for Lightness ie 0.46. So the highest value will have a lightness of 46% and for other values, it will be higher. When lightness increases it moves nearer to White.
Here is the formula:
const color = '#1b2dd0';
const [h,s,l,a] = parseHSLA(color); // <-- [234, 0.77,0.46,1]
const highestValue = 10;
const maxLightness = 1 - l; // <-- 1 - 0.46 = 0.54

const lightness = 1 - (value * maxLightness / highestValue);

// 1 --> 1 - (1 * 0.54 / 10) = (1 - 0.05) ~ 95%
// 5 --> 1 - (5 * 0.46 / 10) = (1 - 0.23) ~ 77%
// 10 -> 1 - (10 * 0.54 / 10) = (1 - 0.54) ~ 46%
Here 10 will be the lowest number and hence we need a very light color so 95% will make it very light.
Lightness % as it increases makes the color whiter.
 So now we have the logic in place, let's start with the directives!
Creating Heatmap Directives
So I mentioned "Directives" (plural) as we will be creating multiple directives for this functionality. To be specific 3 of them. Out of the 3, two of them are just for tagging the element and setting some metadata:
- Heatmap Table
- Heatmap Column
- Heatmap Cell
Here is how we will use the directives in the template:
<table heatMapTable>
  <tr>
    <th>Company</th>
    <th>Manager</th>
    <th [heatMapColumn]="options.employees"  id="employees">
        Employees
    </th>
    <th [heatMapColumn]="options.contractors" id="contractors">
        Contractors
    </th>
  </tr>
  <ng-container *ngFor="let item of data">
    <tr>
      <td>{{ item.company }}</td>
      <td>{{ item?.manager }}</td>
      <td [heatMapCell]="item.employees" id="employees">
         {{ item?.employees }}
      </td>
      <td [heatMapCell]="item.contractors" id="contractors">
        {{ item?.contractors }}
      </td>
    </tr>
  </ng-container>
</table>
Heatmap Cell Directive
@Directive({
  selector: '[heatMapCell]',
})
export class HeatmapCellDirective {
  @Input('heatMapCell')
  heatMap = 0;

  @Input('id')
  colId = null;

  constructor(public el: ElementRef<HTMLElement>) {}
}
We have an input to pass the value into the directive and also accept the id of the column to which the cell belongs in the table. We inject the ElementRef so that we can manipulate the element later.
Heatmap Column Directive
@Directive({
  selector: '[heatMapColumn]',
})
export class HeatmapColumnDirective {
  @Input('id')
  colId = null;

  @Input('heatMapColumn')
  options = {};
}
Here we can pass options for styling like the color etc and also the id of the column.
Heatmap Table Directive
This is the main directive where all the work is done. This directive is placed on the table. And the other directives are placed on the column and the cells.
Here we can see how we can access child directives from the parent directive using ContentChildren.
@Directive({
  selector: '[heatMapTable]',
})
export class HeatmapTableDirective implements AfterViewInit {
  @ContentChildren(HeatmapCellDirective, { descendants: true })
  heatMapCells: QueryList<HeatmapCellDirective>; // <-- Get all the cells
  @ContentChildren(HeatmapColumnDirective, { descendants: true })
  heatMapColumns: QueryList<HeatmapColumnDirective>; // <-- Get all the columns

  highestValues = {};
  cells: HeatmapCellDirective[] = [];
  columns: HeatmapColumnDirective[] = [];
  config = {};

  ngAfterViewInit() {
    this.cells = this.heatMapCells.toArray();
    this.columns = this.heatMapColumns.toArray();
    this.setOptions();
    this.calculateHighestValues();
    this.applyHeatMap();
  }

  private setOptions() {
    this.columns.forEach((col) => {
      this.config = {
        ...this.config,
        [col.colId]: col.options,
      };
    });
  }

  private calculateHighestValues() {
    return this.cells.forEach(({ colId, heatMap }) => {
      if (!Object.prototype.hasOwnProperty.call(this.highestValues, colId)) {
        this.highestValues[colId] = 0;
      }
      if (heatMap > this.highestValues?.[colId])
        this.highestValues[colId] = heatMap;
    });
  }

  private applyHeatMap() {
    this.cells.forEach((cell) => {
      const { bgColor, color } = this.getColor(cell.colId, cell.heatMap);
      if (bgColor) cell.el.nativeElement.style.backgroundColor = bgColor;
      if (color) cell.el.nativeElement.style.color = color;
    });
  }

  private getColor(id: string, value: number) {
    const color = this.config[id].color;
    let textColor = null;
    let bgColor = null;
    if (color != null) {
      const [h, s, l, a] = parseToHsla(color);
      const maxLightness = 1 - l;
      const percentage = (value * maxLightness) / this.highestValues[id];
      const lightness = +percentage.toFixed(3);
      bgColor = hsla(h, s, 1 - lightness, a);
      textColor = readableColor(bgColor);
    }
    return {
      bgColor,
      color: textColor,
    };
  }
Let me break down the code.
Get access to the cells and columns
We get access to the cells to which the heatmap needs to be applied:
@ContentChildren(HeatmapCellDirective, { descendants: true })
  heatMapCells: QueryList<HeatmapCellDirective>;
This heatMapCells variable will have the list of td to which the heatMapCell was applied. Make sure to set { descendants: true }.
Note: If true include all descendants of the element. If false then only query direct children of the element.
Save the options for each column
We can save the options provided for each column in an object. Currently, we are only configuring the color, but this object can be used for all kinds of different options for customizing the heatmap for each column.
config = {
    "employees": {
        "color": "#000fff"
    },
    "contractors": {
        "color": "#309c39"
    }
}
Calculate the Highest Value for each column
We can now calculate the highest value for each column and save it in an object with the colId as the key.
highestValues = {
   employees: 1239,
   contractors: 453
}
Applying the Heatmap styles
We can now loop through the cells and then apply backgroundColor and color to the cell. Since we have injected the ElementRef in the cell, we can use the el property to modify styles:
cell.el.nativeElement.style.backgroundColor = 'blue';
We have a helper function which finds the color for each cell based on the logic we have discussed above:
  private getColor(id: string, value: number) {
    const color = this.config[id].color;
    let textColor = null;
    let bgColor = null;
    if (color != null) {
      const [h, s, l, a] = parseToHsla(color);
      const maxLightness = 1 - l;
      const percentage = (value * maxLightness) / this.highestValues[id];
      const lightness = +percentage.toFixed(3);
      bgColor = hsla(h, s, 1 - lightness, a);
      textColor = readableColor(bgColor);
    }
    return {
      bgColor,
      color: textColor,
    };
  }
The color manipulation is done using a super simple library color2k which provides a lot of utilities to mess with colors.
We have used something called readableColor() which returns black or white for best contrast depending on the luminosity of the given color. This will make our heatmap more accessible.
Demo and Code
Final Thoughts
As you can see, there is not much code in the component. All the logic is beautifully handled inside the directive. The only complex stuff going on in the directive is finding the colors. Everything else is straightforward.
This is a very basic implementation and not perfect too. To make it better, we might have to add some validation and error handling as well. Also, this can be extended by providing more options like Ascending/Descending heatmaps, color ranges, positive and negative heatmaps, and more.
The whole idea of the blog post is to showcase how a directive can be used for implementing this feature.
Connect with me
Do add your thoughts in the comments section. Stay Safe ❤️