
Launching Flare ✨ - The twitter for developers we all have been wanting!
Netlify x Hashnode hackathon submission.

Full stack web developer with main focus in Angular and NodeJs. Loves creating blogs, a side projects when I can find time.
Flare is my take on a social network for developers. It's built entirely around the needs and interests of software developers. Flare is my entry for the Netlify x Hashnode Hackathon 🔥
TL;DR: Flare is a new kind of social networking site made especially for software developers. Twitter is a really great place where developers hang out and share insightful tweets. But there is something that is lacking there.
That's where Flare would fit in. It has more options for the developers to share their knowledge with the community. Like a dedicated code snippet editor, a terminal command editor, etc. No need to convert your code into a screenshot to share it. Just share it as is so that people can copy the code.
What is Flare?
Flare is a dedicated social networking platform for developers to share and learn about new things. With a primary focus of helping the creators share better content to their uses and making it easier for the community to benefit from these contents, Flare has a lot to offer.
Features ✨
Here are some features that I planned for Flare. The ones implemented right now are marked. The fundamental idea is to support writing small posts within Flare. So the concept of blocks came. Blocks are used to create a flare, you can have text, code, images, etc in a single flare. Each of these smaller items that make up a flare is called a block.
- Markdown for creating flares
- Share Code snippets ✅
- Share terminal scripts ✅
- Share Images ✅
- Polls ◻️
- Attach Github Repos
- Share tech stack used
- Share libraries used
- Reorder blocks
- A code sandbox within a flare
- Comments ✅
- Bookmarks ✅
- Show Spotify last played songs ✅
- Tips and Sponsors
- Header Image promotions ✅
- Kudos ✅
- Connect Hashnode blog ✅
Now that the base setup is done, all the other features could be done. The only thing needed is time. So for the sake of this hackathon, I need to focus on what's doable within a few weeks.
Design 🎨
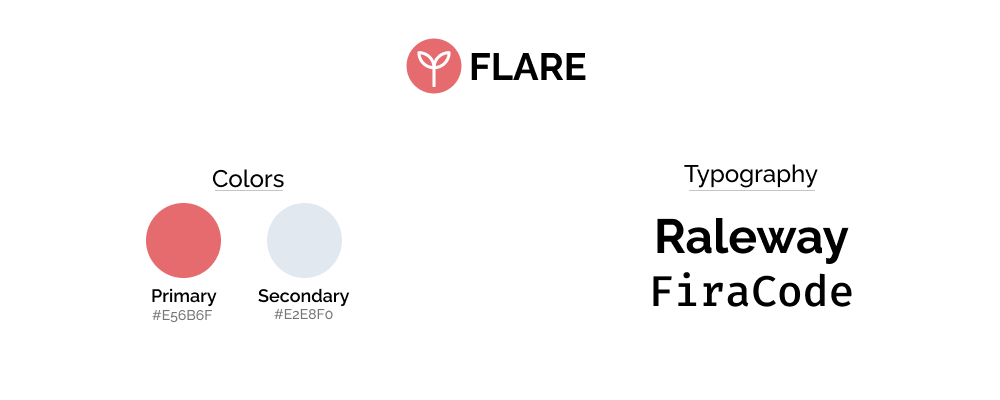
Since it's all about the community and growing with the community, I thought of having a plant as the logo for flare. The developer community is a great place to share and learn and grow. That is what Flare is wanting to be.
Tech Stack 🛠️

Flare uses a lot of cool open-source frameworks and tools. Here is a non-exhaustive list of the main ones.
Front-end
The client application for flare is built using Angular and is styled using Tailwind CSS. There is no complicated state management at the moment, just relying on GraphQL caching. The common components are coming from a small UI library I'm building which is based on Tailwind.
Apollo GrapQL is used for all things GQL in the UI.
Back-end
Most of the exciting stuff happens in the back-end. The most exciting one for me is GraphQL. It's the first time I am building a GraphQL backend. The backend framework of choice for me is NestJs. It provides support for a lot of different patterns in a very well-structured manner.
For the NestJs - GraphQL implementation, Schema First approach is followed.
For database, there is MySQL as the primary data store driven using Prisma. Then there is Redis for the queue and a few other purposes.
The whole project is a monorepo managed by Nx.
Deployment
For the front-end, it's deployed on Netlify. Again there isn't anything special that you have to do. Just put the code in git and connect it with Netlify. Baam, you get a CICD pipeline ready for your UI.
When it comes to the back-end things are not that easy. I used Github Actions to build and deploy the back-end code to a remote VPS running Ubuntu. The code is built and zipped and sent to the remote server. The code once is received by the remote server, unzips it, and starts the server.
PM2 is used to manage the server, detect failures and automatically restart if required. The APIs are then port forwarded through Nginx to a domain that is used by the UI.
Ref: Deployment yaml file
Flare Deep Dive 🔍
Now let's dive deeper into how Flare is actually built and what are the features it currently has to offer.
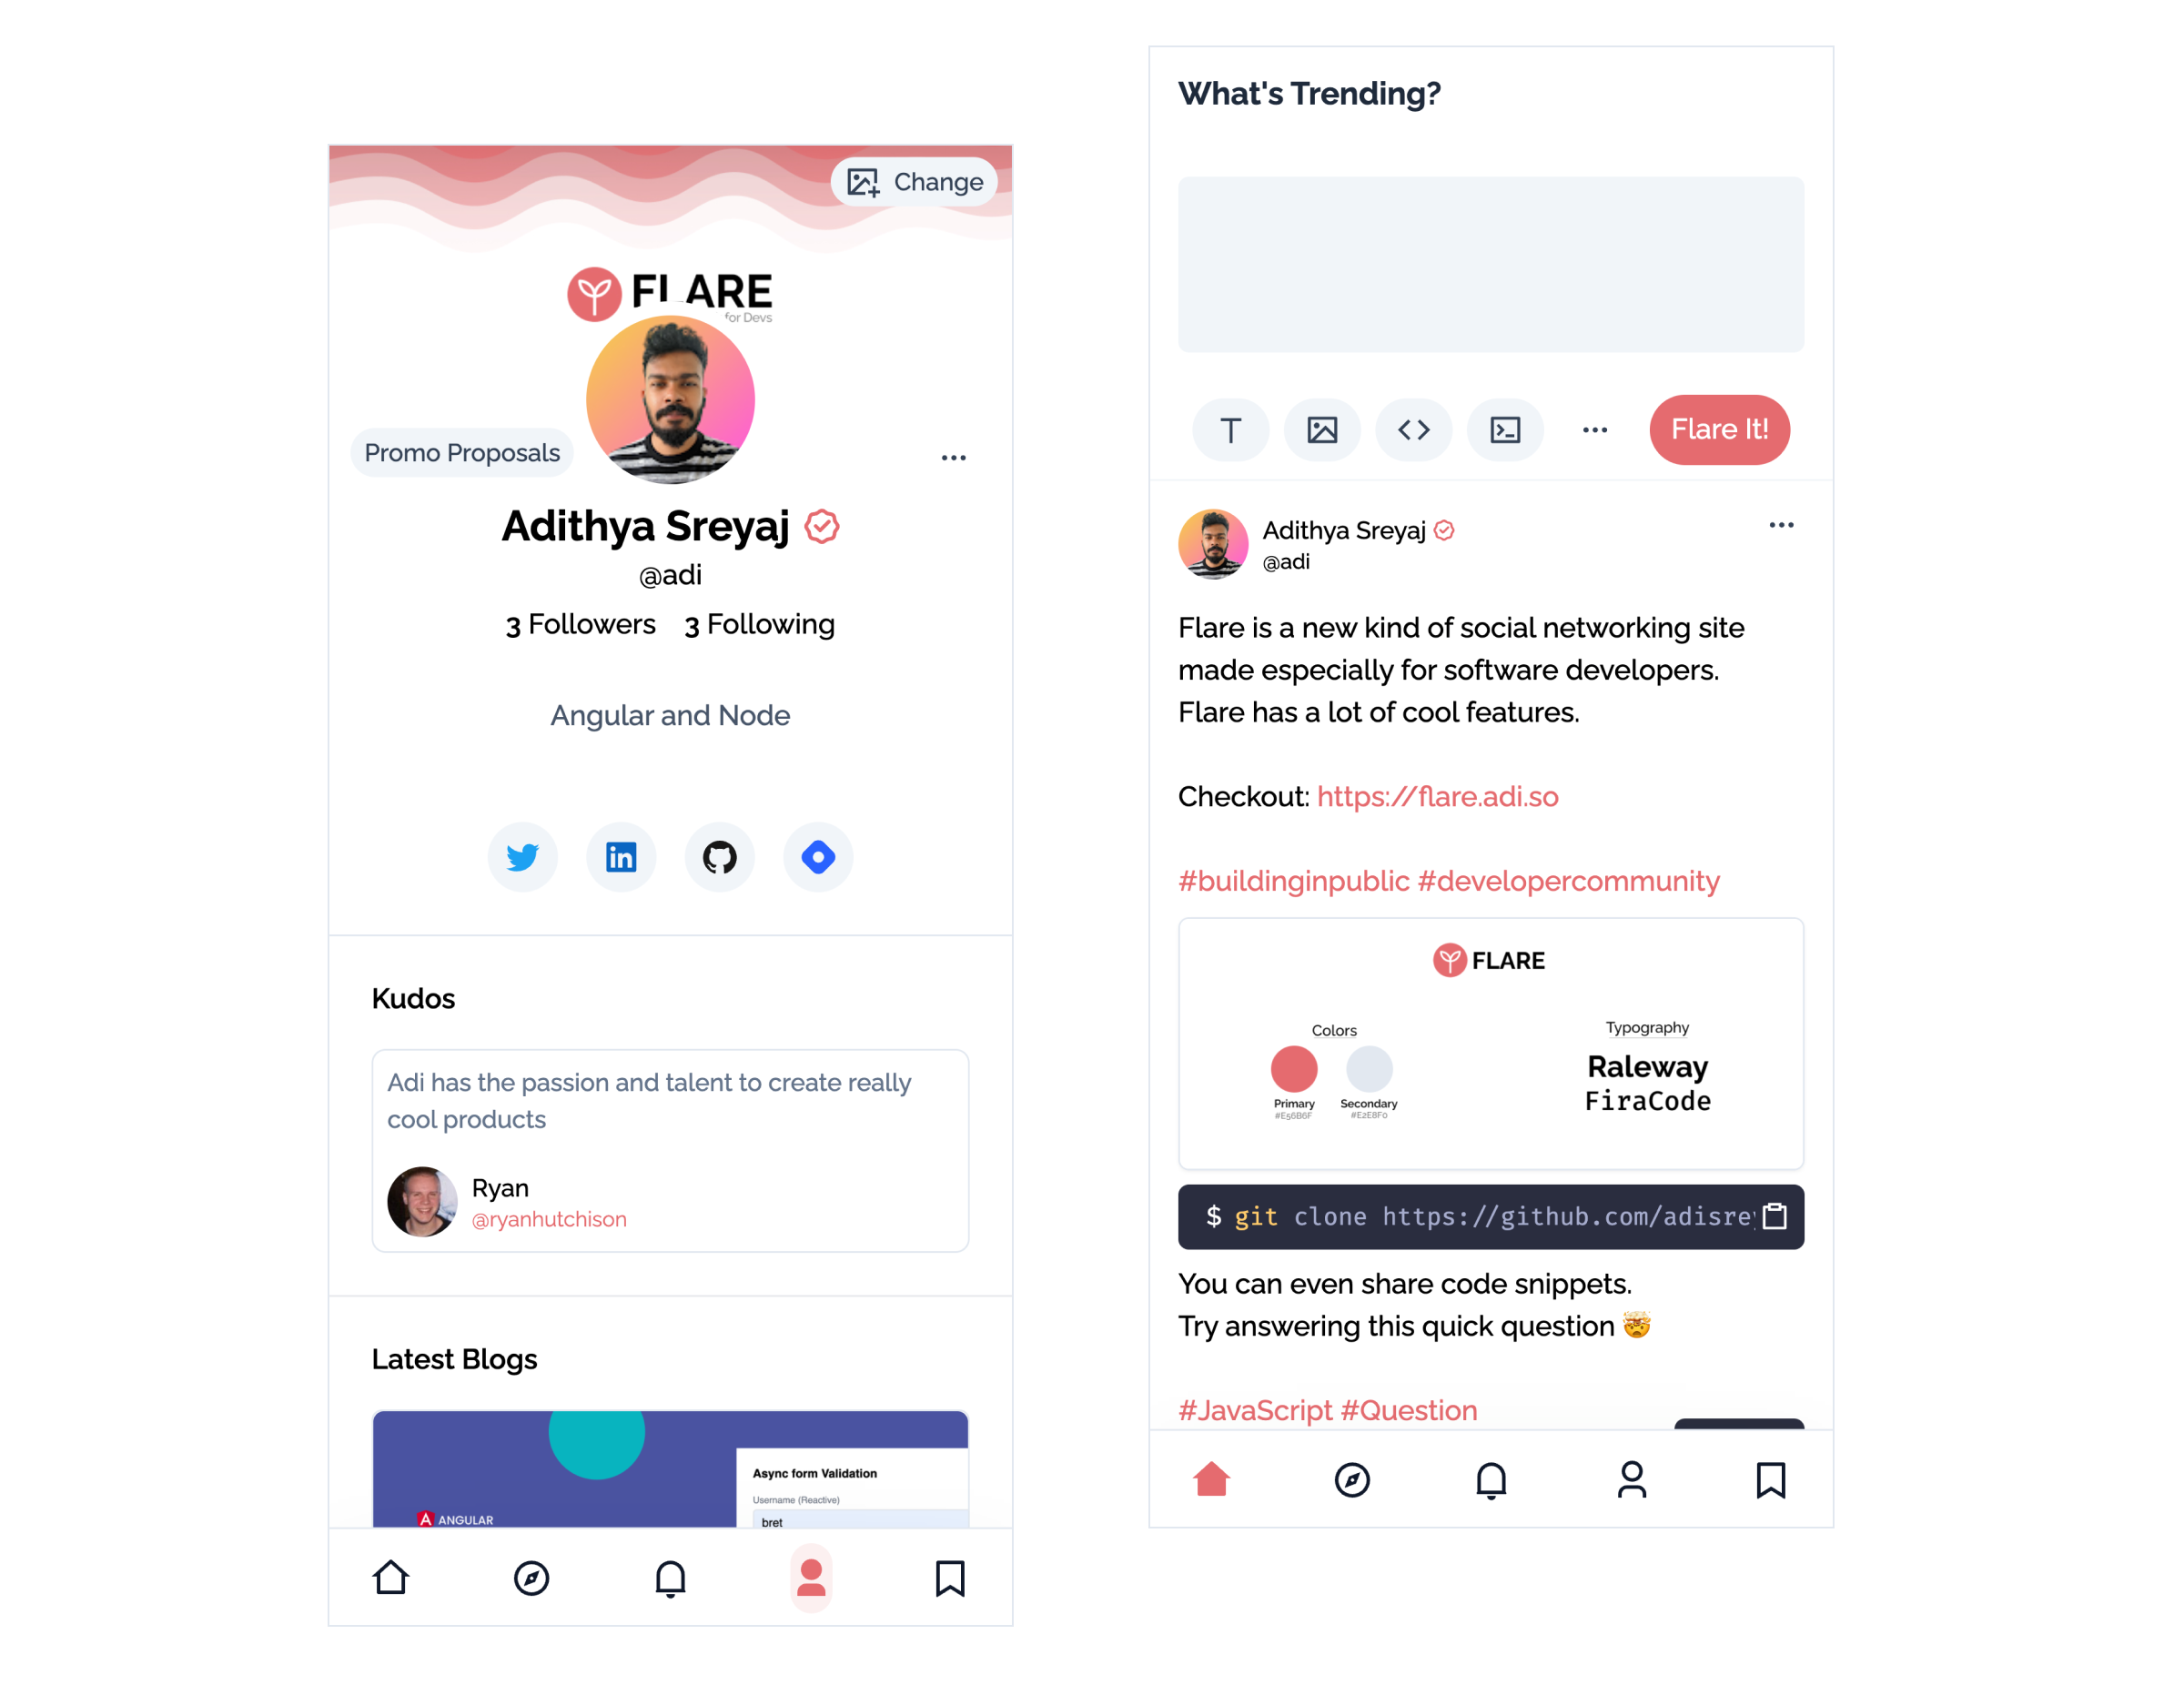
Composing a Flare
The flare below contains multiple text blocks, an image block, a terminal script block, and a code snippet block. It shows how the posted flare is later rendered.
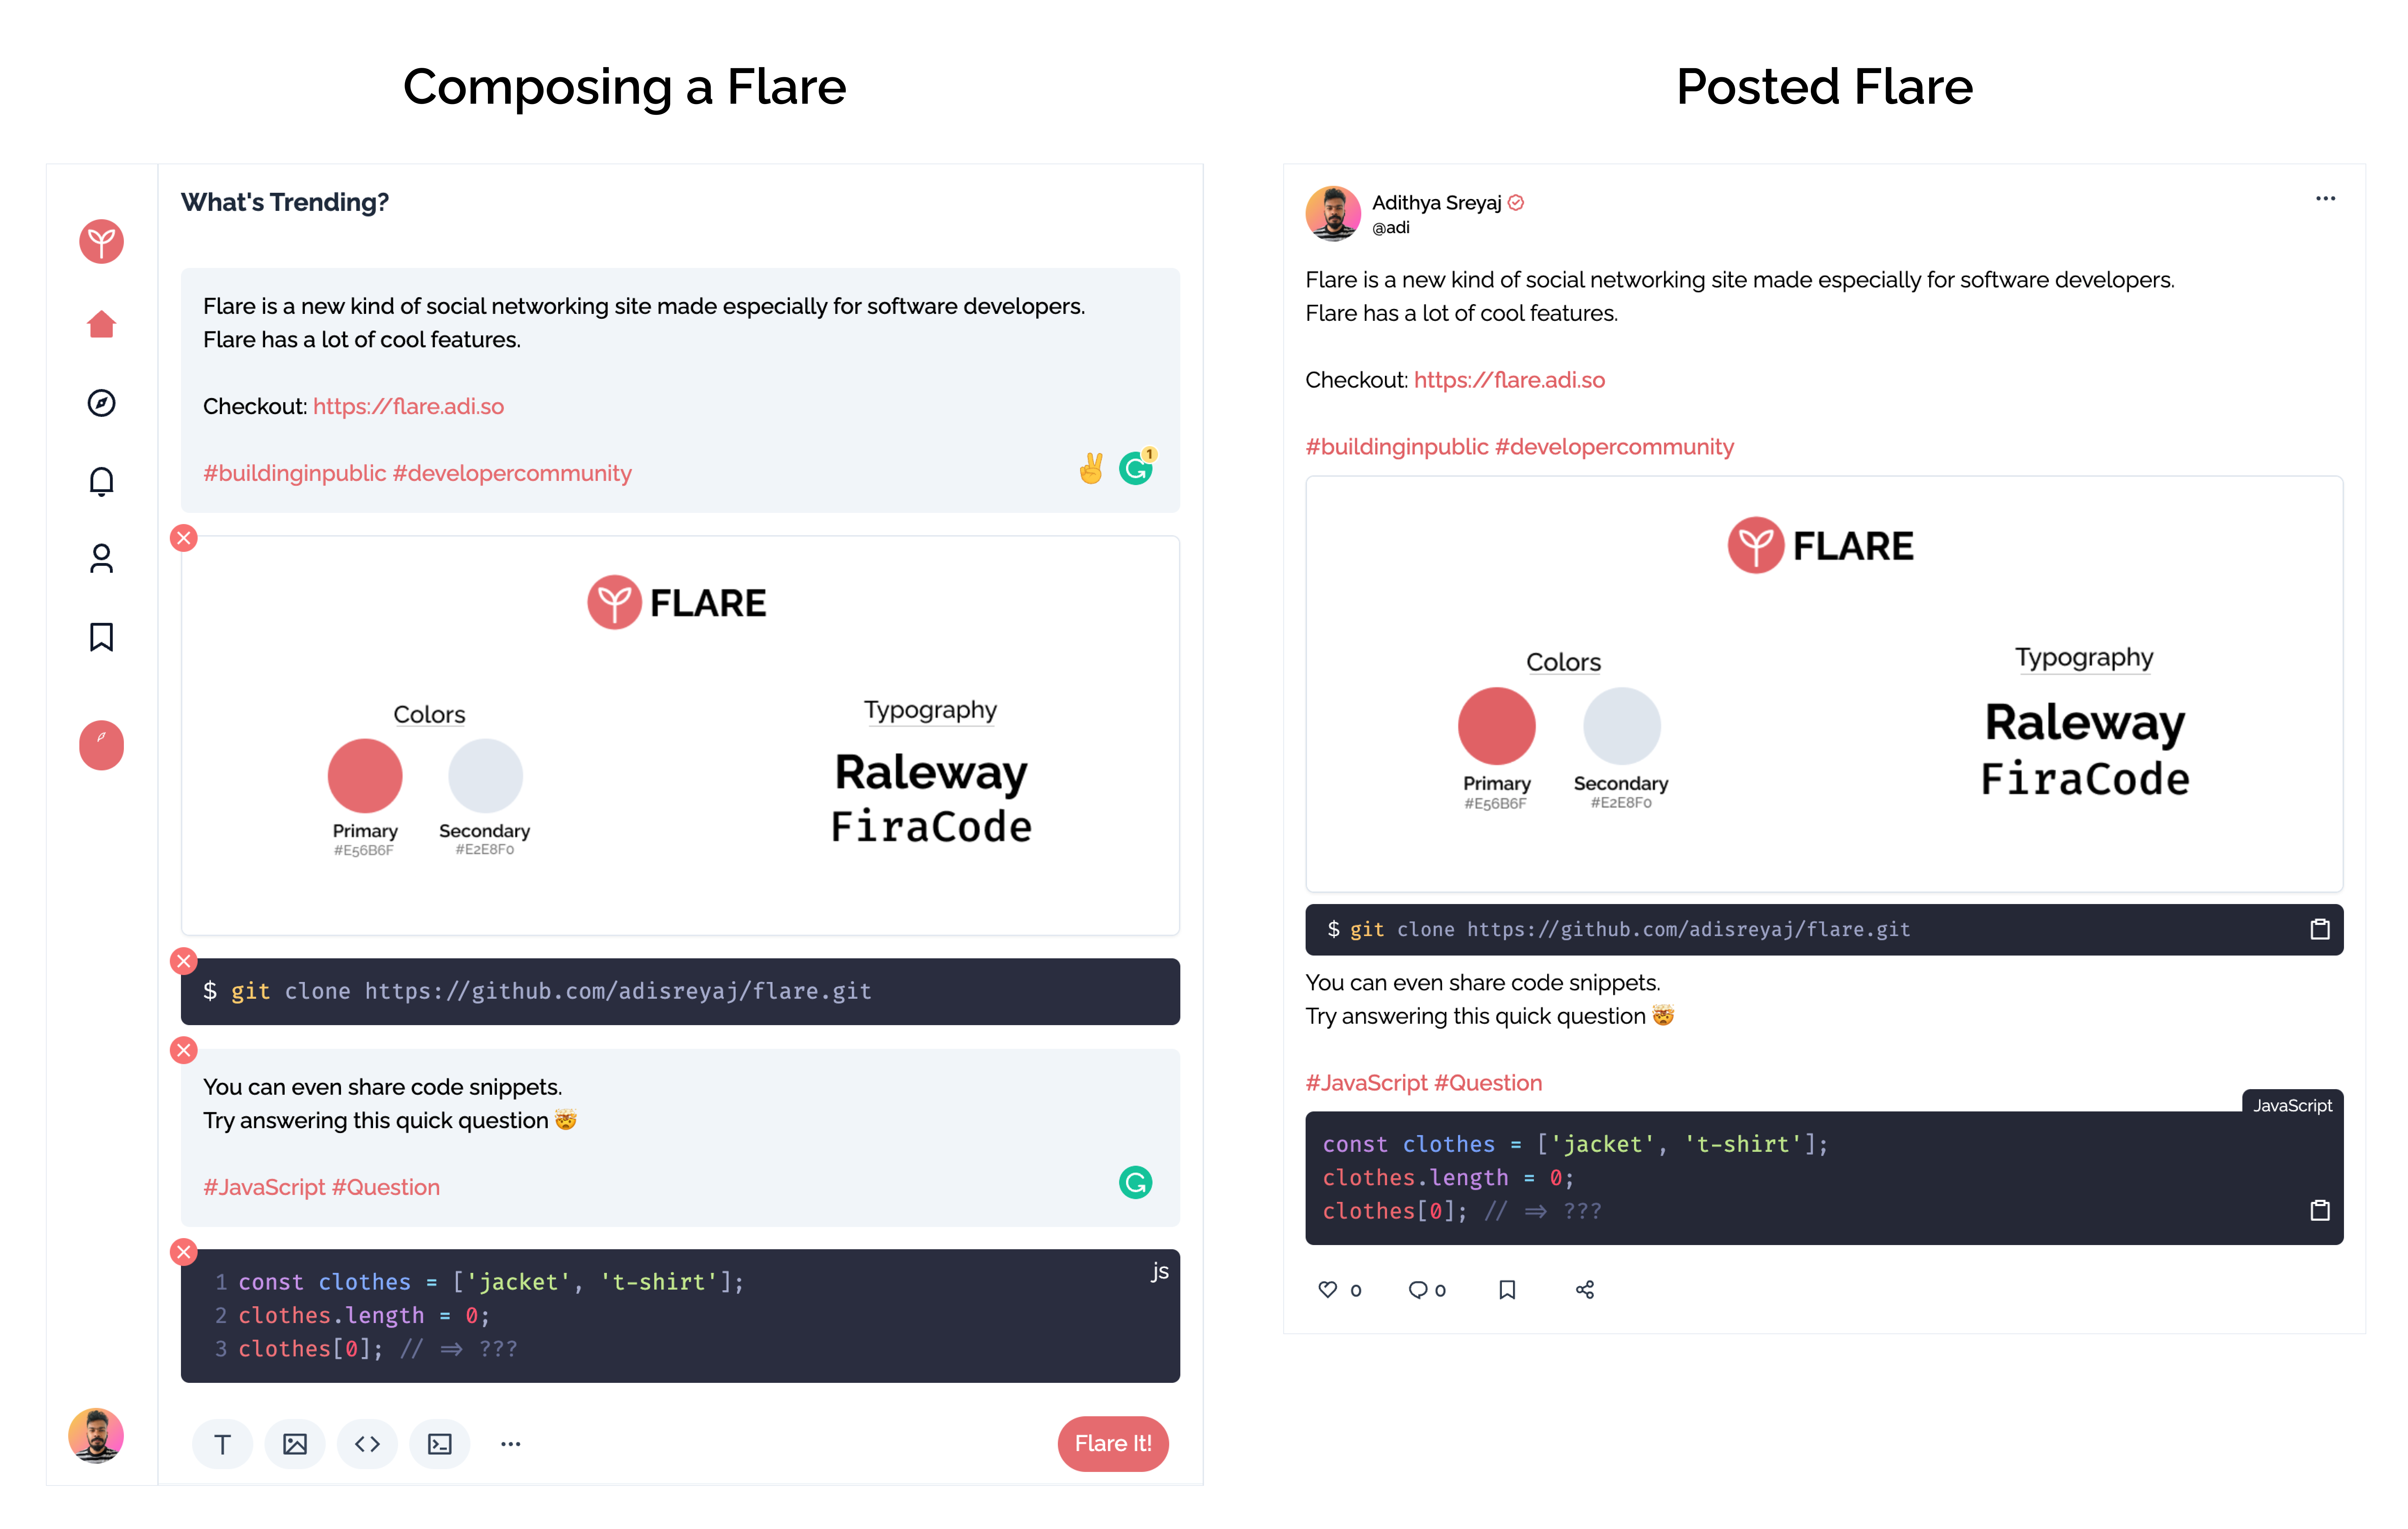
The composer component (left side) looks very simple but is the most complex part of the whole application. There are a couple of interesting things happening around how the flare is composed. Will share them below.
Technical Details
The text field is not markdown right now, but I want to at least highlight the automatically link the URLs and also highlight the hashtags. Had to play around a bit till I could come up with something that works. Here's how the component is build:
@Component({
  selector: 'flare-block-text-input',
  template: ` <div
    class="relative mt-[1px] flex flex-1 overflow-y-auto rounded-md bg-slate-100 ring-primary focus-within:ring-2"
    style="min-height: 100px; max-height: 200px;"
  >
    <div
      #editor
      class="absolute top-0 left-0 z-10 h-full w-full border-slate-100 font-medium text-transparent caret-slate-800"
    ></div>
    <div
      class="flare-block-text-input-rendered pointer-events-none z-20 h-full w-full border-slate-100 p-4 font-medium"
      [innerHTML]="content"
    ></div>
  </div>`,
})
export class FlareBlockTextInputComponent {}
So it's basically two divs overlapping each other. The bottom div is a rich text editor which spits out the HTML of the text. The text is then passed through autolinker which converts the URLs to anchor tags.
The text is then regex'd to find and highlight the hashtags. The final HTML is then sanitized and passed to the upper div.
const linkified = this.convertLinksToAnchorTags(html);
const hashtagified = extractHashTags(linkified).content;
this.content =
  this.sanitizer.sanitize(SecurityContext.HTML, hashtagified) ?? '';
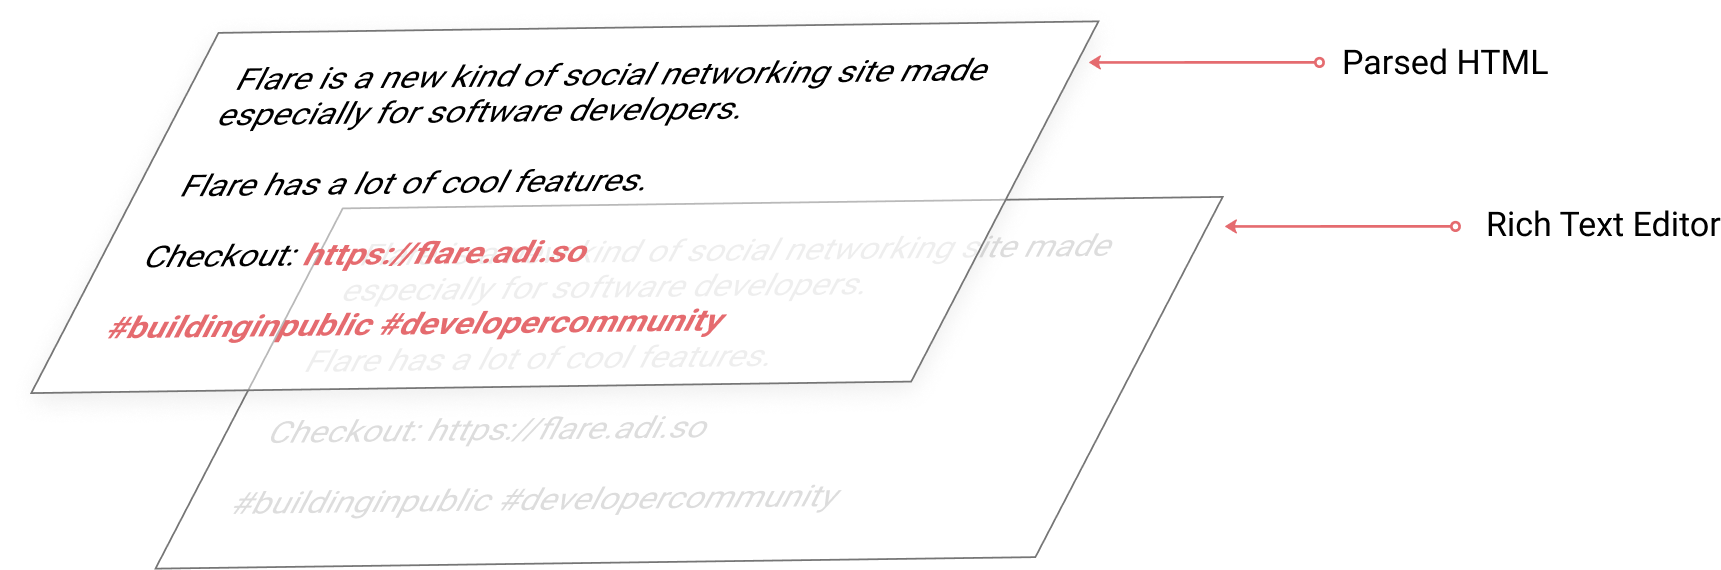
The bottom editor text is transparent so only the content in the top div will be visible. This way we get the caret and select functionality working.
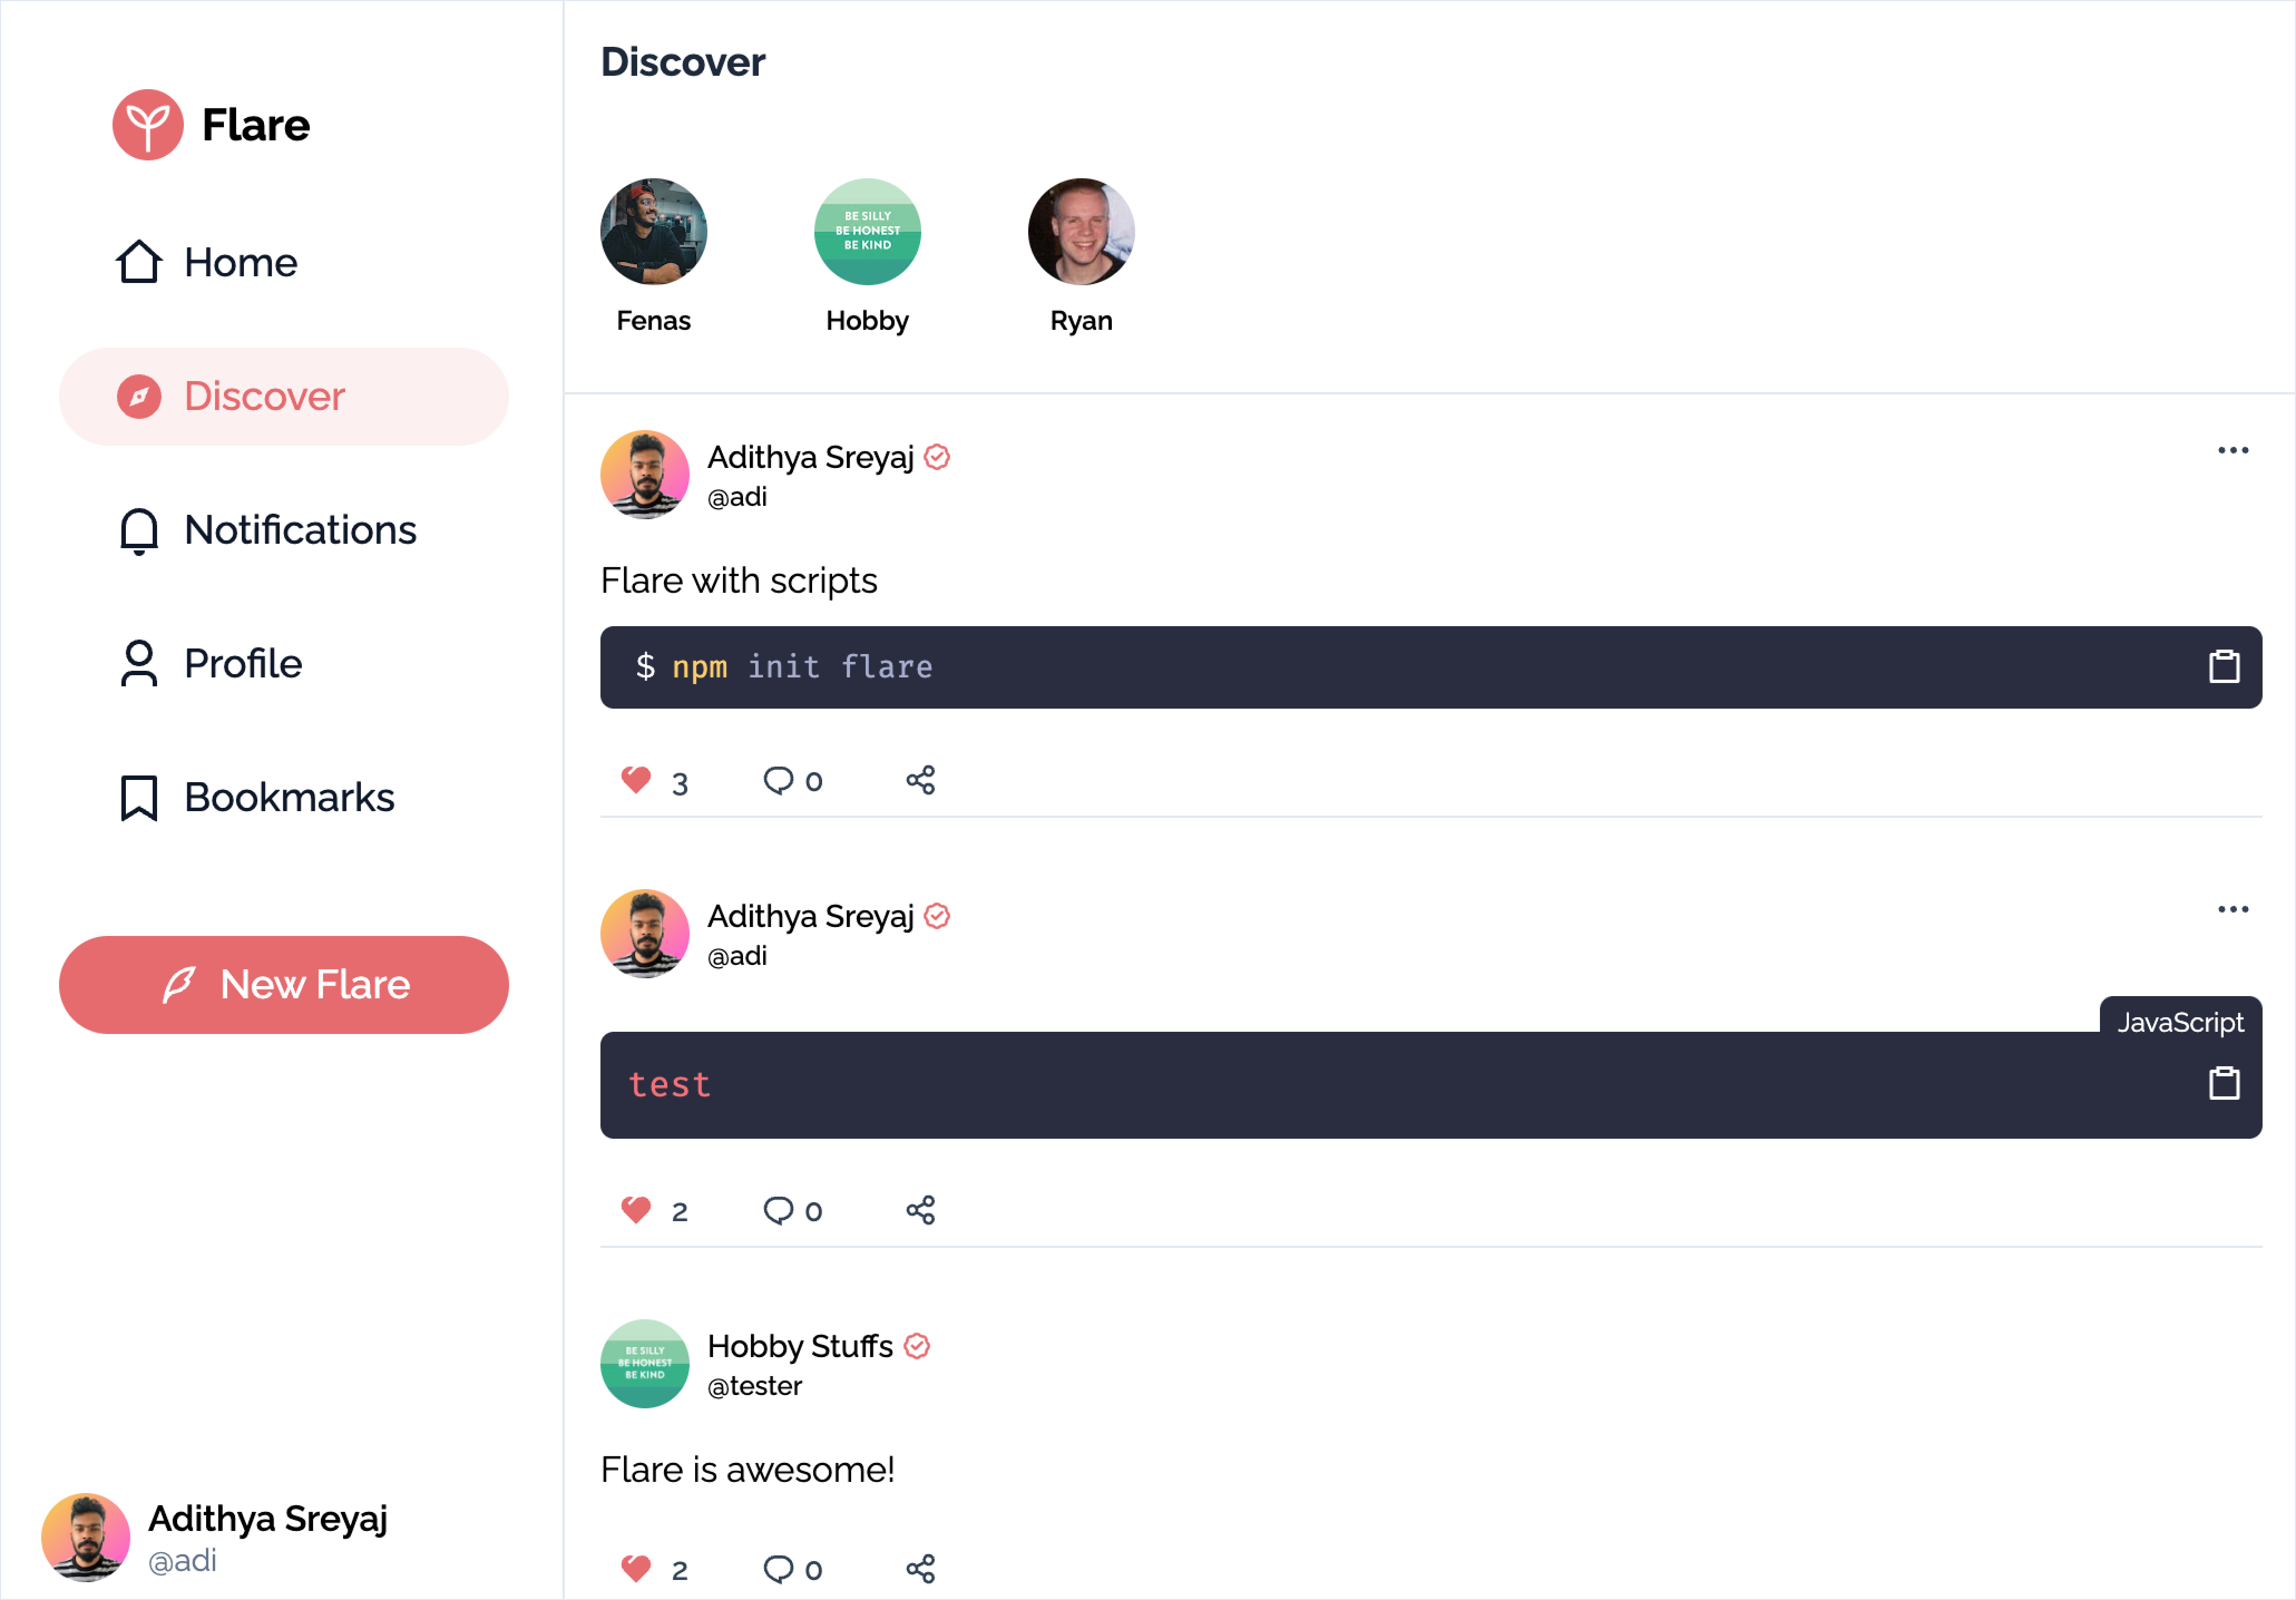
Feed
The home page is the feed page where you can see all the flares from the people you follow. Users will be able to like and comment on the flares. Flares can also be bookmarked so that you don't miss an interesting flare just because you didn't have time to read it.
Users can click on the flare to add comments.
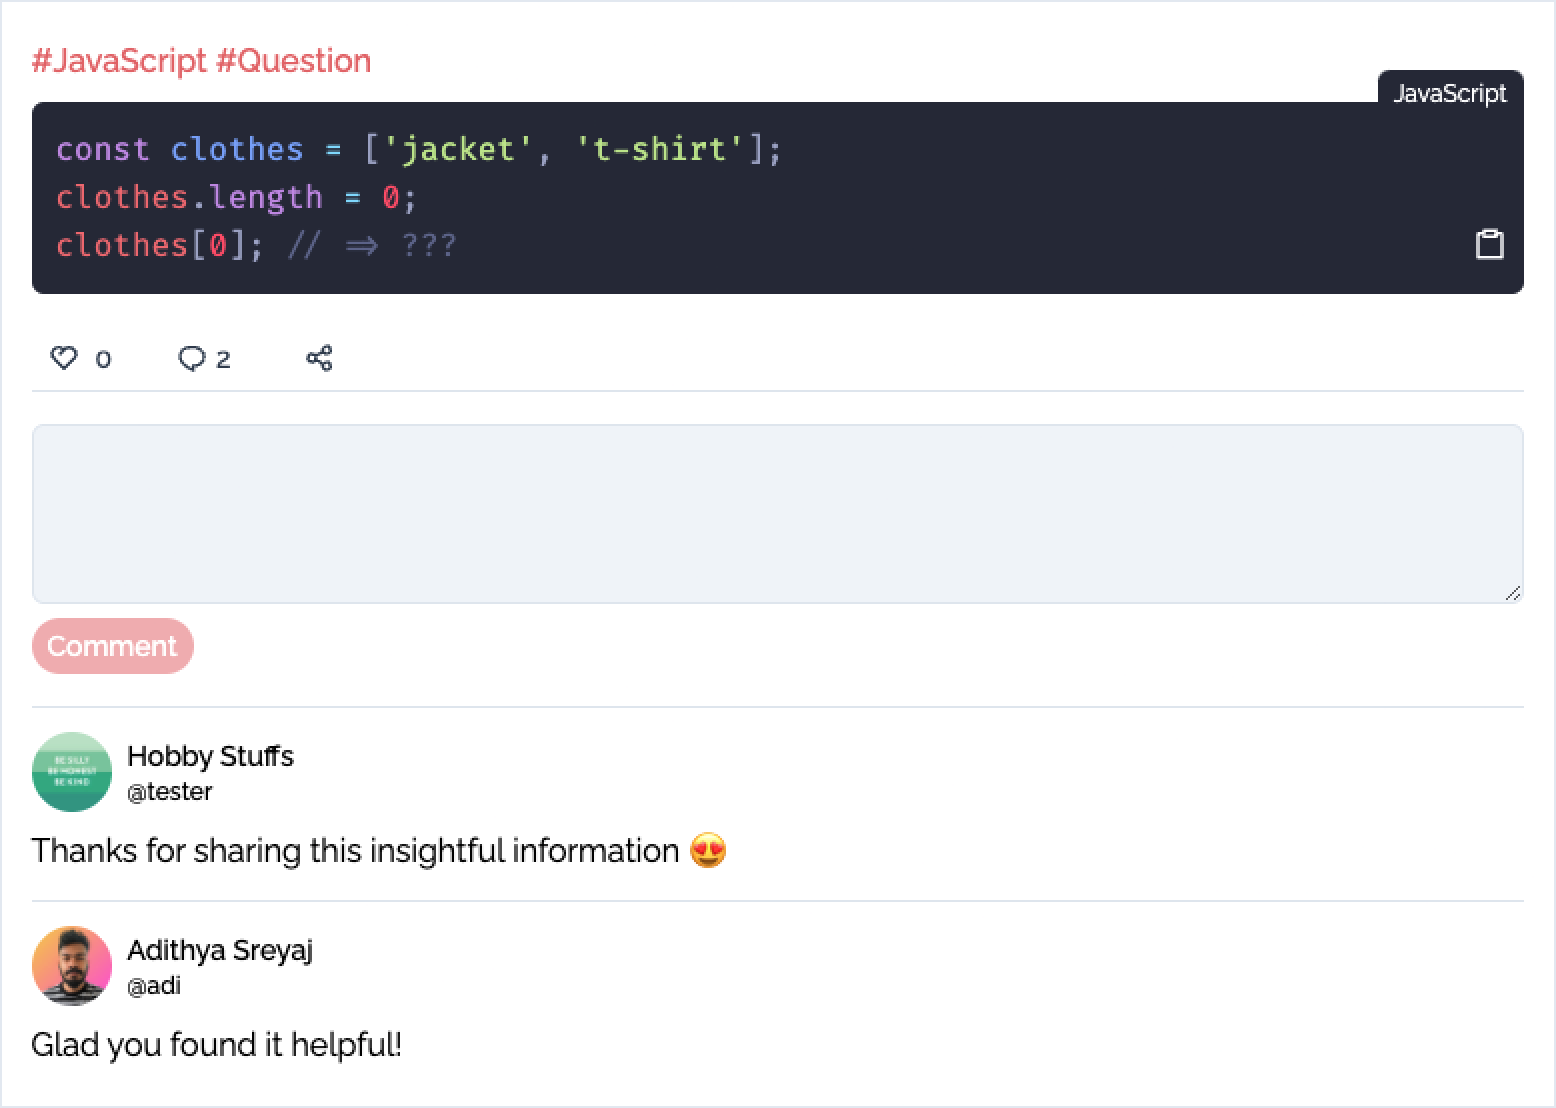
Comments are single-level right now, meaning no nested comments.
Profile Page
The profile page is the most exciting page of all. It's the most happening page in the application after the feeds page.
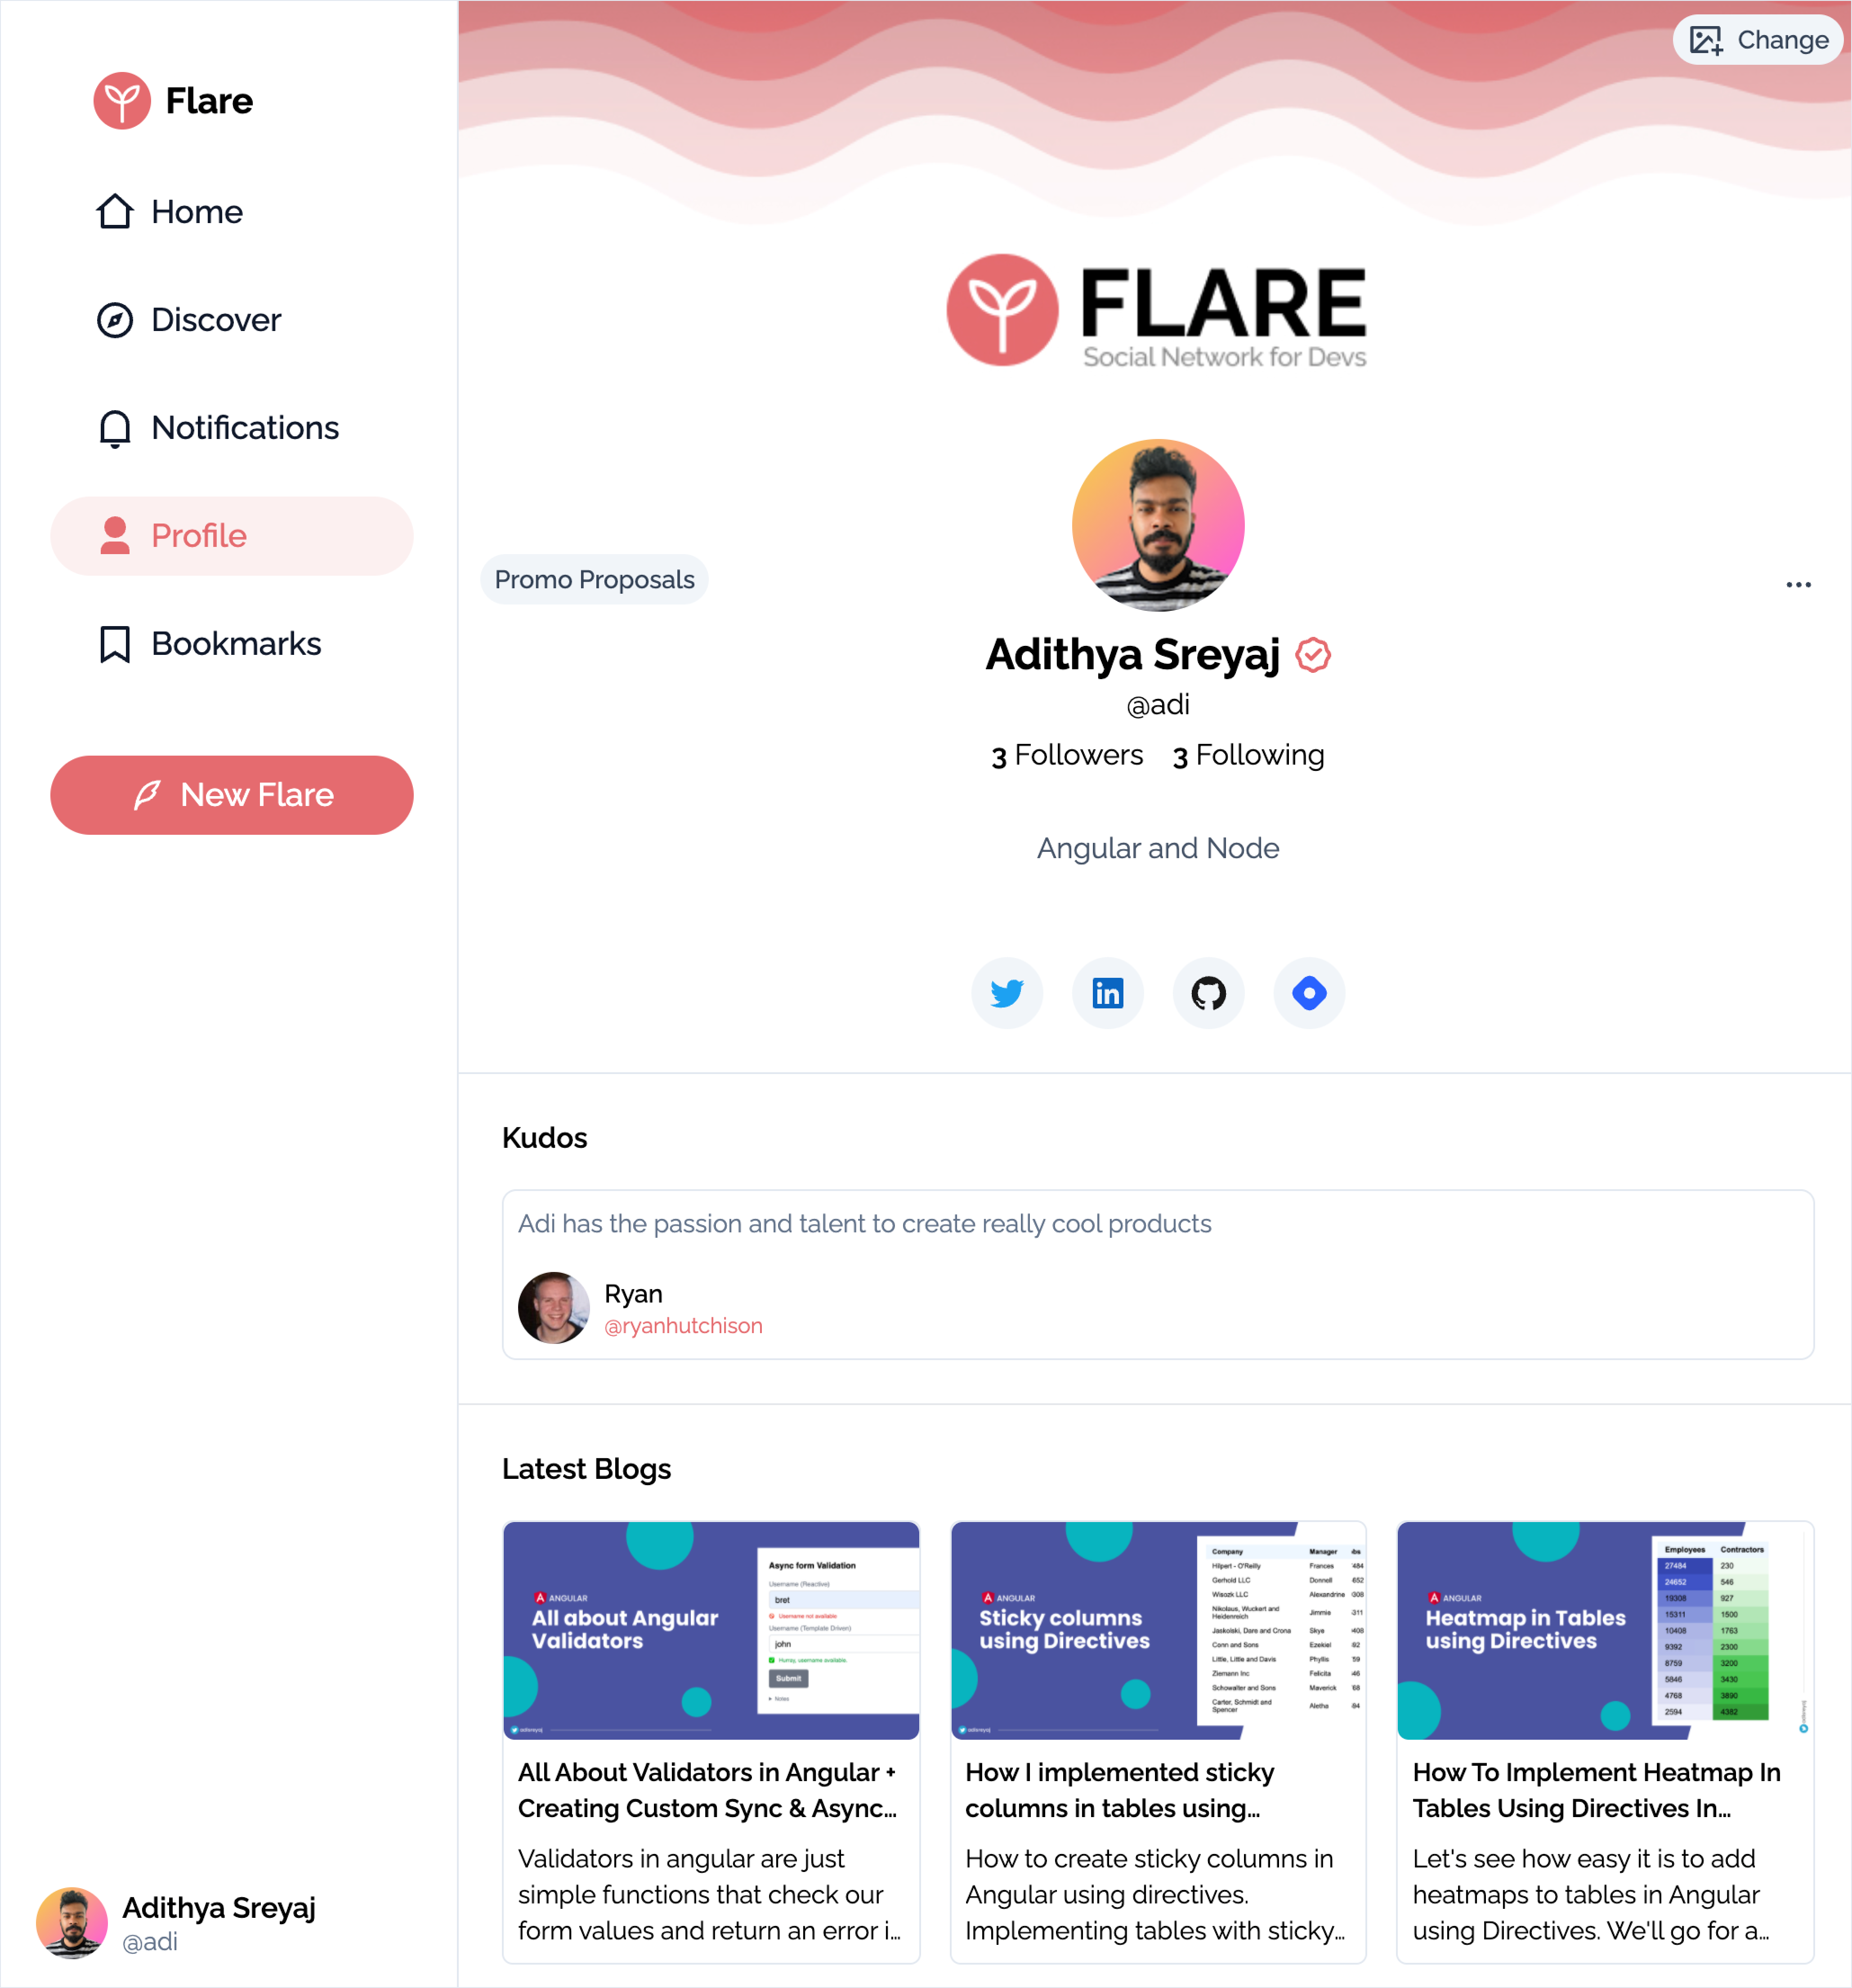
Users can set custom header images and also add a good bio. The social handles provided will be shown on the page as well.
Hashnode Blogs
If the users have provided their Hashnode profile URL during onboarding, Flare will automatically fetch and display their latest blogs on the profile page. It's a nice way to showcase your blogs to the users.
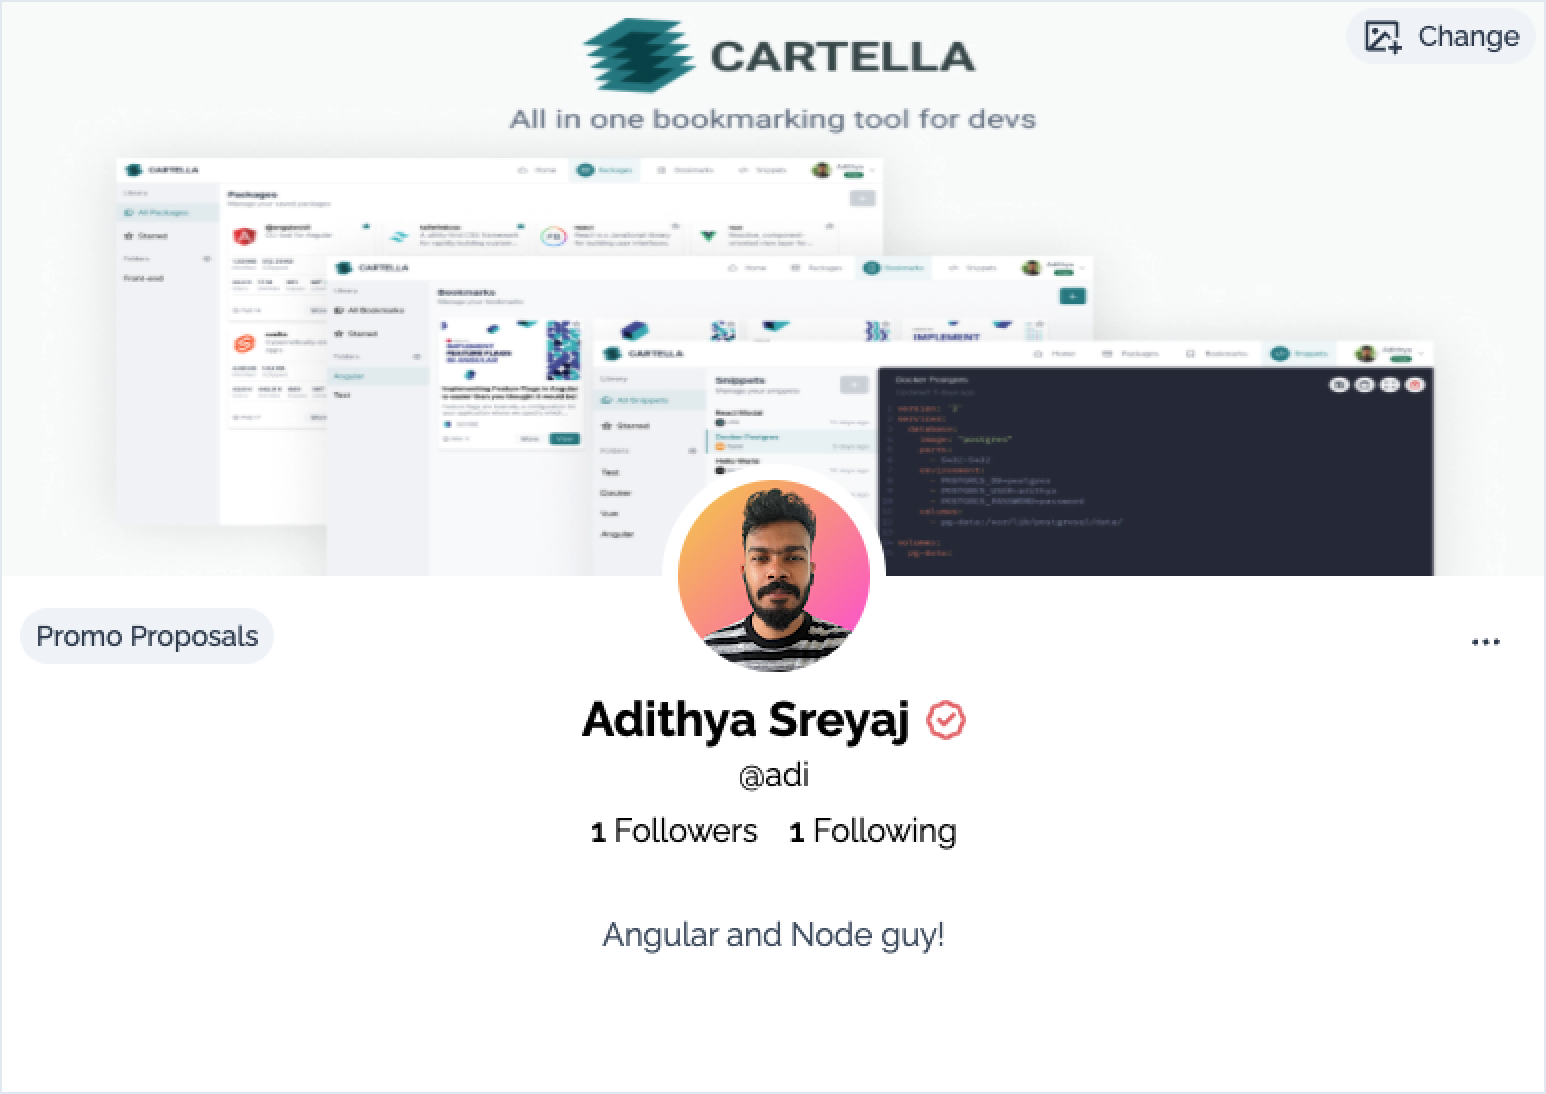
Header Promos (Personal Billboard)
This is a really interesting idea that came to me one day. What if we could let people advertise on our profile. So the header image acts as a billboard that can be rented out to show adverts. This way, devs, and creators can earn some money.
Submitting a Header Promo
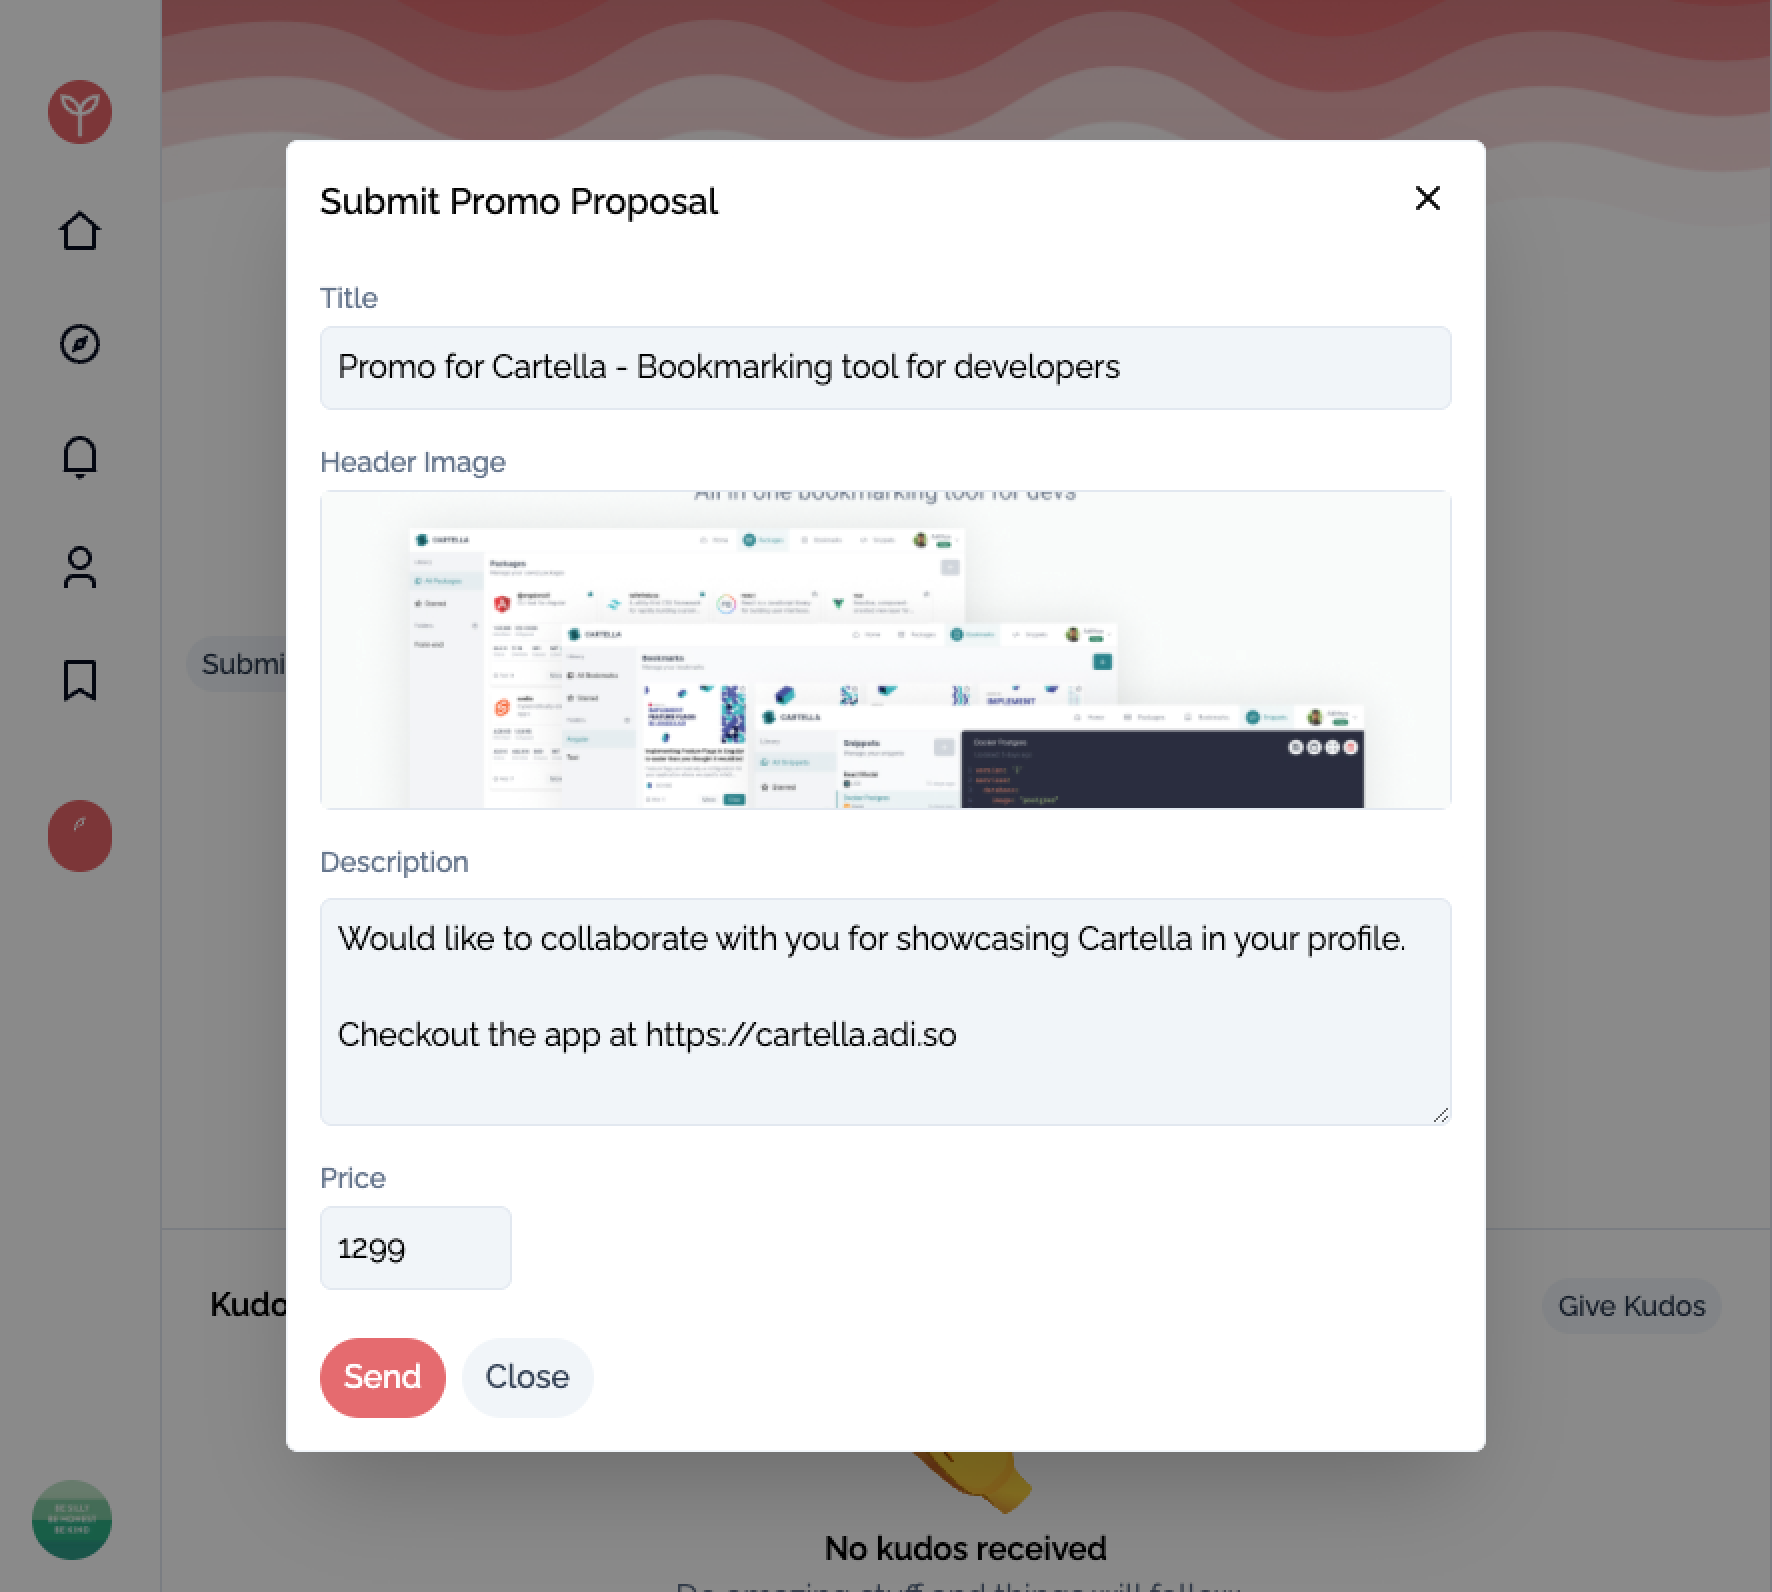
Promos are basically ads proposals that can be submitted to someone by visiting their profile. The person submitting the promo can add a title, description, compensation, and the header image that needs to be posted as well.
Applying a Promo
Users can see all the proposals they have received by clicking on the Promo Proposals button which opens up a modal like below.

The receiver can then choose to set the image as a header by clicking on the Apply Header button. This automatically updates the header of the user. A notification can then be sent to the advertiser.
Give and Recieve Kudos
If you find someone who is really doing a great job in helping the community and sharing knowledge all the time, you can give them kudos for their contributions.
What a developer or a content creator needs is appreciation. Show them you appreciate them for their contributions. It'll be the biggest motivator for any developer out there.
Spotify Integration
A great way to share your taste in music with others. Hopefully, find other folks with the same likes in music. Just another way to make connections on Flare.
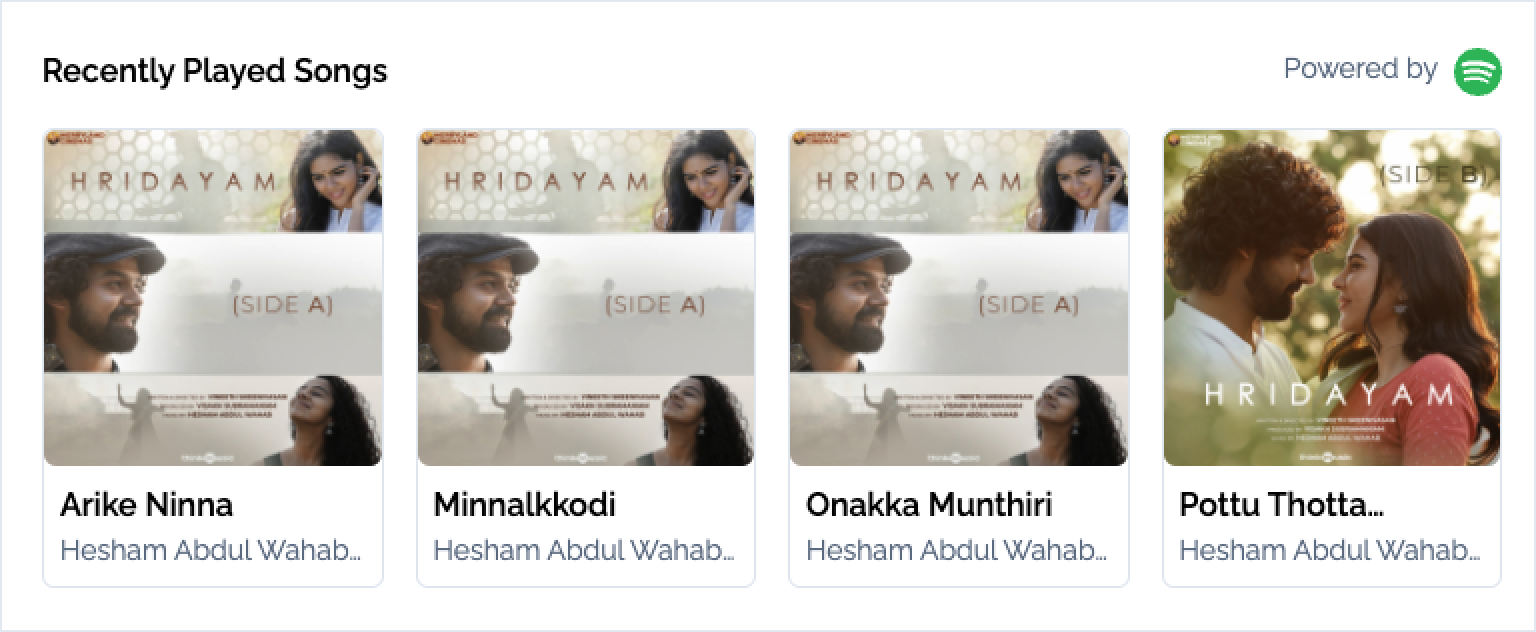
Users will be able to integrate Spotify to show the last played songs on their profile.
Note: Due to the limitation of Spotify API in development mode, new users are not able to integrate their spotify. Quote extension is required!
Discover
Discover page lets you find top accounts and popular flares.
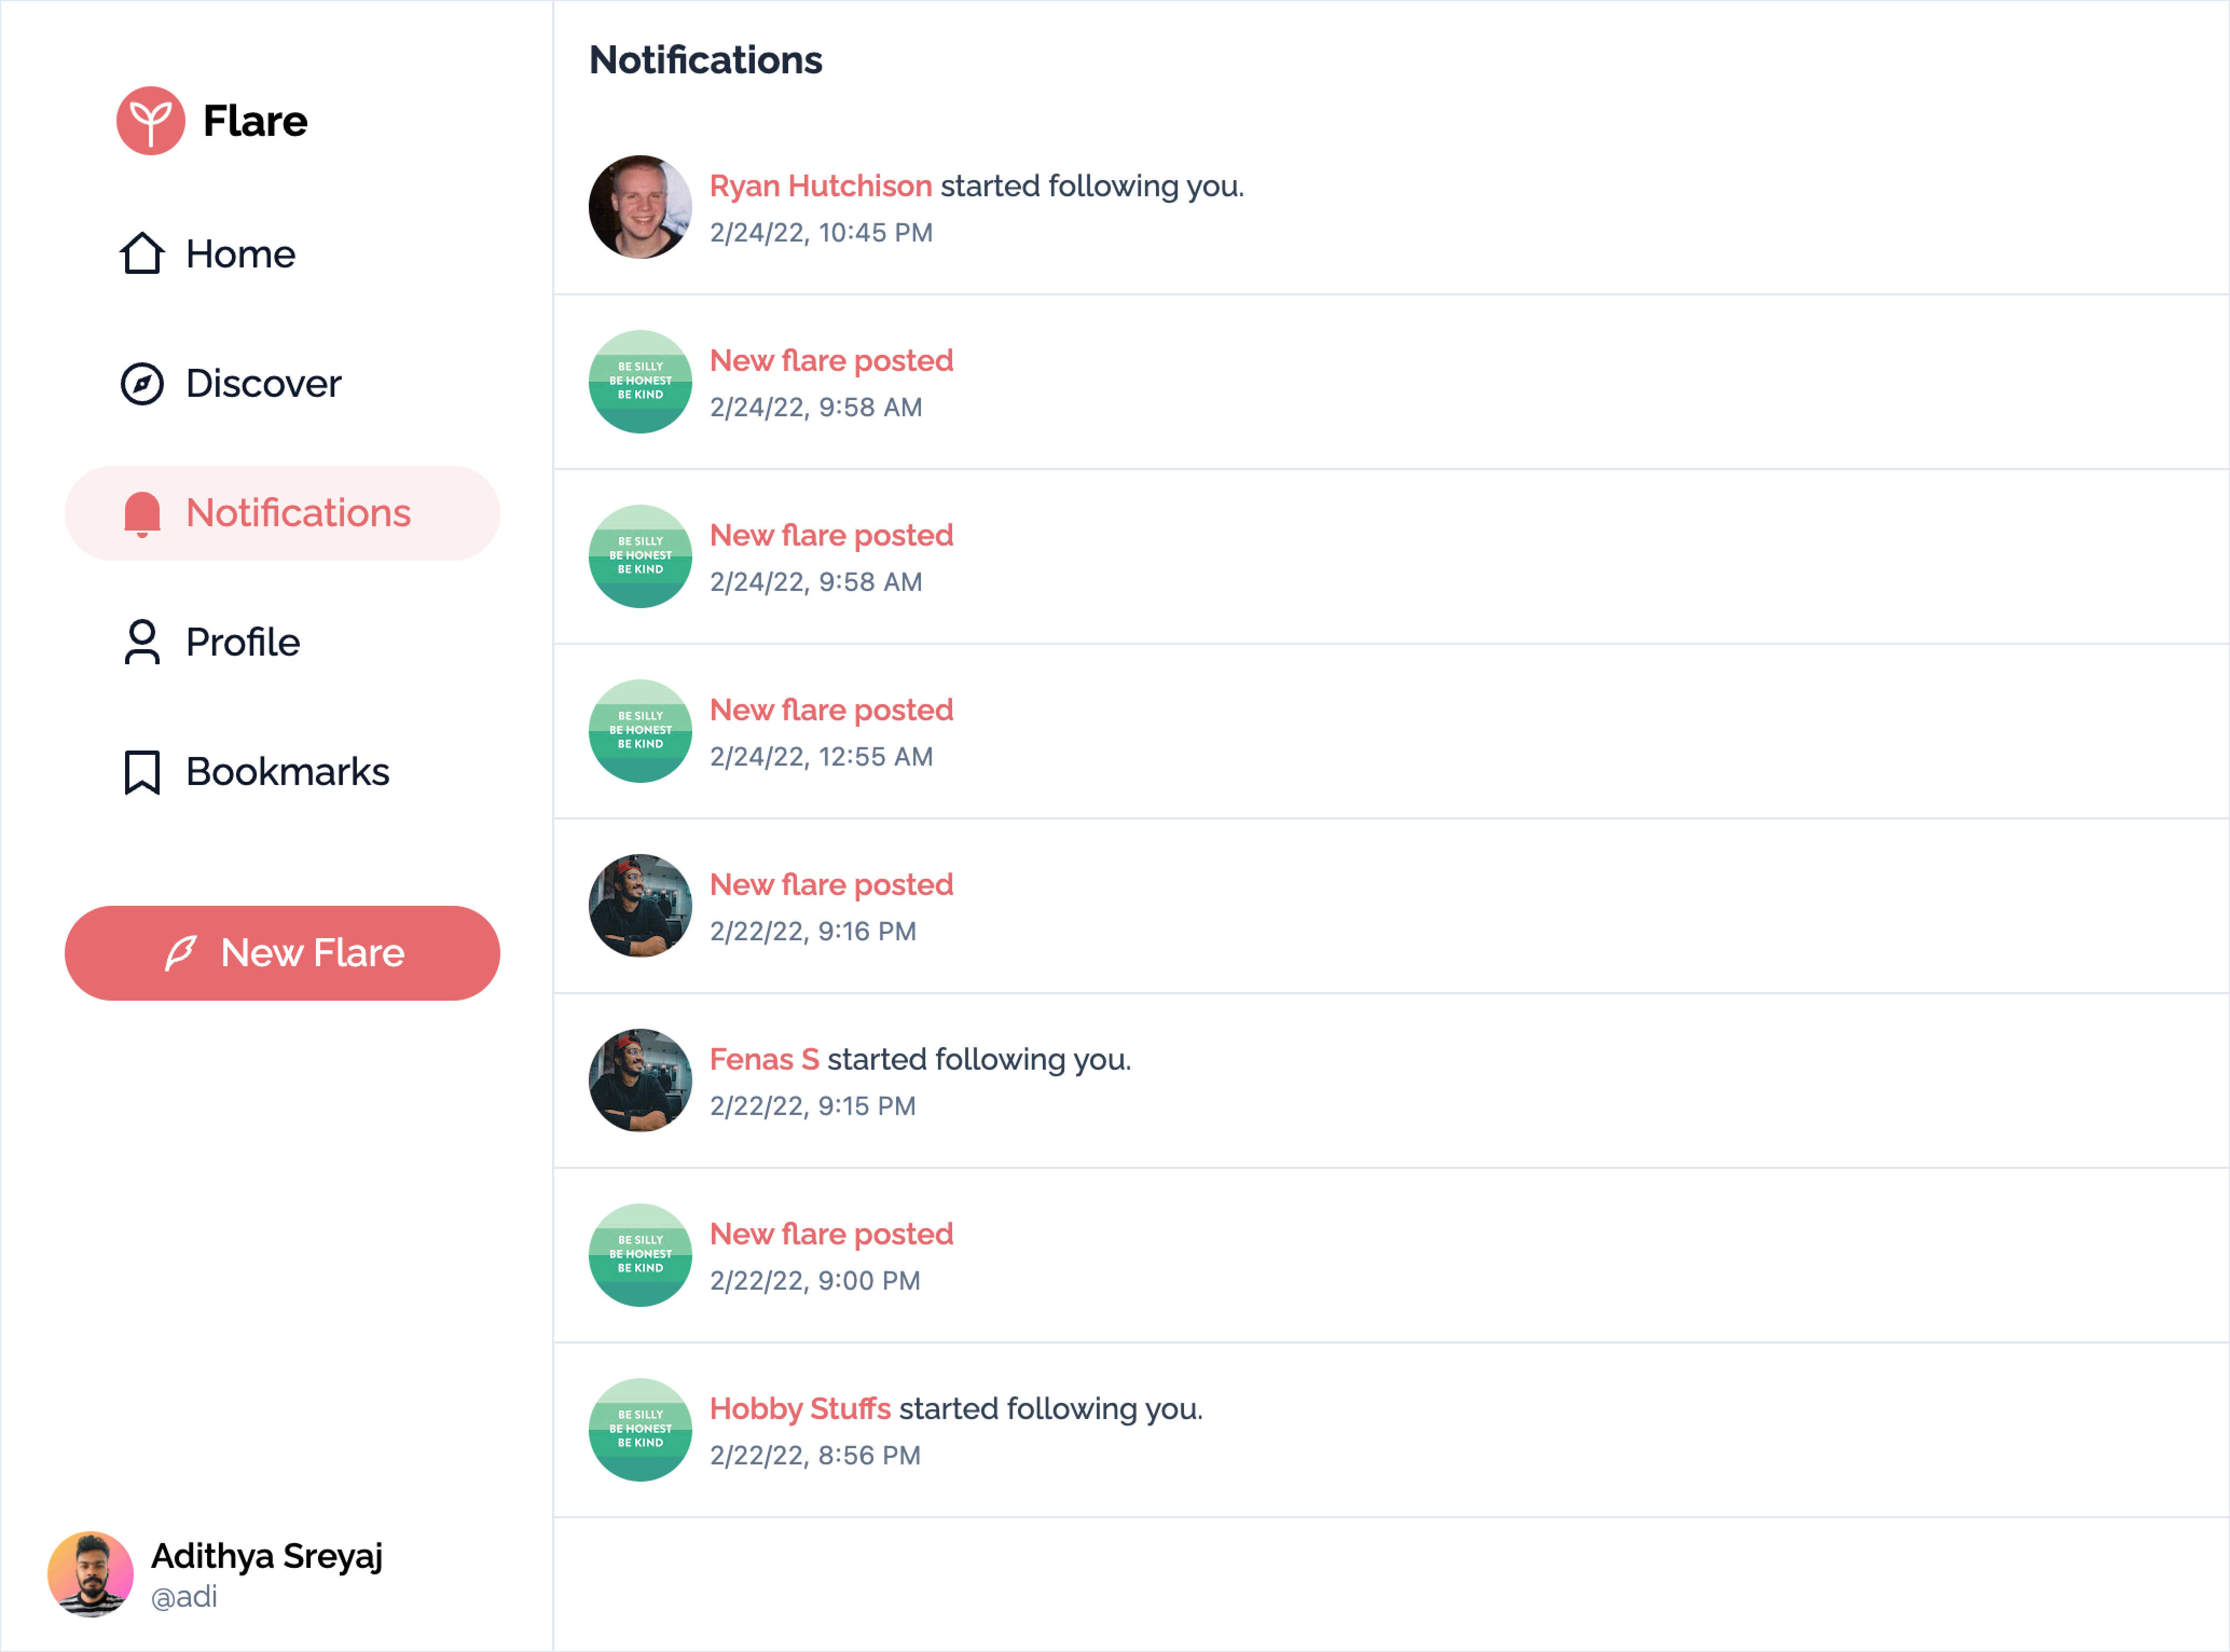
Notifications
Your regular notifications page where you get notifications when someone follows you or posts a new flare. Nothing fancy going on in here.
Onboarding screens
On the first login, users are taken through a series of pages to complete their profile and follow users
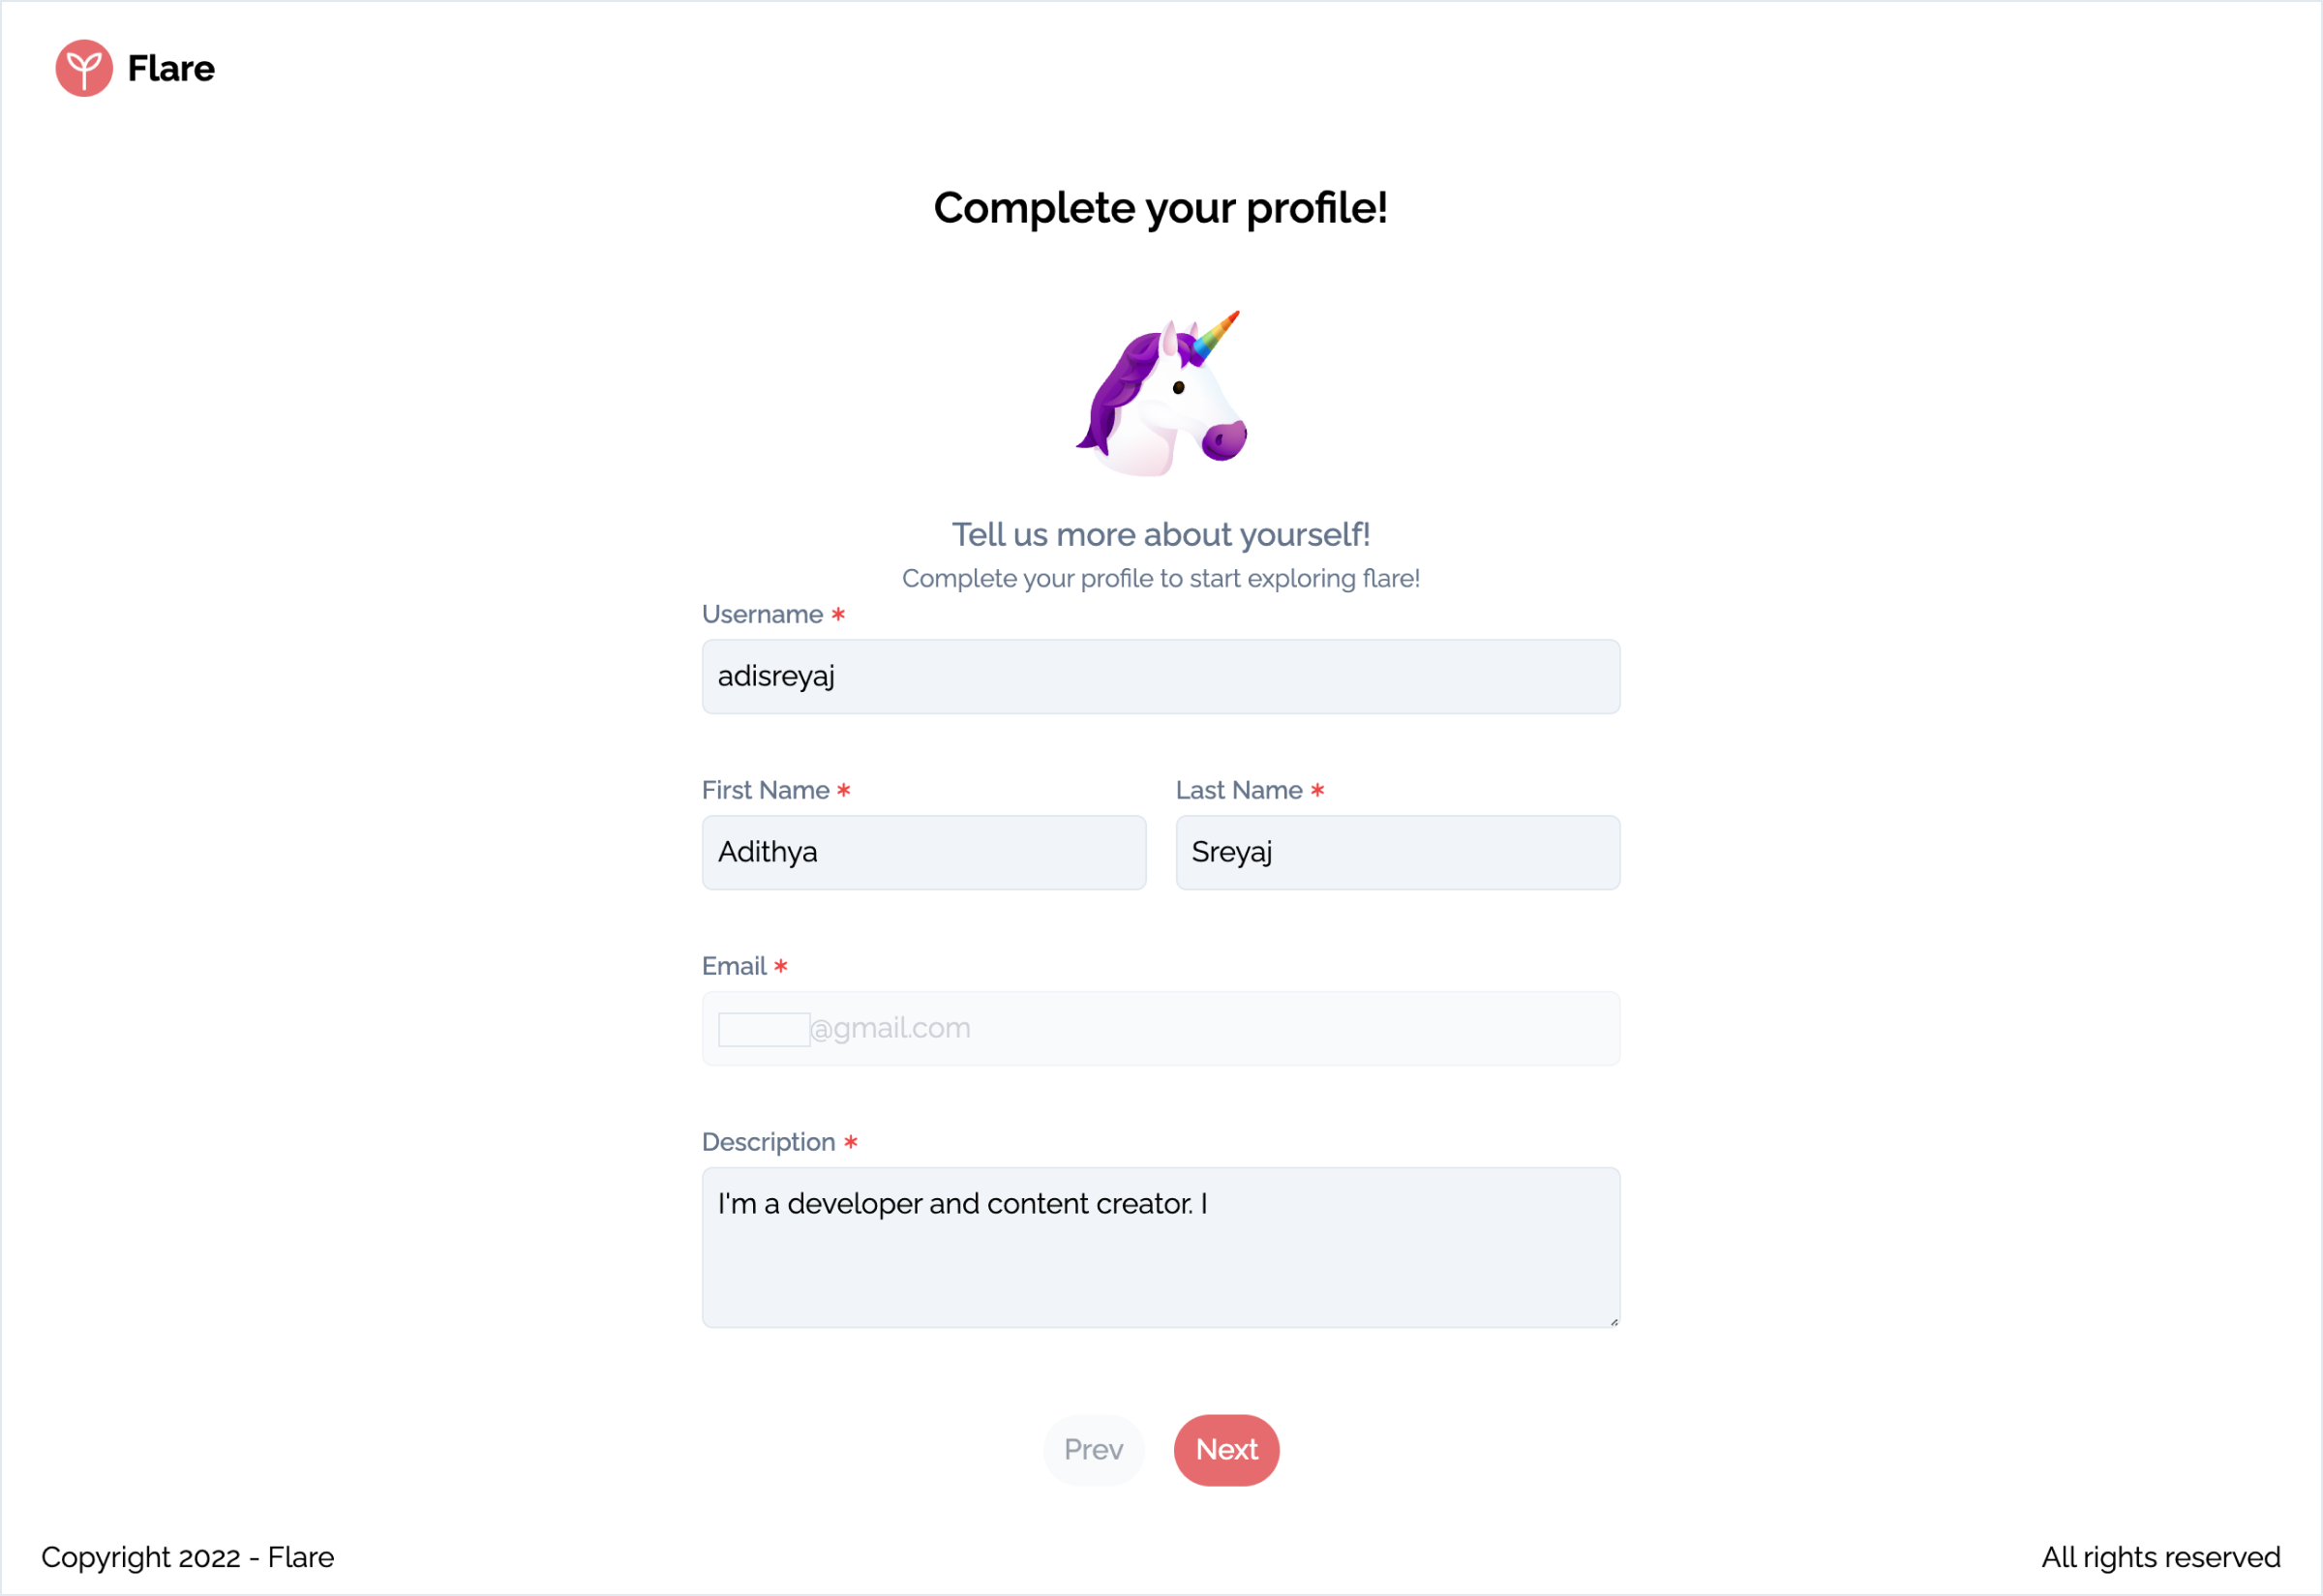
A few basic questions are asked and on the next page, the social handles can be added.
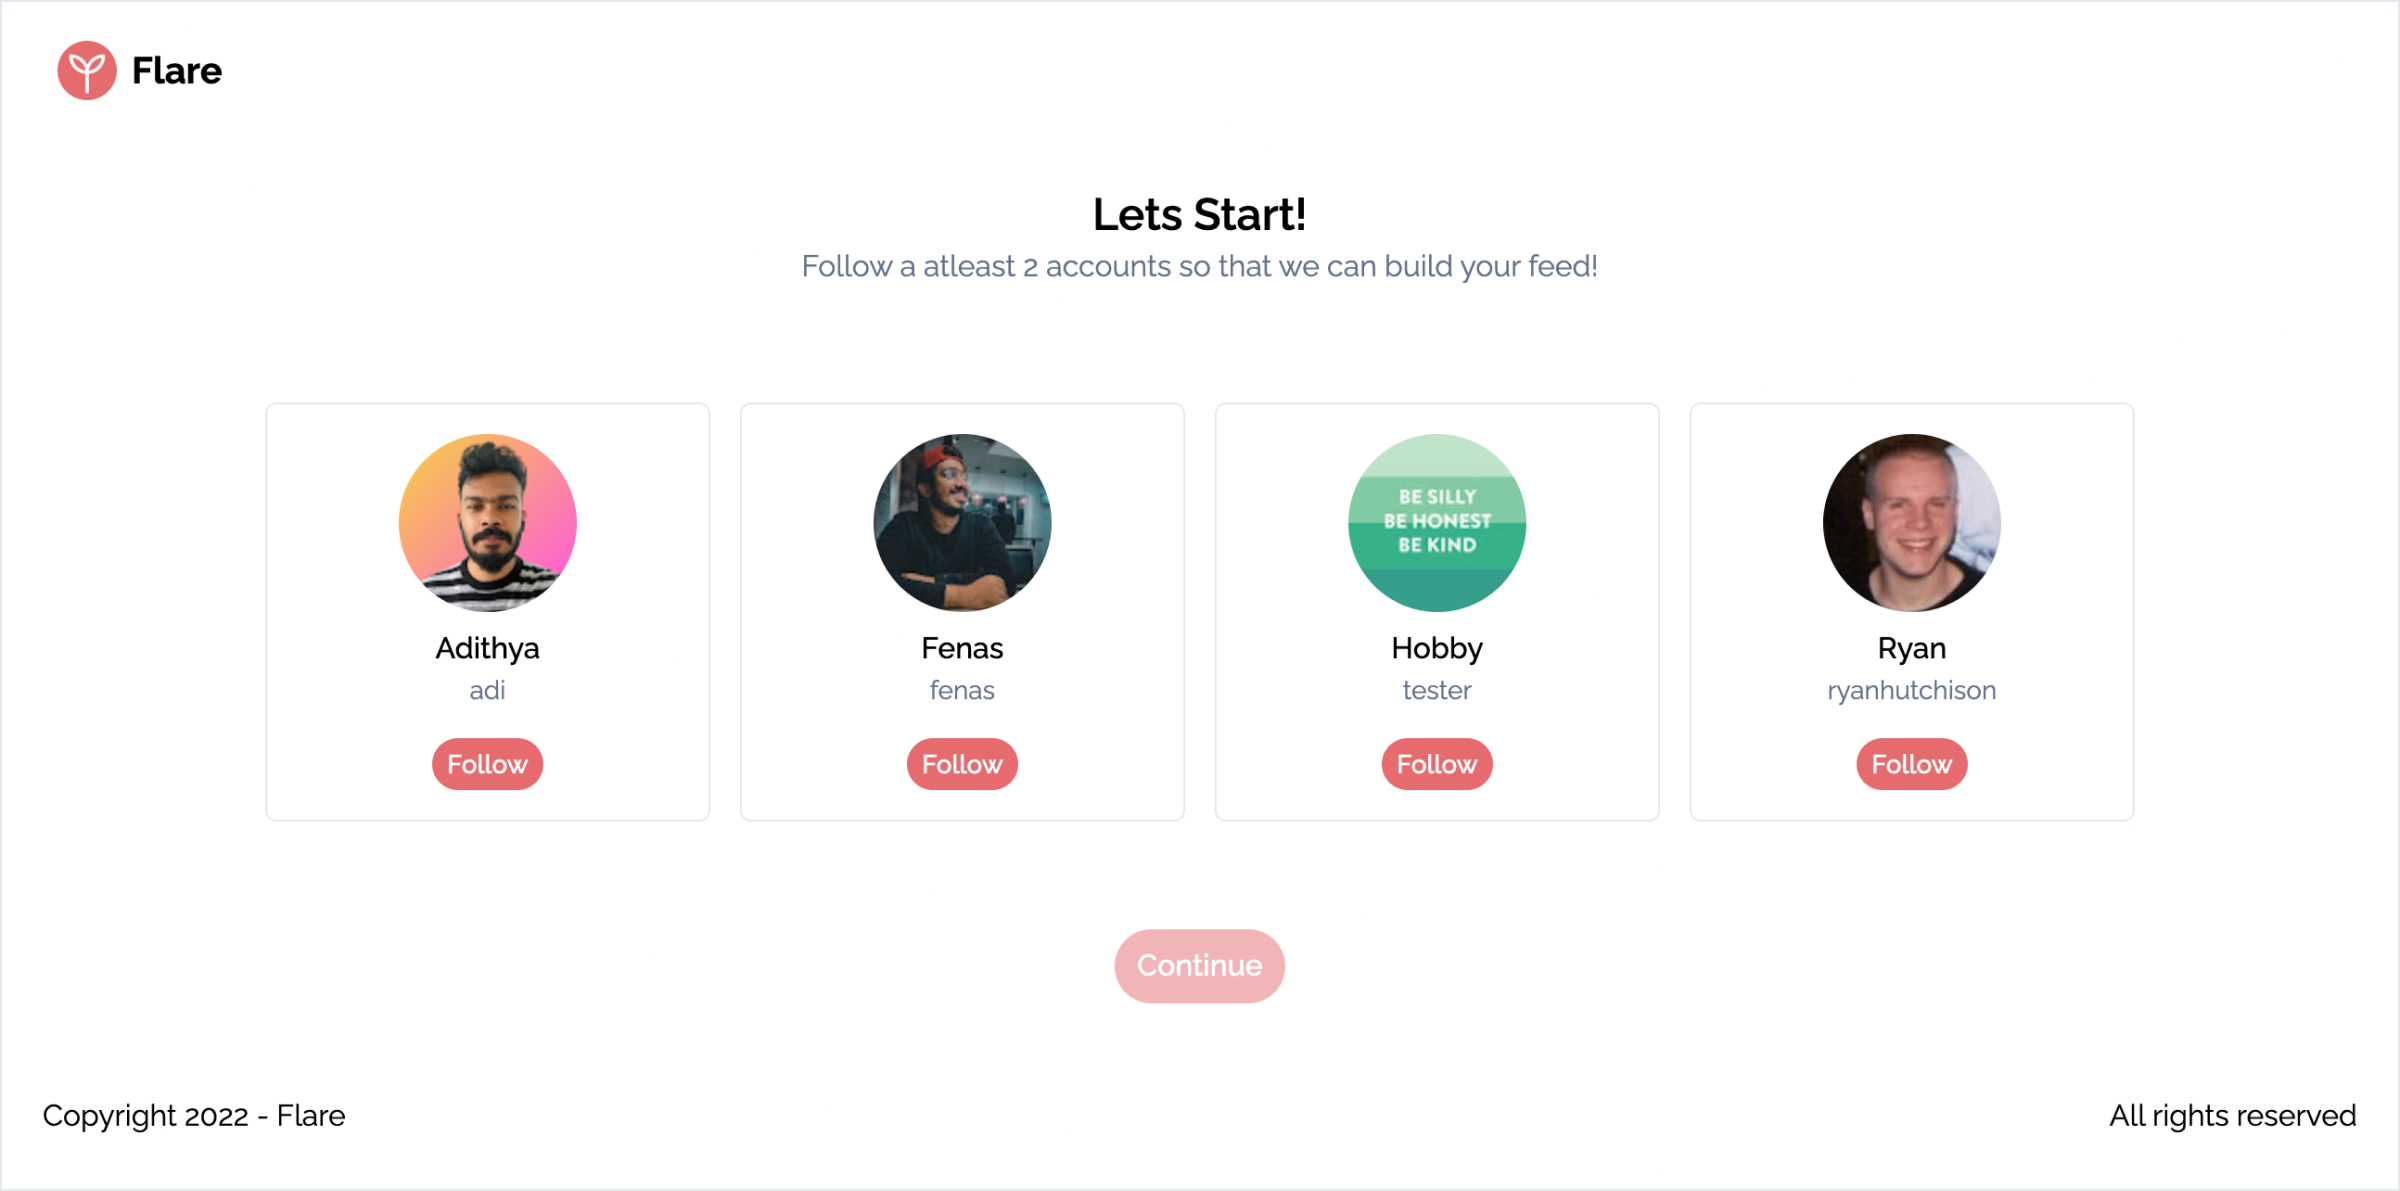
To build the feed, the users are asked to follow a few existing users.
Responsiveness
It's not a proper application in 2022 if it's not responsive and so I've put in a bit of effort to try and make Flare as responsive as possible.
Recipes 🍳
Here are some functionalities worth mentioning.
Authentication
Flare currently allows users to signup/login via Google or Github. This is implemented using passport in the backend.
The authentication token is securely set on the front-end as a httpOnly cookie. This way the client itself cannot access the token via code.
res.cookie('token', accessToken, {
  expires: new Date(Date.now() + 24 * 60 * 60 * 1000),
  httpOnly: true,
  secure: true,
  signed: true,
  maxAge: 24 * 60 * 60 * 1000,
  sameSite: 'strict',
});
So how does a user log out from the system? Since the client can't remove the cookie while logging out, the user gets logged back automatically as the token is present as is valid.
To fix this issue, we introduce a new normal cookie:
/**
 * Set a non http cookie which can be removed by the client on logout
 */
res.cookie("token-sync", accessToken, {
  expires: new Date(Date.now() + 24 * 60 * 60 * 1000),
  httpOnly: false,
  secure: true,
  signed: true,
  maxAge: 24 * 60 * 60 * 1000,
  sameSite: "strict"
});
So now the front-end can clear out the non-http cookie.
The server expects both the cookies to be present to validate a session:
// jwt.strategy.ts
export class JwtStrategy extends PassportStrategy(Strategy) {
  constructor(private config: ConfigService) {
    super({
      jwtFromRequest: (req) => {
        /**
         * Get both the http and non http tokens from cookies
         * and match them.
         *
         * For logged-out user, the `token-sync` cookie will not be present.
         */
        const token = req.signedCookies['token'];
        const tokenSync = req.signedCookies['token-sync'];
        if (token && tokenSync && token === tokenSync) {
          return token;
        } else {
          return null;
        }
      },
      ignoreExpiration: false,
      secretOrKey: config.get('JWT_SECRET'),
    });
  }
}
Problem solved ✅
File Uploads
Files uploaded in GraphQL are not that straightforward. With REST, we just create a FormData and then append the file to it and send a POST request to the server.
Strategy
I investigated how Twitter is handling media uploads for tweets. Opened up the Network tab and started looking for clues. That is when I found something interesting. I tried to think about something like that and implement it for flare.
Here's what I did.
- User adds an image to the flare.
- Immediately the image is uploaded to the server via a REST API.
- Server handles the file and saves it locally.
- A job is added to the queue as well for the image to be removed if it's not used in the flare. There is a set expiration time. The job id is sent back to the UI.
- So if the user cancels or decides to remove the image from the flare. The job will run after the specified expiration time and remove the image from the server.
- If the user finally posts the flare, the image is then uploaded to an S3 server and removed from the local server.
Queue
Bull is the most popular library for setting up Queue in a Node application. NestJs has official support for Bull and so setting up things was pretty easy.
Bull uses Redis as the data store. I used UpStash which provides a free Redis instance. A queue is basically a "queue", I mean you can put things in the queue and run them one by one as configured.
Setting up Queue in NestJS:
// app.module.ts
import { BullModule } from '@nestjs/bull';
import { Module } from '@nestjs/common';
import { ConfigModule, ConfigService } from '@nestjs/config';

@Module({
  imports: [
    BullModule.forRootAsync({
      imports: [ConfigModule],
      useFactory: async (configService: ConfigService) => ({
        redis: {
          host: configService.get('REDIS_HOST'),
          port: +configService.get('REDIS_PORT'),
          password: configService.get('REDIS_PASSWORD'),
          maxRetriesPerRequest: 5,
          tls: {
            host: configService.get('REDIS_HOST'),
          },
        },
        prefix: 'flare',
      }),
      inject: [ConfigService],
    }),
  ],
})
export class AppModule {}
Cloud Storage
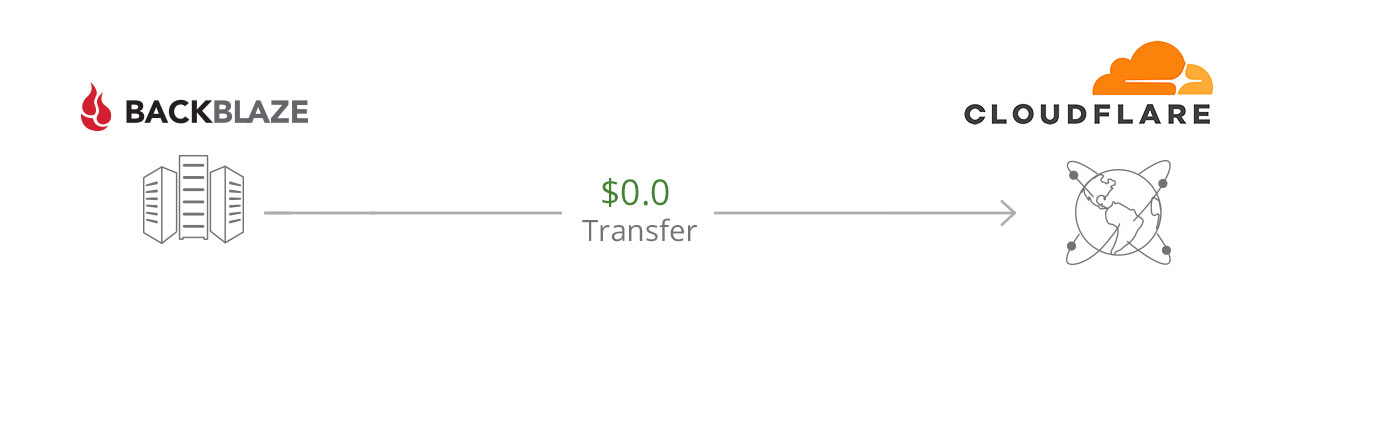
The files are uploaded to Backblaze which provides Object storage with an S3 compatible API. Backblaze has a generous free plan. There is something interesting about Backblaze. So under the Bandwidth Allianze program data transferred between Backblaze and Cloudflare is free. Meaning I will only have to worry about uploads.
Uploading files to Backblaze
Files are uploaded from the server to cloud using the AWS SDK. Here's how the NestJs service for uploads will look like:
@Injectable()
export class S3Service {
  s3: S3Client;
  constructor(private readonly config: ConfigService) {
    this.s3 = new S3Client({
      endpoint: config.get('S3_ENDPOINT'),
      region: config.get('S3_REGION'),
      credentials: {
        accessKeyId: config.get('S3_ACCESS_KEY_ID'),
        secretAccessKey: config.get('S3_SECRET_ACCESS_KEY'),
      },
    });
  }

  async upload(file: FileWithMeta) {
    return this.s3.send(
      new PutObjectCommand({
        Bucket: this.config.get('S3_BUCKET'),
        Key: file.filename,
        Body: file.buffer,
        ContentType: file.mimetype,
      })
    );
  }

  async delete(file: string) {
    return this.s3.send(
      new DeleteObjectCommand({
        Bucket: this.config.get('S3_BUCKET'),
        Key: file,
      })
    );
  }
}
You might have noticed that there is no function written for getting the file from the cloud. Because we don't need it.
Cloudflare sits in between Backblaze and the web app. So we can directly query the files via Cloudflare without any data transfer charges. And on top of that add additional headers to the request to cache images.
How cool is that?
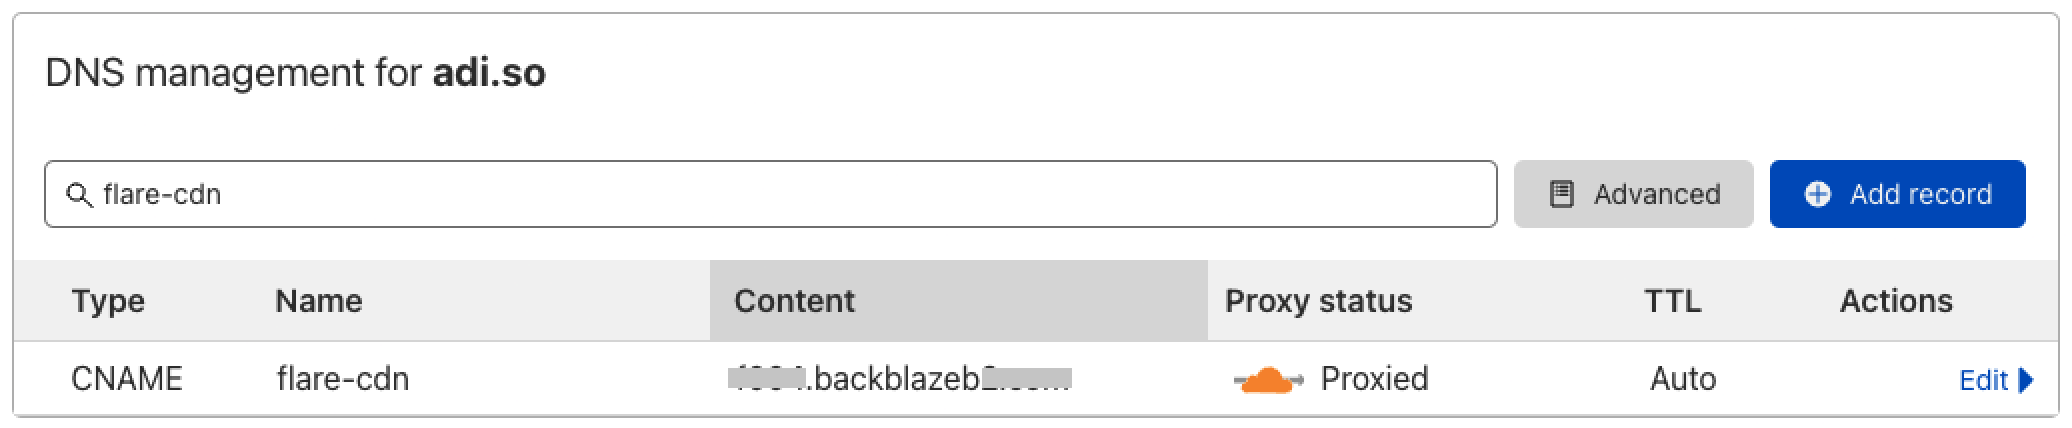
That is if the image URL in Backblaze is:
https://f004.backblazeb2.com/file/flare-media/ckzvelloy0000z8xchry323ng.jpeg
It becomes:
https://flare-cdn.adi.so/file/flare-media/ckzvelloy0000z8xchry323ng.jpeg
Here is a details tutorial for setting up the connection between Cloudflare and Backblaze: https://help.backblaze.com/hc/en-us/articles/217666928-Using-Backblaze-B2-with-the-Cloudflare-CDN
Retrieving the Images in Web App
So when an image is uploaded the image name is the identifier and that is what gets stored in the DB. The image name will be sent to the web app as well. We use a simple Pipe to construct the full media URL from the image name:
@Pipe({
  name: 'mediaUrl',
})
export class MediaUrlPipe implements PipeTransform {
  constructor(@Inject(API_CONFIG) private apiConfig: ApiConfig) {}

  transform(value: string): string {
    return `${this.apiConfig.mediaURL}/${value}`; // <-- cloudflare connected domain
  }
}
The benefit here is that we don't have to write APIs to fetch images from the cloud and then stream it back to the web app. This puts load onto our server and we have to do exception handling and caching-related stuff on our side. This just eliminates everything.
Spotify Integration
Users can choose to show their last played songs from Spotify by connecting their Spotify account with Flare.

Technical Details
The whole feature is implemented using Netlify Functions which is their serverless offering. Setting up this using Netlify functions was pretty easy once I figured out the logic.
1. Getting the user's refresh token from Spotify
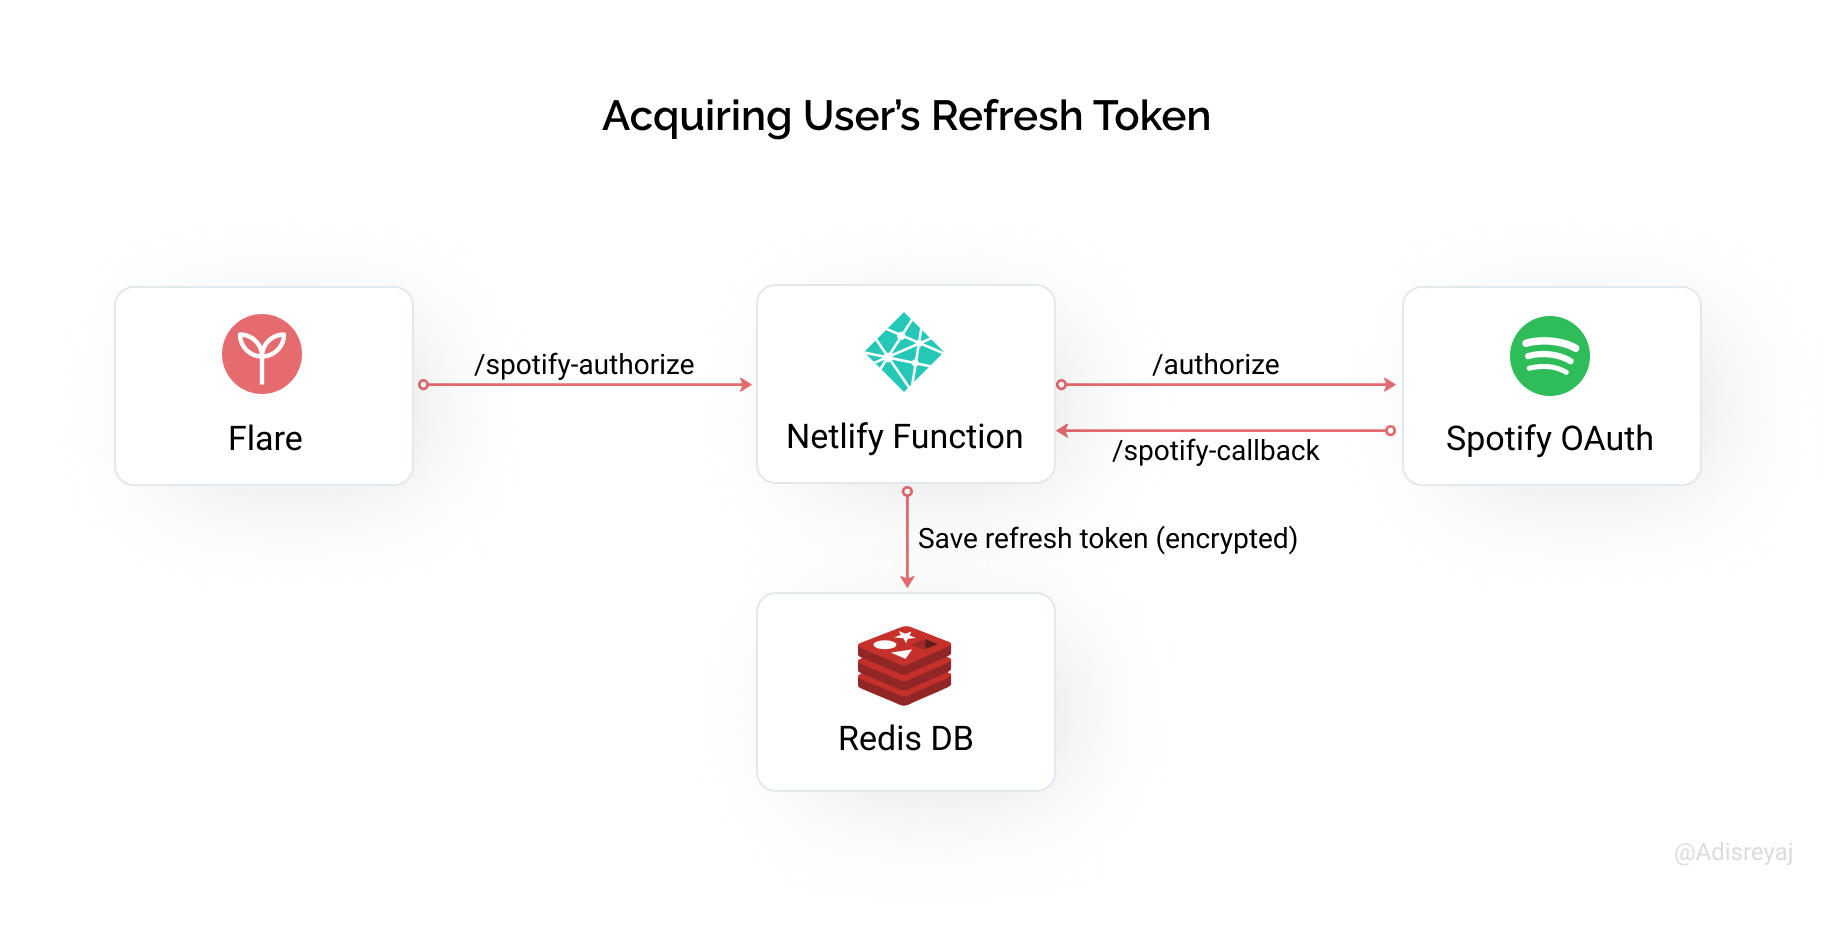
- The user clicks on Connect Spotify button.
- A new window is opened and the
spotify-authorizeNetlify function endpoint is called inside. - User can log in to their Spotify account.
- Spotify redirects to
spotify-callbackon successful authorization. - Callback encrypts the refresh token and saves it in Redis with the user's username.
- Once this is done, the popup window is closed.
1. Using the token to get the last played songs
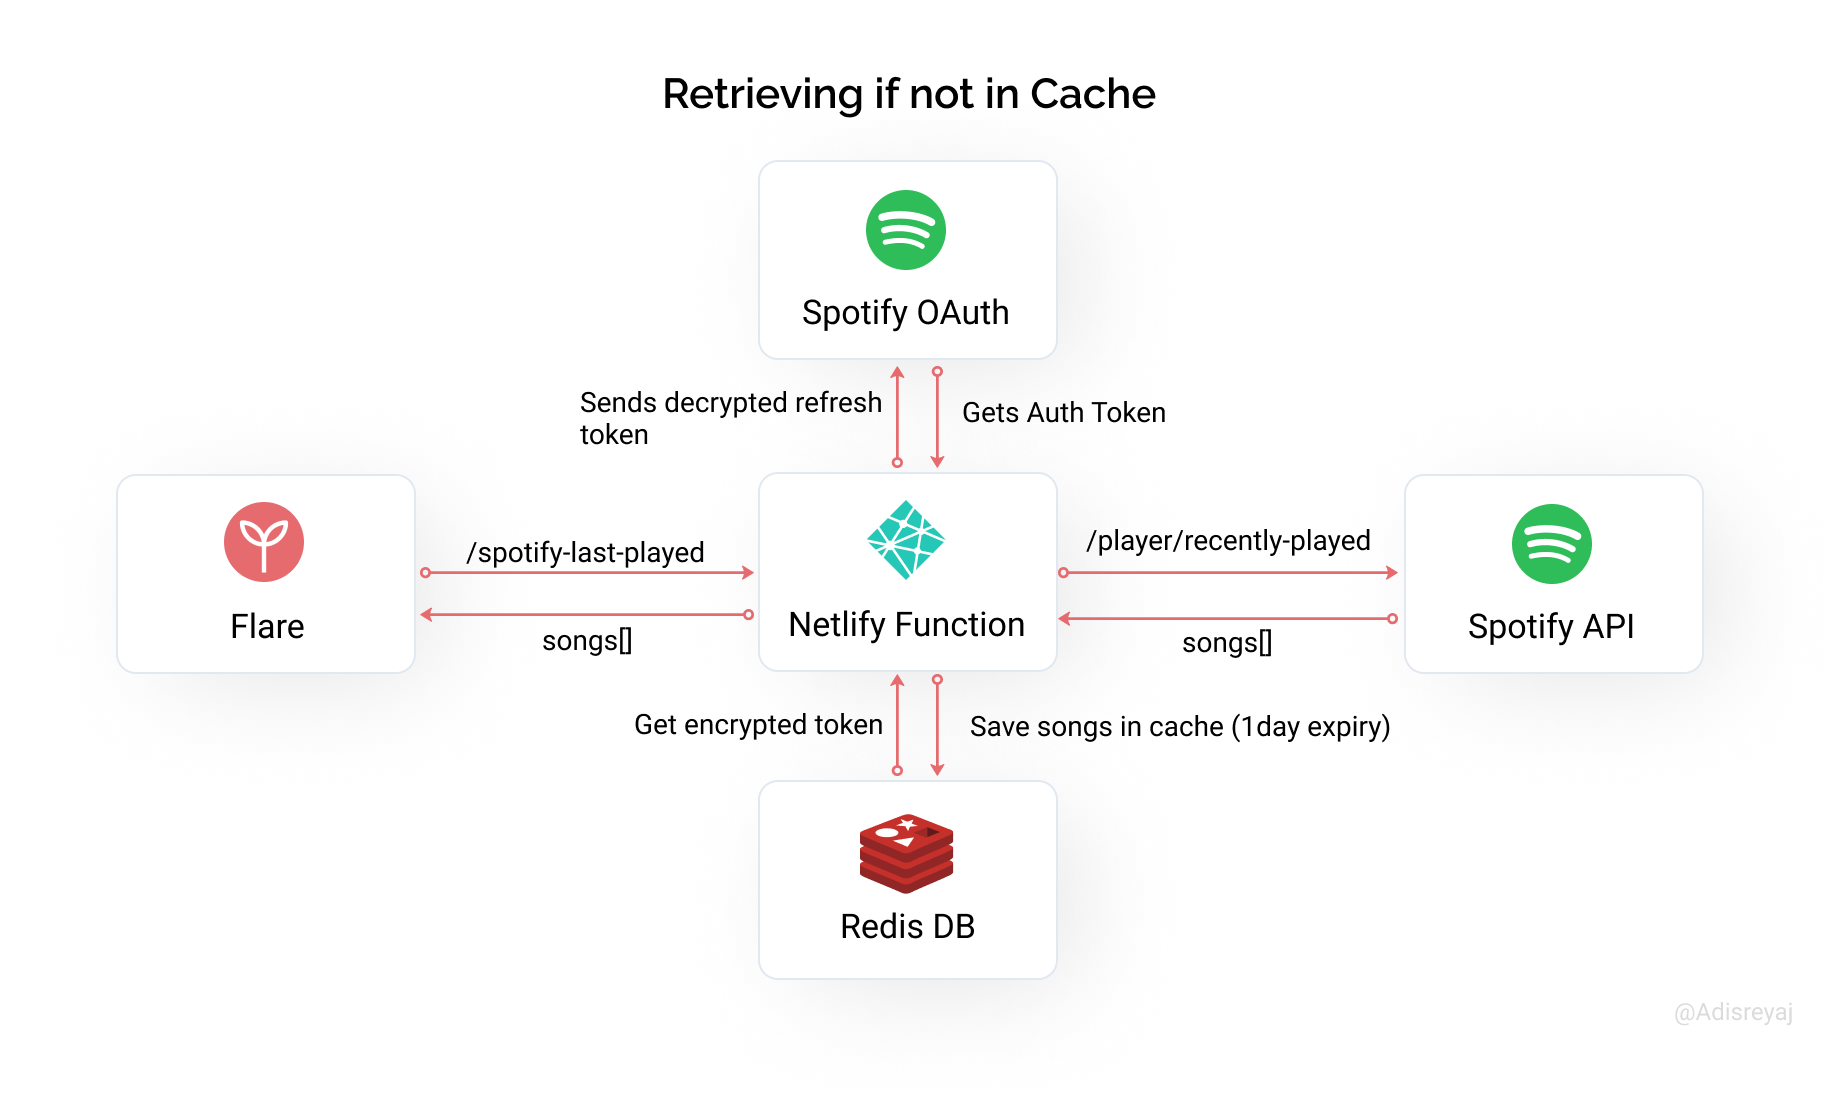
- The
spotify-last-playedNetlify function endpoint is then called to get the user's songs. - Refresh token is retrieved from Redis and then decrypted.
- An new auth token is generated for calling the Spotify API.
- The Recently Played API endpoint is called to get the list of songs.
- The songs are then saved to Redis for a day.
- Response is then sent back to UI with required Cache headers.
Cache working
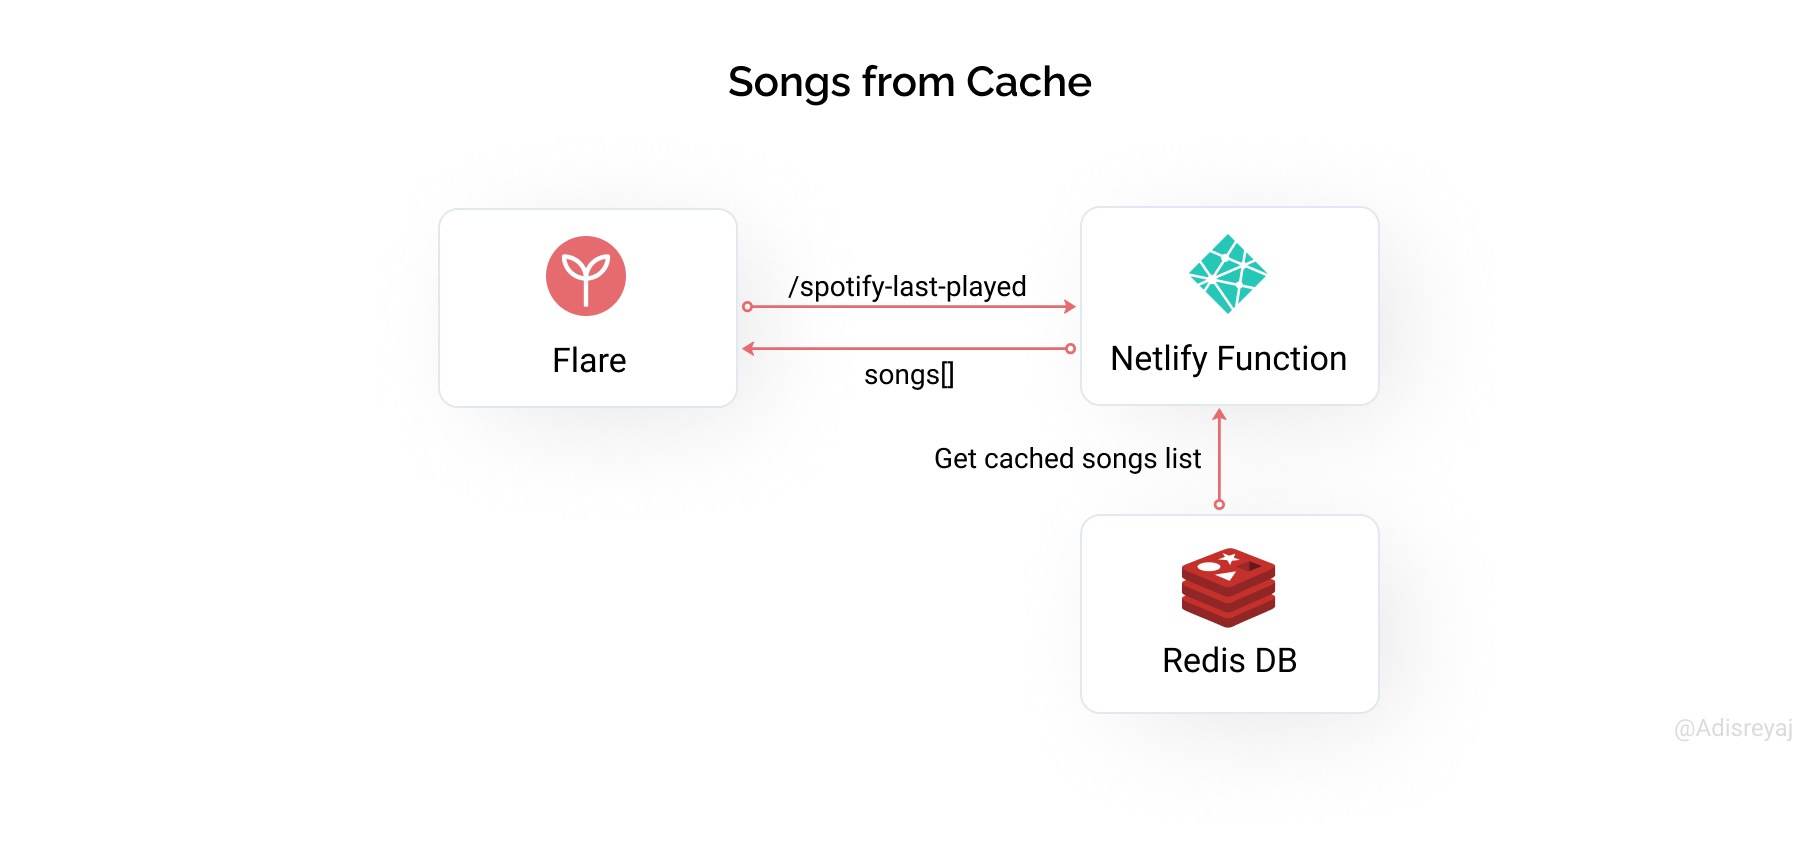
When the API is called again, the cache will be checked first to see if the user's songs are already retrieved or not. If it exists, they are returned back.
Code references:
- Authorization Function - spotify-authorize.ts
- Authorization Callback - spotify-callback.ts
- Get Last Played Songs - spotify-last-played.ts
Challenges ⏳
There were lots of challenges along the way. Firstly, GraphQL is very new to me. So learning and doing it all in a few weeks was definitely challenging. But worth it as now I know why people chose GraphQL these days.
How I spent hours debugging a silly issue 😫
The introduction of queues was not as easy for me as I made it sound. I made a stupid mistake at first which caused my server to consume a crazy amount of resources and was causing crashes.
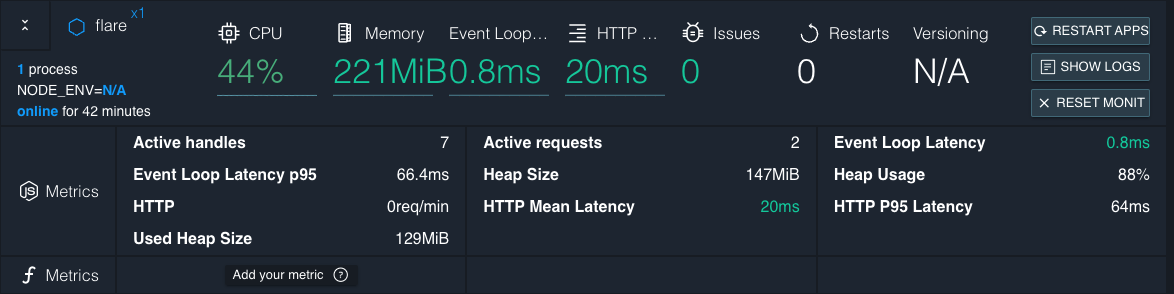
This is a screenshot of my PM2 dashboard when the server was idling.
What could have gone wrong?
My first hunch was its because I used RxJs for some of the queries. I used it queries which need to get some information from one DB call and then do another DB call based on it. I could have used multiple async-awaits to get it done. But I thought RxJs made such code better.
Here's an example:
findAllFlaresFromFollowingUsers(user: CurrentUser) {
  const currentUsersFollowing$ = from(
    this.prisma.user.findUnique({
      where: {
        id: user.id,
      },
      select: {
        following: {
          select: {
            id: true,
          },
        },
      },
    })
  );

  const getFlaresByAuthorIds$ = (userIds: string[]) =>
    from(
      this.prisma.flare.findMany({
        where: {
          deleted: false,
          authorId: {
            in: userIds,
          },
        },
        include: getFlareFieldsToInclude(user.id),
        orderBy: { createdAt: 'desc' },
      })
    );

  return currentUsersFollowing$.pipe(
    switchMap(({ following }) => {
      if (isNil(following)) {
        return of([]);
      }

      return getFlaresByAuthorIds$(
        following.map(({ id }) => id).concat(user.id)
      );
    }),
    take(1)
  );
}
So I suspected that there is some memory leak because of the subscriptions. I knew that NestJs handles the subscription and subscription for us. But silly me thought RxJs is to blame here.
I converted all the RxJs code to promise based like any sane man would've done in the first place.
After countless hours of debugging, turns out it was the flipping queue that was causing the issue and not RxJs. The bull was trying to connect to the Redis, but it failed and crashed. The reason was that for the TLS connection, there is a special configuration that needs to be passed while configuring the queue.
What helped me find the issue? Logging. Loggin is very important to any application. It can help you find and fix problems fast. I've used NestJs-Pino for logging purposes.
Outcome
While creating the Redis DB in Upstash, it gives an option to enable TLS or not. So if you are trying to connect to a TLS enabled Redis DB in Bull. Make sure to add this to your queue config:
{
  redis: {
    host: configService.get('REDIS_HOST'),
    port: +configService.get('REDIS_PORT'),
    password: configService.get('REDIS_PASSWORD'),
    maxRetriesPerRequest: 5,
    tls: { //<-- TLS config
      host: configService.get('REDIS_HOST'),
    },
  },
  prefix: 'flare',
}
Here's the SO thread that helped me fix the issue: https://stackoverflow.com/a/57896863/10781739
After all this, I later switched back to local Redis install in a docker container 😅
Coding Practices
✅ Linting is taken care of by ESLint (Thanks to Nx, no work to be done for setting up linting).
✅ Code formatting is taken care of by Prettier ( Don't know what I would do without it).
✅ And commit messages are following Conventional Commits enforced using Husky
✅ Logging is thanks to NestJs-Pino. I can't stress how important logging is for any application out there. Proper logs make debugging easier.
✅ Code Comments are added "only" when required. Not a fan of polluting the codebase with irrelevant code comments.
✅ Custom exception handling for Prisma related errors using NestJs Exception Filters:
const PRISMA_ERROR_CODE_TO_STATUS = {
  P2025: {
    code: 404,
    message: 'Resource not found',
  },
};

@Catch(PrismaClientKnownRequestError)
export class PrismaExceptionFilter implements GqlExceptionFilter {
  logger = new Logger(PrismaExceptionFilter.name);
  catch(exception: PrismaClientKnownRequestError, host: ArgumentsHost) {
    const { code, message } = PRISMA_ERROR_CODE_TO_STATUS[exception.code] ?? {
      code: 500,
      message: 'Internal server error',
    };
    this.logger.error({
      code,
      message,
      exception,
    });
    return new HttpException(message, code);
  }
}
Code and Demo 💫
Demo: https://flare-api.adi.so/api/demo For those who just want to test drive and not sign in with their accounts, Try the above link 👆🏻
Link: https://flare.adi.so
Note: Please don't spam 🙏🏻. Respect others 😊 Its' not a production app right now, still in a very early stage and there will be unforeseen bugs. Please don't try to break it 🥺
Attaching the GitHub repo for the project.
Right now only Google and Github based logins are enabled. Demo env will be flushed out regularly so don't worry about your personal data.
Running Locally 💻
#1. Clone the repo
git clone https://github.com/adisreyaj/flare.git
#2. Initialize the submodule (UI components)
I created a small UI component library called Zigzag that is used in the project as a submodule.
git submodule update --init
#3. Install the dependencies
npm install
#4. Setup the environment variables
Set up all the required environment variables required for the back-end:
NODE_ENV=development
DATABASE_URL=mysql://root:root@localhost:3307/flare
FRONT_END_CALLBACK_URL=http://localhost:4200/auth/callback

# JWT sign secret
JWT_SECRET=veryverysecretkey
JWT_EXPIRY="3d"
COOKIE_SECRET=veryverysecretsessionkey

# Google OAuth Details
GOOGLE_CLIENT_ID=
GOOGLE_CLIENT_SECRET=
GOOGLE_CALLBACK_URI=http://localhost:3333/api/auth/google/callback

# Github OAuth Details
GITHUB_CLIENT_ID=
GITHUB_CLIENT_SECRET=
GITHUB_CALLBACK_URI=http://localhost:3333/api/auth/github/callback

# Queue
REDIS_HOST=localhost
REDIS_PORT=6379
REDIS_PASSWORD=

# Object Storage
S3_ENDPOINT=
S3_REGION=
S3_BUCKET=
S3_ACCESS_KEY_ID=
S3_SECRET_ACCESS_KEY=
#5. Prepare the Database
Use docker-compose to spin up MySQL and Redis databases.
version: '3.1'
services:
  db:
    image: mariadb
    restart: always
    environment:
      MYSQL_ROOT_PASSWORD: root
      MYSQL_DATABASE: flare
    ports:
      - '3307:3306'
    volumes:
      - /Users/<username>/Desktop/code/db:/var/lib/mysql
  cache:
    image: redis
    restart: always
    ports:
      - '6379:6379'
    volumes:
      - /Users/<username>/Desktop/code/cache:/var/lib/redis
#6. Set up the Database
Run the command to populate the DB with tables:
npm run prisma:migrate
#7. Generate the GraphQL interfaces from the schema
Run the command to generate the required types:
npm run generate:gql
#8. Start up the UI and Back-end
For UI:
npm start
For Back-end
npm start api
UI: http://localhost:4200 & GQL: http://localhost:3333
You are all set for exploring Flare locally.
Links and References 🔗
| Title | Link | Description |
| Angular | https://angular.io/ | Front-end framework |
| NestJs | https://docs.nestjs.com/ | Back-end framework based on NodeJs |
| Netlify | https://www.netlify.com/ | Deployment for UI |
| Prisma | https://www.prisma.io/ | Node.js and TypeScript ORM |
| Tailwind CSS | https://tailwindcss.com/ | Utility first CSS framework |
| Nx | https://nx.dev/#getting-started | Build system with monorepo support |
| PM2 | https://app.pm2.io/ | Advanced, production process manager for Node.JS |
| Upstash | https://upstash.com/ | Serverless Redis DB |
| Backblaze | https://www.backblaze.com/ | Cloud Storage |
Connect with me
Do add your thoughts or if you have any questions, shoot'em below in the comments. Stay Safe ❤️